Showing posts with label Pretty in Pink. Show all posts

Monday, August 17, 2026

Note Cards - Slow Stitching

I worked on slow stitching art for note cards today.  I have sold a few at the gallery so I will have to replenish my stock.

This is a mountain scene with yellow and grey/white. Is it winter? Maybe.

A strip of white with running stitch. A strip of grey flannel for a bit of puff to which I added trees and running stitches.

A narrow strip of dark grey and then the mountain in the same color.

I placed a piece of thin white cotton behind the mountain then a sun behind that.

The back layer is a grey white patterned piece with a white cotton foundation layer.

Added snow to the mountain peak so it is winter but the sun is shining bright.

I chose a yellow A2 card base to match the sun.  I tack stitched the piece to the front and taped down the ends on the inside.  I gave it a half sheet insert to cover the tacking stitches.

A beige cotton foundation layer onto which I layered a tea dyed cotton from a tablecloth.  It has nice patterned texture.

I chose a piece of warm patterned cotton with blues and greens and ripped to a square.  It is stitched on with green thread and running stitch.  I added a bit of blue stitching to the flowers in the top right hand corner.

I then added a strip of navy cotton just below the center line. A bit of stitching in greens and blues and an ivory button.

The stitched art was tack stitched to an A2 navy card base in the landscape orientation.  The stiches are taped down on the inside.

I gave it a half sheet white insert and an ivory envelope.

A baby pink stitched greeting card.

I layered a piece of light grey linen with a piece of white cotton foundation layer. 

I stitched a piece of white lace across the front with pink thread and an over cast stitch.

I used the threads from the dark grey crocheted piece to tie it onto the light grey layer.  I sewed a tiny pin button in the middle of the crochet square.

I chose a link pink A2 card base for this card in the portrait orientation. I tack stitched the fabric art to the card front and taped the stitches inside the card.

I gave it a half sheet insert and a white envelope.

Friday, October 17, 2025

Cards - Donation - Friends

Once I discontinued my on line card exchange I started giving my cards away without having someone else's card to handle.

I was going to see a friend at the funeral so I made up some cards for her.  She has been battling cancer so not sure card making has been a priority.

The card base is Chocolate Chip with white embossed layer.  The folder is a floral one from Cuttlebug. I added a sentiment created from a CC Scallop Circle and a 1 inch cirle color printed punchie. It was mounted to the card front with 3 D foam tape.


This card features Stampin Up Designer Paper from the "Oh So Ombre" 6x6" set which I bought at the thrift store unopened for just over $2.

The colors in the set are Bermuda Bay, Blackberry Bliss, Granny Apple Green, Rococo Rose and Whisper White.

Again, a Chocolate Chip card base, with the green DSP from the above set. I used pencial crayon to put 2 brown lines across the top of the card.

The greeting is a CC scallop circle, a coordinating green circle then a 1" Just for you punchie.  

A quarter sheet insert and white envelope.

This card features the ombre DSP in the Bermuda Bay color.  The card base is the same color.  

I cut a SU Window Frame die cut from Whisper White with a framelit. I cut a left over of the DSP to about 2" square and adhere it to the die cut. 

I added 2 Five Petal Flowers one large one small layered and held in place with a coordinating mini brad.

This layer was adhered to the left of center on a landscape card.


This card base is Bermuda Bay with a coordinating DSP in the same color. 

I cut a strip of Whisper White the width of the card and adhered with double sided tape.

I cut a piece of card stock to 2 inches square and added a Martha Stewart butterfly punchie in white held in place with a tiny white brad. The square was adhered to the white strip.

Some of these cards are greeting less so they can be used for multiple occasions.


This bright blue card stock is from Michaels. 

I cut a book page down to fit the front of the card then used a couple of inkpads to add color and soften the text.  Blue and grey ink pads.

I took a scrap of silver card stock and cut a strip and a star die cut. I mounted the strip across the card.

The accent is a black SU Deco Label punchie, with a 1.25 inch circle light grey, 1 inch dark grey circle and the star I cut earlier.  It was adhered to the card front with double sided tape.

Nice to have a masculine card on hand.


Again, Pretty in Pink card base.  

I added a panel of Whisper White embossed with the Swiss Dots folder.

I mounted some Prima Handmade Paper flowers onto the panel with tiny white brads and irridescent flower sequins.  I placed them from dark at top to lighter below along teh left hand side of the panel. It was then adhered to the card base.


I am sure my friend will enjoy the cards.

Card - Sympathy

I attended the funeral of a church friend's husband.  He died quite suddenly after a fall.

I chose Pretty in Pink card base.  

I then embossed a Whisper White layer which left a decent border. The embossing layer is Stampin Up folder. Once adhered to the card front I used a small amount of chalk on a Qtip to apply some color to the flowers and branches.

I stamped the sentiment from Stampendous with an inkpad called Cement

A white quarter shee insert and a white envelope with pressing under books for a while made the card ready to give.

Sunday, February 18, 2024

Card - Slow Stitching - Pink and Blue

I brought some heavy cotton fabric home from ReUse Center this week.

I thought, let me see what I can stitch using the pattern on the fabric.

I added stars in the upper left hand corner - navy on white. 

Triangles white on navy.

Some couched stitching in the bottom right hand corner - medium blue on light blue. 

Then some pink stars/flowers on the medium blue piece.

Adhered the piece with double sided tape on a pink A2 card and pressed over night under books.

Ready to give.

Monday, June 12, 2023

Exchange Cards - Pink flowers

I got my exchange cards made today.

I started with 2 4x4 photos from my previous calendars. I chose 2 pink flowers - a rose and Ninebark.

I chose Stampin Up Pretty in Pink card stock as the base for both cards.  I used a corner round punch on this photo.  I used the SU Slot punch to make a slot in the fold where I could pull my ribbon through. I used Basic Black Scallop Dots ribbon for both cards.

I wrapped it around the card front and taped the ends together in the front.  I then used a black mini brad to adhere the Martha Stewart champagne butterly punchie to the ribbons and press the prong apart between the ribbon and the card.

The photo was adhered to the card front with 3D foam tape in all four corners.

I added a quarter sheet insert to the inside.


On this card I changed the orientation to landscape/wide.

I wrapped the ribbon around the card front and taped it down in the front where the photo would cover it.

I chose a corner punch which added 2 notches to either side of the photo.

I added a sentiment which was printed black on white cardstock and punched with 1 inch punch then mounted to a 1.25 inch black circle punchie. I put a hole and threaded through a white thread and hung it on the Scallop Dot black ribbon.

The photo was adhered to the card front with 3D foam tape.  These are off tomorrow.

Sunday, May 1, 2022

Exchange Card - May

These cards are for my card exchange partners. 

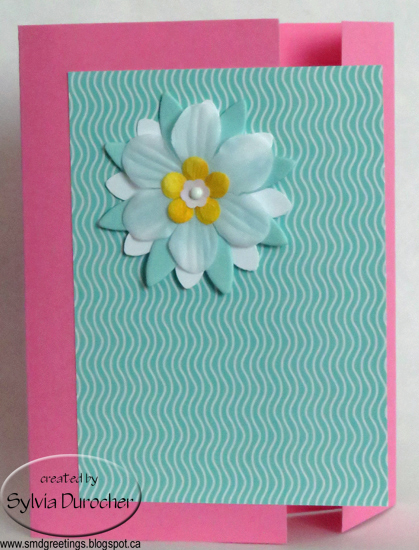
I started with the aqua handmade paper flowers then chose the Stampin Up Fresh Prints designer paper then the pink card base.  

This card has a Stampin Up Pretty in Pink card base with a designer paper layer featuring the color of Coastal Cabana which matches super well.

I layered a white flower sequin, a yellow handmade paper flower by Prima, then a white silk flower, the large handmade paper flower and lastly a large white card stock daisy punchie onto a white tiny brad.  Once aligned I pressed it into the DSP and press the prongs apart on the back.

The card base was scored at 1.5 inches then 5.75 inches and folded to the front to create an offset fold.  

The flower accent layer was adhered to the card front with double sided tape just on the left hand side so the Coastal Cabana DSP would overlap the small flap.

The card on the right has the same accent layer of die cut flowers and DSP in Coastal Cabana as the one above.

The card base for this one is Pink Passion which is a deeper version of the one above.

These are headed off to my card exchange buddies.

I added a white quarter sheet insert and a white envelope.


Monday, January 29, 2018

Card for the Engaged Couple

This is the card I for the engaged couple. 

A card base in Pretty in Pink smooth finish with a full layer of the Love Words designer paper which features Rose Red and Pretty in Pink. It was cut to leave a small border of card color.

I added a strip with the words - A happy heart across the top third which was adhesive.  Then I chose 3 little hearts in Pretty in Pink, Chocolate Chip and Regal Rose to create a cluster on the left hand side. 

The cards were all packaged up in a clear 6x6 inch box with a generous amount of white tissue paper.

I wish them years of happiness.

Sunday, February 7, 2016

Shower - Baby Girl Shadow Box Frame

I attended a baby shower for my nephew's daughter today.
I designed the personalized square in the center with all the pertinent details for placing into a black shadow box frame.  The information was color printed on 8.5 x 8.5 inch piece of Stampin Up Whisper White.  I chose Pretty in Pink, Regal Rose, and Rose Red as my colors as well as a bit of Basic Grey.  I added a length of Pretty in Pink 1/4″ Stitched Grosgrain in the space I had allowed on the left and adhered the ends to the back.  I punched 3 Sweetheart hearts in Pretty in Pink textured card stock.  I added 3 large buttons and 3 small buttons in the same color held in place with Zots.  The hearts were adhered with 3 D foam tape.  The 8.5 inch printed square was adhered to a piece of pink paper from the Petals & Paisley double sided designer paper set which was trimmed to 10.5 inches square.  This was then adhered to a piece of 12x12 Pretty in Pink card stock. It was mounted inside the shadow box the the back put in place. I added a length of the same ribbon to the back hangers and knotted it to hang the frame on the wall.

The mother requested books instead of cards so I chose the Velveteen Rabbit with a nice pink cover. This is one of my favorite children's book.

Thursday, January 21, 2016

HB - Pink and Blue

I made this card for a friend who celebrated a birthday recently and I'm seeing her today. 

I started with the Stampin Up Winter Bright DSP, which I chose the strips.  I then cut a layer of Bashful Blue textured and adhered it to the card front.  I then adhered the 3.25" square piece of DSP to the top half of the layer.  I cut a flower from Pretty in Pink with the Blossom Party die.  I cut a butterfly from Bashful Blue and layered it onto the flower.  I stamped the sentiment from the Perfect Punches stamp set in Garden Green on Whisper White.  I cut it out by hand because my extra large oval punch has stopped punching.  I mounted it to the card front with 3D foam tape.


Wednesday, December 2, 2015

Card Kits - SU - Pink Owl

I'm working on card kits again. This time it's for a kid's Christmas party.

I started with the Stampin Up Owl Occasions stamp set and did him in Pretty in Pink.  The branch is done in black and the greeting from the same set in both colors.  I added a black triangle hat which was cut 1" W and 1.25" T then embossed with the Polka Dots folder.  I added a pink button at the top of the hat, held in place with a Zot.  The wiggly eyes make this card.  They are held in place with Bling Zots.


Submitted to Christmas Card Challenges - Anything Goes