Showing posts with label photo paper. Show all posts

Friday, December 10, 2021

Card Exchange - October 2021

I made a couple of large cards for my October card exchange.  Since they are late and it Christmas time I chose to make them with a Christmas theme.  Love making Christmas cards at any time.

I chose turquoise alcohol ink background paper in 4x6 and cut ornaments with the Sizzix Bigz Die - Ornaments #4. One of each design.

I cut the hangers from copper metallic paper and glued them on top.

I added copper metallic thread.

I embossed a layer of white with a Cuttlebug folder from the Winter Bundle.  I wrapped the thread to the back and adhered the snowflake layer to the front of the Tempting Turquoise card.

The ornament was adhered with 3D foam tape.

I added a Stampin Up Modern Label greeting which was offset with a punchie from the same paper as the ornament.

On this one I added the copper star and mounted the turquoise one in the left hand corner.

These are large A7 5x7 cards.

These are on their way to my card exchange partners.


Saturday, November 13, 2021

Decorative Magnets


I had fun a while back making liquid acrylic paint backgrounds using 4x6 photo paper. 

I lay drops of liquid acrylic color on a piece of glass, spritz it with water and then lay the photo paper on top.

It always creates wonderful colors in random patterns.

Great abstract art.

Almost always the ink is completed absorbed by the photo paper's front layer as it is meant to be.

This time I found some of the inks acted a little differently, in that some color lay on top of the surface instead of being absorbed.  It may be that I had took much liquid and it could not all be completely absorbed.

With Christmas just around the corner I have decided to make a few small gifts this year.

With these wonderful papers I chose to make decorative magnets.  Since it is photo paper I decided that I could easily print on it with the inkjet printer.  I set out find images and sayings I thought would be compelling.  I have used some sayings I gathered from the internet. I love the flip magnets which you turn over to indicate something.  Like the Clean/Dirty one for the dishwasher.  I have used some of  my Stampin Up digital sets as well.  Again, I had to keep my images and fonts to thin lines because ones with too much surface area did not absorb and stayed wet which was a bummer.  These will make great stocking stuffers.


Thursday, March 4, 2021

Christmas Card Challenge - March - Large Greetings

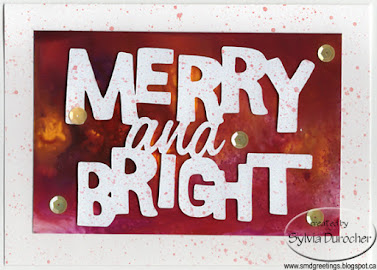
I decided to make Christmas cards with large greetings for my March cards.

It was easy to find some greetings on some of my Cricut cartridges.  They are easily sized and cut.  I chose the Winter Frolic cartridge.  It's hard to tell how large they will be on the first cut so I ended up with some larger die cuts than I planned so I used 5x7 cards (A7). 

The large greeting was cut from white pearl card stock at 3.5" T.  

Of course, the fun part was making acrylic ink background with photo paper.  These are 4x6 sheets and I used my Nick Bantock liquid acrylic colors for these. The colors were: Deep Turquoise, Cerulean Azure, Prussian Blue, Chrome Yellow, Chartreuse Leaf, Vermillion Lacquer, and Sapmoss Green.

I added colored sequins to the card fronts adhered with Bling Zots. For the first one the sequins were Christmas green, the red one was gold,  and the other was red and green.

I used a bit of color watered down to spatter the card fronts once I was done which helps to marry all the elements.

For the 5x7 cards I needed a clean pull of color across the 4x6 as I could not trim it.  Sometimes I end up with white edges or finger prints in the corners as I turn them over.

I see that I ended up with some pink sequins as well as red on this card. Not my intention but that's how it goes.

I have documented these in my Cricut manual so I can get smaller die cuts next time.

Always nice to have a few larger cards in my Christmas card box.

Super happy with these.

Sunday, April 22, 2018

How To: Spinner Art

I'm starting to get some creativity back and this morning decided to create some spinner art for cards for the gallery, my exchange partners and classes.

I settled on the salad spinner after checking a few things on line. 

Pros: The mess is contained within the container
          You can spin very fast
Cons: You can't see the art as it happens

I see some recent salad spinners have a hole in the top where you can add water which would be great to allow you to add paint on the fly which I think would create a different look to the art.  Not buying a new one for this feature. 

The kids art spinners are kind of cool and they run into $40-$50 range. Salad spinner around $10.

I used 4x6 photo paper as a I have good supply of those and for making cards the are the perfect size. 

Supplies:
  • a plastic tablecloth to keep table clean
  • a salad spinner
  • 4x6 photo paper
  • a collection of liquid acrylic paint
  • water
  • small containers to hold the paint and a place to thin it
  • double sided tape
 I selected my colors and placed a few drops in each container.  Generally, I added the same number of drops of water as the ink did not spread if it was too thick.

Into the process I decided on 3 containers.
1. color one
2. color two
3. combination of the 2 colors


I used a bit of double sided tape on the center spindle to keep the paper flat to the bottom of the bowl.  I gently pressed the sheet of paper onto the tape so as not to create a mark on my paper.

Sometimes the paper released early and I would open the spinner to find my sheet against the side.

Apply drops of ink on the paper, close the lid and spin.  Open the lid and see what happened.  Repeat process until you are happy with the results.  Thin the color to add shades of the same color.

I also splattered a few with the same ink with a toothbrush and knife to add more dimension to the art.

Ta Da you have art!  The sheets are placed on plastic to dry.  When dry, they can be pressed under books to flatten them.

This is a great process and I just loved it.


Keep an eye for the stuff that I make with these wonderful papers.