Showing posts with label HB. Show all posts

Monday, August 18, 2025

Watercolor HB Card

This is a card for an aunt who is celebrating a birthday this week.

I trimmed the watercolor panel to align with the left and right hand side of the SU Marina Mist card base. Placed the ripped edge at the bottom and the clean edge along the top.

I added an SU Old Olive grosgrain ribbon wrapped around the card front and knotted it.

Saturday, February 1, 2025

Sylvia' s Simple Shots

The Name of the Wind by Patrick Rothfuss was read this week. My brother-in-law lent me this book as he thought I would enjoy it. 

This is the second book in the The Kingkiller Chronicle Trilogy.

The story is set in a fictional continent Temerant. The hero is the renowned Kvothe: an unequaled sword fighter, magician, and musician, rumored to have killed a king—earning the title Kingkiller. We learn about his early childhood where is loved, nurtured and educated by his parents and wise ones. When he is eleven he returns from the woods to find his parents and the full troupe killed by the evil Chandrian.  He survives on the streets. He is inspired to join the University to gain access to historical texts which may lead him to the Chandrian. He hones his magical skills, explores the subterranean areas below, makes friends and enemies.

During his time at the University he earns money playing his lute at the inn the town. He earns financial support based on his achievements. Denna, a musician, attracts his attention but she moves around a lot so a pursuit commences.  An excellent read.

I am so glad to be home! I have been away for 8 weeks while the asbestos was abated, the kitchen cupboards were rebuilt, the bathroom vanity was replaced and a bunch of painting and floor laying has been accomplished.

Things regular use and maintenance to operate properly. 

I got home to find the shower spewing water where it should not be.   I had to have a bath the first day, not my favorite.

I headed to the Home Depot where the fellows have gotten to know me pretty well.  This time I found the right washer and some Teflon tape to seal the connection.

Added the washer, wrapped tape on the threads and screwed the shower head back on to supply pipe.
Ah! The shower is back in operation.

I take showers all the time.  

A bath for me is when I have sore muscles and they need a soak to feel better.  I likely have 1-3 baths a year.


After making puzzles in my temporary accommodations I asked my self where I would have space to keep an unfinished puzzle.

My sister suggested a puzzle board on the dining room table.  A good idea.

I headed back to my favorite DIY - Home Depot and bought a piece of hard board cut at the store to be the exact size of the table top.

Generally, I keep a table cloth on the table so the board and puzzle can hide under there with no problem.


We had a party!

One of my sister's celebrate a big 0 birthday and invited family and friends to celebrate with her.

It was a great time to visit with extended family.

The food was great and company wonderful.  I was fortunate that one sister brought me and another sister brought me home.

I am grateful for the supper as I face getting my place back to a place where I can live again.

Things which were hastily packed will need to be unpacked and reorganized.


Thursday, October 24, 2024

Birthday Card - Teen

A birthday card for a boy who is becoming a teen shortly.

An olive green card base cut 12"W x 6"T.  Another self closing card. I added some decorative paper to the left hand side of the card. 

I cut a large primitive star with the Sizzix Primitive Star #2 out of gold glitter paper. Adhered with 3D foam tape.

The greeting is a SU Artisan Label offset with green cardstock punchie.

I did add some double sided tape to the flap and closed it with clips so that it can be reused.

Saw his Mom on the 20th.


Tuesday, September 24, 2024

Card - HB - Watercolor Oak Leaves

A watercolor for a guy who celebrates his birthday this week.

I created a warm watercolor background then let it dry.

I cut one piece for the background of the card, then cut the leaves and acorns from the rest.  

I then added definition to the leaves and acorns with watercolor. Painted the white edges with dark brown watercolor.I added gold accents as well from my new watercolor set.

The card base in dark brown measures 6x12 inches.

A white insert and a length of double sided tape with carrier on the flap.  Ready to go.

Saturday, June 22, 2024

Sylvia's Simple Shots

My sister and I were treated to lunch by her children along with celebrating Father's day for each of the 3 families.  My sister's birthday treat is sponge cake with strawberries and whipped cream and mine was ice cream bars.  I used to get ice cream cake but that is just too much sugar these days.

I prepared lunch for my sister and brother-in-law was they were in town for shopping and helping me get the laundry room ready with a dryer vent connector.

I roasted chicken along with veggie salad and T&T Organic Mixed Thai Rice.

There was fresh strawberries and Greek yogurt for dessert.

Then the work began. The connector was installed and the room was ready to paint.

I was up early and put a coat of primer on the wood around the dryer vent connector.

A couple hours later I painted the second half of the laundry room now that the dryer and wood shelving unit had been removed.

The green tape is to make where the shelving unit ends so that laundry center is placed to ensure that the unit can go back into the closet.

I am grateful that there is still paint from when I bought 2 years ago so that went well.

I did paint the other half while the washer was out of the closet.

While shopping for improvements to the laundry closet I found a pair of black jeans to for a great price.

The picture on the left is the mending I did on the left knee to my regular pair of jeans. With my slow stitch experience I was more comfortable just getting it done.

There have been several repairs to these jeans so it was time for a better pair.
And all this preparation and waiting has finally resulted in the arrival of the new laundry center.  Yeah!

The other set was over 20 years old and it had not been happy about being moved in early May for building leak repair work.

It was moved out on May 6th and was finally returned to the laundry closet on a very temporary basis May 31st.

I am a believer in signs so I heeded the one I got and ordered a replacement.  It was 20 day wait for it to arrive and be delivered.

I spent a lot of time measuring, going to appliance stores, researching details on line. Plugs, drain hoses, drain stacks, and more.  Thank goodness for the amount information available on line these days as there was not a physical example in store for me to see, measure to help in the decision making process.

The laundry closet is back together but that will be a separate post.

Saturday, June 15, 2024

Sylvia's Simple Shots

A visit to the St. Albert Botanic Park yielded some great shot. The is Jacob's Ladder and it will likely make the calendar at the end of the year.

Gorgeous color and wonderful delicate flower.

There were a few roses open, the peonies were on the verge of opening.

With a few more days of sun the gardens will be looking really good!


Attic Treasures by four authors who have written romances into each story.

This book was 4 short stories about Lydia Dunmore, a grandmother getting ready to sell her large home to move to a seniors residence.

She has invited her 4 granddaughters to visit her attic and pick the one item which was their favorite.

Sheila is looking for her grandmother's doll but it has been sold.  With the help of a local antique store owner she searches for the doll.  
Kimber chooses an old fishing tackle box and through the help of a local fisherman discovers that some of the lures therein are quite valuable.
Lauren cherishes a christening gown her great grandmother wore.  She has chosen career over motherhood.  Her husband buys a farm and they leave the city. She did survive the transition and the gown came in handy.
Jessica takes an antique dress from Grandma's attic. Inside she finds old papers and photographs.  There was an adoption and the identity of her father is in question. Lydia shares what she knows. It is all very mysterious and there's a photojournalist chasing a story. It all turns out well in the end.

There was a large stash of fabric yardage which appeared at one of the thrift stores. 

The price was unbelievable.

Did I need another piece of fabric? No but I could not help myself.  Will I have a chance to sew this summer with the renovations planned.  Unlikely. Still I brought home 5 pieces for less than $10.  Averaging about .75 of a meter. Some less some more.

Beautiful blue purple watercolor, a denim blue vintage geometric, rainbow with gold dots, a yellow blender and a turquoise batik.

Just the right size for a book cover, a placemat, or a wine bag.   We shall see.

I had lunch with a dear friend.  Vietnamese noodle bowl is always delicious and this was no exception.

Meeting at 1:00pm after the lunch time rush we had great conversation and caught up on our lives and what we have been up to.

She is headed on a big vacation.


I was invited to celebrate a birthday this week.

The birthday girl hosted lunch at her house.

It was very delicious and I was able to catch up with extended family.

Dessert was an upside down cake with blueberries with whipped cream on top.  A good cup of tea and good company.  It was a lovely afternoon.


Friday, June 14, 2024

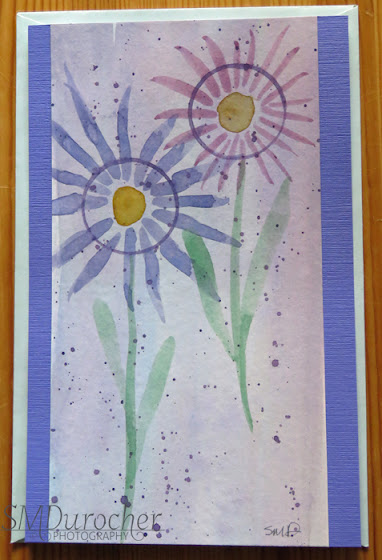
Card - Birthday - Watercolor and Flowers

This card is for my aunt who celebrates her birthday soon.  

I chose a SU Crushed Curry textured A2 card base. 

I cut a piece of water color paper left over from the paper I made for these pieces.  I adhered it to the card front.

I wrapped a length of Crushed Curry grosgrain ribbon along the left hand side and knotted it a the top. 

I added 3 handmade paper flowers on the right and held them in place with coordinating mini brads.

I added a SU Modern Label greeting in the bottom right hand corner with 3D foam tape.

I added a quarter sheet insert and envelope.  It is ready to go.
 

Saturday, June 1, 2024

Card - Happy Birthday - Night of Navy

A card for my brother who is celebrating a birthday this week.

I chose a beige card base with navy and red accents.

The red layer was embossed with a recent thrift store purchase.  See below.

I punched a navy 1.75" circle and added a 1 3/8 circle greeting on beige cardstock.

I trimmed the embossed layer to place the circle off center, then ran a length of Night of Navy seam binding along the left hand side.

I attached the 2 circles over the embossed circle and held them in place with a navy mini brad.

A quarter sheet insert and an envelope and it is ready to deliver. 

No company branding on these but considering that the price was 2 for $1 and I have all the Stamping Up circle punches and Nestabilities dies which will cut circles I decided that it was a good investment.

One is masculine and the other would work for feminine cards it was a great combo.

There is some room in the embossing folder storage box which is priority as well.

Saturday, May 25, 2024

Card - Watercolor - Belated Birthday

A large watercolor card for a teen who is heading into her last year of school in the fall.

The birthday was back in April but I got to deliver this card in person and it included a bit of mad money.  There is a big trip coming up in July so it will come in handy.

I used left overs from my senior show entries and cut a piece tall and narrow.

I added circles with a small glass vase dipped the same color that was still sitting o my palette.  How handy!

I then added petals, stems and leaves.

Then a bit of spattering.

I mounted it on a single layer of card stock in Stampin Up Lovely Lilac. 

I added a single sheet of insert on the back and tucked the moola behind it.

Loved the visit with this family.


Wednesday, February 14, 2024

Card - Velvet Daisy Paper

I quick card for a belated birthday.

I used an Always Artichoke card base in A2.

I added a piece of velvet daisy paper cut to leave a small border.

I punched a daisy accent from green card stock and then gold foil card stock.  A small daisy vellum flower in the center all held in place with a green mini brad.

I added a white insert and envelope.

It's off in the mail today!


Sunday, October 8, 2023

Calendar - Countdown - Four More

Cool Snowman Countdown Calendar featuring the scene I created and photographed. 

On this 4x6 I added the "Days until Christmas" and the star digitally onto the photo that I took.

The birthday side features bright red polka dot designer paper with silver metallic balloon punchies with black strings.

This one got a black dry erase marker.


On this Green Red Ornament countdown calendar I used a red ornament on a green background with a pine bough.  I created this digital composition a few years ago. I created all these elements myself.

I added the star and the words digitally above the ornament.

The birthday side has some beautiful blue paisley designs with olive green and chocolate brown sprinkled around the shapes.

I chose the green dry erase marker for this calendar.


The calendar features a Bethelehm collage that I created on artist board. I painted the board a medium blue.  I then ripped cardstock paper that I had painted in deeper tones of blue.  The paper was also embossed with the Swiss Dot folder.  The darker pieces were adhered onto board leaving the blue color show in between.  
The Bethelem buildings a a similar design to my Simple Bethelehem.  They were traced, cut from card stock, painted with silver domes and lit windows. The bottom third was cover with crinkled paste paper in deep blues and purples. The silver band of metallic card stock was cut with the Creative Memories Decorative Trimmer and adhered over the collage.

I did have to manipulate a photograph of this artwork to make the silver band wider to allow for the words and space for the numbers.  

The birthday side is a piece of wonderful floral designer paper with purple and yellow flowers and yelllow bees. This calendar was paired with a purple dry erase marker.

Warm Snow Angel count down calendar was made with the photo shoot I did the other day.

I added the words "Days until Christmas digitally before having the 4x6 printed professionally.

The birthday side is a colorful wirly swirly designer paper featuring many colors.

I paired this calendar with an orange dry eraser marker.

These are ready to go!

Tuesday, September 12, 2023

Card - Watercolor - Yellow Cosmos

I painted this yellow cosmos for my niece's birthday card.   

I found an image on line just to give me an idea about their foliage.  I did a bit of a pencil drawing to start.

I used my Stampin Up Watercolor Wonder Crayons. I did a light wash of blue with Tempting Turquoise and a light wash on the bottom half with Old Olive. Once I had my first light color on the flower and the stem then I erased about 50% to leave just a very light line.

I used Daffodil Delight for my first light layer on the flower and Pear Pizzaz on the stem. I then added definition on the cosmos with More Mustard and Always Artichoke on the stem.

I added some very light stems on the bottom just so the flower was more grounded. 

I mounted the watercolor with double sided tape to a 5x7 card of Hello Honey.  I was a little short on the bottom so I added a length of  Washi Tape in More Mustard.  It rips very easily so I need to use this up so that its gone!

Wednesday, August 9, 2023

Card - Watercolor - Barn

I made this card for an aunt who celebrates her birthday in August.

I cut a piece of 90lb watercolor paper to 4.25 x 6.25 inches and taped it to my hard board.

I found a couple of graphics on line with elements I wanted to use. Specifically, the barn and the fence.

I used my Stampin Up Watercolor Wonder Crayons.  I started with a light wash of blue in the top third and a light green wash on the bottom.

I drew the composition by hand with a pencil adding the elements from several inspiration images. I had to dry it several times between layers of color. I did use a fine black marker to add some definition to most of the objects.

The card base is A7 (5x7) in Stampin Up Barely Banana which worked well with the colors in the painting. I just adhered the watercolor layer with double sided tape. A white insert was added to the bottom half of the card with a white envelope.

Note to self: Lighten your pencil marks before painting.  The barn is not wide enough. Remember to use your grey marker instead of black. 

Thursday, July 6, 2023

Cards - July Birthdays

 This is a birthday card for my sister who celebrates a birthday this month.

I chose a piece of watercolor paper I colored up a while back with playing with my Stampin Up Watercolor Wonder Crayons.  It was 9x12 inches.  I chose to cut it with the Tim Holtz Vintage Cabinet Card.  I mounted a layer of silk flowers filling in the top half circle of the die cut. I chose a large oen with warm toned ends, then a pink organza one and then a small ivory one all held in place with a gold mini brad.

I added a pink Modern Label punchie topped with a Word Window punchie with the greeting.  This was adhered below the flower on the diecut with 3D foam tape.

The diecut was adhered to the Lucky Limeade green A2 card base.

A white quarter sheet insert was added to the inside.

With the other half of the watercolor sheet I cut a Tim Holtz Cameo Frame. 

I chose to highlight the bit of yellow towards the bottom of the diecut and so cut big H and B with the Stampin Up Typeset Alphebet dies in Crushed Curry.

I traced the rest of the words with a More Mustard marker.

I added 2 gold glitter star brads to the left of the B.  The diecut was then adhered to the Lucky Limeade card front of with 3D foam tape.

A white quarter sheet insert was added.

This is for my nephew whose birthday has already passed but that's okay I was in touch by email.

Saturday, June 17, 2023

Sylvia's Simple Shots

I visited the St. Albert Botanic Park with my aunt this week to see the peonies in full bloom.

Gorgeous big flowers in so many colors.

This is the third book in the Angelic Letters Series by Henry K. Ripplinger.  The Angel of Thanksgiving.

Henry and Julean are happy with their new daughter, a new home and Henry's new job.  He still cannot forget Jenny his first love.  Julean hears Henry talk to Jenny in his dreams at night and is troubled about it. 

Father Englemann has returned from the seminary and is as popular as he was as the grocery store owner.  He is now the parish priest still dispensing his lessons of love, forgiveness and thankfulness for all things.

Jenny accepts James' marriage proposal but puts the date far in the future hoping that Henry will be in touch.  Jenny and James eventually marry and Jenny has a son. She now lives on an estate with beautiful grounds and the flowers and nature and the gazebo are her solace. 

The angel her father commissioned before he passed eventually makes it's way to Jenny and is placed near the gazebo which brings her much comfort.


My aunt are just a few years apart in age and both celebrate our birthdays in June so we decided to treat ourselves to Delux Burgers - mushroom and sweet potato fries for lunch.  They were super delicious!

She had a pecan tart for dessert while I had a slice of tiramisu.  I saved the Nanaimo bar for supper.


The insects were a buzzing and flitting at the Botanic Park.  On the left is an Ashy Mining Bee - I had not seen a black and white bee before, the Ferris Ruddy Copper Butterfly just perched itself on the edge of the leaf for just a bit - I managed one shot, a Hoverfly on a pale purple Aster. 

It was a good week!

Friday, June 16, 2023

Card - Watercolor Pansies

This is a card for my sister.  She celebrates her birthday soon and I wanted it in the mail so it arrives on time.

I found a coloring book page on line to help me with the line drawing of these flowers.

I used Stampin Up Wonder Watercolor Crayons so it would match with the card stock I selected.

The colors are Night of Navy, Elegant Eggplant, Daffodil Delight, More Mustard, and Always Artichoke. Once painted and dry I outlined the image with a fine Micron permanent black marker.  It pressed overnight under several heavy books.

The back petals are a mix of Navy and Eggplant, the center ones are EE and the front one is Daffodil with darker marks with More Mustard. Put a pale background with Night of Navy on the top and Always Artichoke on the bottom.

I chose to trim the watercolor piece to 3.75 x 5 inches. I taped a couple of lengths of grosgrain ribbon in the AA and EE to the back of the watercolor. Brought them forward and held in place with double sided tape and trimmed the ends on an angle. This was adhered to an Eggplant layer leave a small border.  Then that was adhered to the Always Artichoke A2 card base.

Monday, April 17, 2023

Cards - Birthday

A birthday card for my brother in law.

The card base is Soft Suede.  

I found a piece of watercolor background I made in early January that worked for a guy card.  

I followed a tree image from one I found on line with a dark grey marker.

I then watercolored the tree with brown that I mixed and a green which is a mixture of Always Artichoke and Garden Green.

I mounted on a scrap of black card stock leaving a small border all the way around. Adhered with 3D foam tape. A narrow strip of black card stock under the focal element.

The greeting is a SU Word Window punchie on a black Su Modern Label punchie.


I added a Stampin Up Modern Label punchie greeting to this sunflower card for my sister who has a birthday next week.

The sunflower was stamped with Memories permanent black ink.  I then watercolored it. I ripped the edge on all 4 sides.

I mounted it to one of my small handmade paper sheets in a warm yellow.  This was adhered to a white card with hot glue.

These are off in the mail this morning.


Saturday, September 11, 2021

Birthday Gift - Blue and white dinnerware

 My niece and god-daughter is celebrating a birthday and I will be able to see this year!

There is a large box of wonderful stuff ready for her.  

She already knows what is inside so it's okay that it has been identified.

She has just moved into a new house and is working on getting the kids back to school and unpacking and setting up the house.  

I have had this Blue Nordic by Johnson Brothers dinnerware for several years but was not using it to it's full potential.  I want to downsize and when I found out she would love it, it was an easy choice.

I'm not sure she has the piece of furniture in the dining room yet. These good dishes will likely be in their place for Christmas dinner.

I am sure she will enjoy it!

The set includes enough of the pieces for 6 place settings.  The pieces are dinner plates, salad/dessert plates, cereal bowls, soup bowls, and teacup and saucer. They are a family of four so there is enough for one set of grandparents.

The extra pieces include the teapot, cream and sugar and a large serving platter.

I am super happy to have this set going to a good home.

I bought most of it at a thrift store.  I collected tea cups and saucers along the way.  I found the platter at a second hand store. 

I wanted her to have a surprise as well so I made her a linen tea towel and a pale green linen fabric.

My sister and I had a conversation about using linen for bath towels the other day and I managed to find her some linen/cotton fabric she will be trying out. I do have a couple linen tea towels.

This is a perfect color for my niece.  I had a piece just the right size.  Finished size 18 x 27 inches.  I added a hanging loop in one corner and made mitered corners.  On hindsight, maybe the loop should have gone in the middle.

During my visit this summer, she expressed wanting a special silver spoon for a lovely container.

She had a small spoon from Air Canada in the other dish and wanted another.  (Remember when airlines actually used real cultery with their in flight meals?) How things have changed but I digress.

I'm not sure what the chances are of finding another Air Canada spoon but this one is quite similar and can work as a stand in until the better one shows up.

Tied it onto the tea towel with the same twill tape.


Sunday, July 18, 2021

Card Box - HB and Thank You

 Another couple of cards for the box.

I started with designer paper from Echo Park called Hello Spring.  I paired it with a purplish Rich Razzleberry card base.

I added a length of Island Indigo 1/4" satin ribbon along the right hand side.  Taped the ends to the back. I added three deep teal and yellow handmade paper flowers on the left side adhered with tiny yellow brads.

This layer was adhered to the front of the card with double sided tape.  This ensures nothing showing on inside of the card. 

The greeting is a Stampin Up Modern Label punchie color printed.  I added the deep purple punch split in half and adhered to the back offset a bit for it to show up.  This layer was adhered to the card front with 3D foam tape.

Ready for an August birthday.


The same paper was paired with a Rose Red card base this time.

I added a white grosgrain ribbon across the bottom third of a landscape oriented card.  Then ends taped to the back and then adhered to the card front.

I added an oval color printed greeting in Rose Red and chalked with the same color around the edges.  It was adhered to the card front with 3D foam tape.

Is resting in the Compassion House box for delivery a little later.

Monday, July 12, 2021

Cards - Birthday and All Occasion

I chose a piece of Stampin Up Designer Paper from the Tea for Two series and cut it into 6 - 4.00 x 5.25" pieces.

The paper was designed with Island Indigo as the deep blue I don't have that color so I substituted Midnight Muse which works well.  Love the quilting pattern.  This is my Angle Rectangle design where the decorative paper is titled on the card front and adhered. Then it is trimmed to the card edges with scissors. 

I added a length of Lucky Limeade Ruffled Ribbon and knotted it on the front aligning it on the left near the fold.

I punched an Artisan Label from a scrap of the same DSP and turned it over to reveal the Calypso Coral polka dot side. I layered a Modern Label blue greeting over that. It was adhered in the bottom right hand corner with 3D foam tape.

This will be a card for one of my quilting sisters.

For this card I have paired it with a Lucky Limeade card base.

I cut the layer at 3.5" and turned the smaller piece over and taped them back together.  I placed a length of Lucky Limeade Ruffled Ribbon along the join and taped the ends to the back.  The layer was then adhered to the card front.

I created the greeting with a SU Scallop Circle punchie in a coordinating orange card stock with a color printed circle greeting.  The blue and green greeting was punched with the 1 3/8 inch circle punch then adhered to the scallop.  This accent was then adhered to the card front over the ribbon with 3D foam tape.

This card is for a friend who celebrates her birthday in early August.


I made a couple of all occasion cards for my card box.

Here I have paired the reverse side which is the Calypso Coral Polka Dots with a coordinating card base. 

I assembled the flower accent with a couple handmade paper flowers (turquoise and yellow) and a couple silk flowers (white and orange).  All held in place on the designer paper with a tiny blue brad. 

The layer was then adhered to the card front with double sided tape.


I used another Midnight Muse card base with the quilting side of the Tea for Two DSP facing out. I made a slit in the designer paper and folded back the triangles to reveal the orange polka dots.  Like the way it repeats the triangles in the paper.

I wrapped a length of narrow organza ribbon in the Lucky Limeade color around the narrowest point of the front layer and tied a bow.  Trimmed the ribbon ends.

The layer was then adhered to the card front.

I added some three warm white Sugar Dots in the triangle space across from the ribbon bow.

Each of these has a white blank insert and has been paired with an white envelope.