Showing posts with label felted wool. Show all posts

Friday, April 19, 2024

Slow Stitching - Wool Brooches

I have acquired quite a few small pieces of wool or felted wool and decided to see if I could use my slow stitching to make brooches.

This blue one was my first one.  I chose to add a star in single thread where the 3 colors in the fabric met.  

Originally I had use white thread for the blanket stitch edging and that was not working.  I pulled it all out and started over.

It works much better to have dark blue edge stitching.

I like the uneven shape of this brooch.


 This brooch was stitched on a piece of felted wool which has various colors in it.  It was quite thick so I paired it with some grey fleece. I cut 2" circles from each fabric.  

I slow stitched my sunrise scene onto the felted wool circle. I then whipped stitched the 2 layers together.  I am not sure that whip stitching was the best choice as it has given the brooch an organic shape.

I hand stitched a pin back.


I chose some bright pink wool fabric for this brooch.  I had these iridescent flowers I had reclaimed from an old wedding item.

I stitched my stems on first then added my flowers with a frosted Ebead in the center.  I added some blue seed stitches to indicate sky.

I chose pink thread and used the blanket stitch to hold the 2 layers of pink together.  I chose to put running stitch along the bottom because I wanted to preserve the raw edge.

I then placed a piece of black felt on the back with whip stitch. 

I handstitched a pin back to the black then hid the stitching with a small piece of the same felt.


This is how all the brooch pins are attached  to make them as pretty as possible.

The small piece of fabric over the center the same as the back piece so it becomes quite invisible.


These may make it to the Christmas Store at the gallery in December.

Thursday, November 16, 2023

1 of a Kind - Tree Scent Oranments - Set 4

It has been very enjoyable to pick up needle and thread while I watch TV in the evenings.

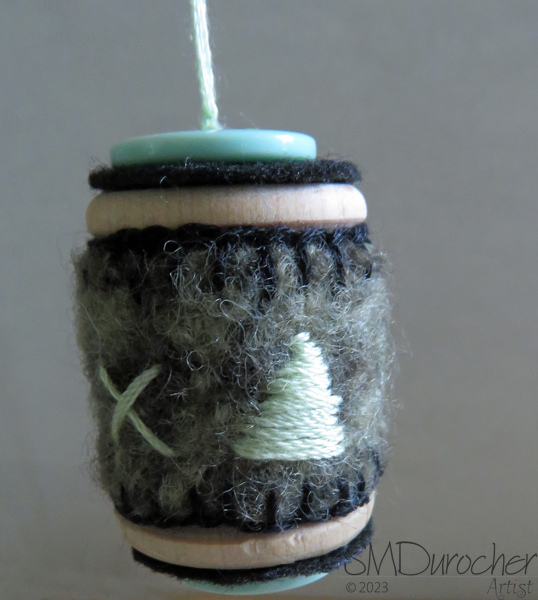
I pulled out another 5 wooden spools from my stash and started another set of One of a Kind Christmas Tree Scent Ornaments.

Here we have red wool with black blanket stitch around the top and bottom edges.

I added open circled around the center of the essential oil diffuser.

A black felt circle cut with the smallest die in the large smooth circle set for both ends.

The buttons matched the wool very nicely.


I did find a few new small pieces of felted wool at the ReUse Center again last week.

This is one is charcoal grey.  

I added plum blanket stitch on the top and bottom edges.

A turquoise daisy flowers with a yellow center in the middle.

Turquoise felt circles on both ends topped with warm golden yellow buttons.

The hanger is the same turquoise thread as the flowers.


This Tree Scent ornament starts with felted wool with a herringbone pattern.

I used ivory thread on the blanket stitch as well as the arrow pattern around the middle.

Black felt circles on top and bottom with tan buttons which coordinate with the wood in the spool.

This is a more masculine pattern as every one can use aromatherapy.  Essential oils diffuse completely which allows for a change of scent the next time. 

Most do not stain the fabric but the black is for sure not going to show.


This is the felted wool has aqua stitching accents.  

I followed suit and used aqua for the blanket stitching around the top and bottom edges.

The short and long stitch pattern around the middle in the same thread color.

Dark felt circles and aqua buttons on the top and bottom with stitching pattern around the outside edge.


The tree scent ornament mimics the warm green tones of a real live tree.

The felted wool is multi colored in warm tones.

I added a coordinating tiny button on the front with arrow pattern around the middle with brown thread.

The felt circles were cut from the same wool and I added warm green button on both ends.

I really anticipate a good response to these precious hand made gems.

They are all unique - One of a Kind - and will be a special ornament even if not used as a diffuser.

I really love this one!

Tuesday, October 17, 2023

1 of a Kind - Tree Scent Oranments - Set 3

Another set of these very cute Tree Scent Ornaments.  These can be used to give your artificial tree a scent.  Choose your favorite Christmas essential oil and apply 1 or 2 drops and enjoy.  

Here I have grey felted wool to which I have added royal blue blanket stitch on the top and bottom edge.

I had stitched white snowflakes around the middle.

The top features white felt circle and a grey button.

The hanger is the royal blue thread in 6 ply.


This felted wool makes me think of woodsy so I put small triangular trees on the middle panel of this ornament.

I chose black embroidery thread for the blanket stitch around the top and bottom edges.

The top features a black felt circle and a medium sized button.

The hanger is 6 ply embroidery thread in the same color as the tree on the wool panel.


A Bumble Bee colored ornament.

It features the ivory and black felted wool panel around the middle of the ornament. 

I use golden yellow embroidery thread for the embellishments.  The blanket stitch on the bottom and top edges.

I followed the fabric pattern with cross and dash stitches.

The top features a black felt circle with a golden yellow button.

Embroidery thread in 6 ply for the hanger.


I put white snowflakes on this woodsy felted wool panel.

I used chocolate brown thread for the blanket stitching along the top and bottom edges.

The top has an ivory felt circle cut the the SB Nestabilties smooth circle die - the smallest in the large set.

Topped with a brown button and brown embroidery thread hanger.


Another daisy on this grey houndstooth wool fabric panel.  

I did triple fold this fabric and stitched the ends to ensure no unraveling of the ends.

I chose pink thread for the daisy and the dashes in the middle.  Same for the blanket stitching along the top and bottom edges.

Charcoal grey felt circle at the top cut the the nestabilities die.

Topped with a pink medium sized button.

Pink 6 ply embroidery hanger.

This is the last set for this year.  I learned a lot in the process.  I got some feedback that they could be a popular item.  Let's hope so.

Monday, October 9, 2023

1 of a Kind - Tree Scent Ornaments - Wood Spools

Tree Scent Ornaments are ornaments on your artificial Christmas tree that are oil diffusers.  You place oil on the felt and it makes your tree smell like you want.  If you want it to smell like a real tree you can place essential oil that would give you that scent. I discovered last year that I no idea what kind of tree we had when we were kids.  I believe they were spruce trees.  You could also choose any scent that makes it Christmas for you.  I have made a variety of these ornaments last year and will continue this year with new styles this year.

I saw samples of these spools with embroidered wool on line over a year ago.  I really liked them.  
This was a project by Susan Lenz.  You can check out her blog post here.

Many of her wooden spools are older than mine and have the words embedded in the top and bottom ends of the spools.

She filled a small wooden bassinet of these.  It must have taken her a long time.
I had collected small pieces of wool at the ReUse center over the last 6 months.

These small spools come from Mom's stash.  She saved her spools and of course she sewed for many years when thread was sold on wooden spools instead of the plastic we have today. The wooden spool was eliminated in the 1970's.

I started with a 5 small wooden thread spools which I sealed with Modge Podge several days ago.  They measure about 1.25 inches tall and 1" around.

I gathered my bits of wool, my embroidery thread, a bucket of felt and a bucket of buttons and tackled this project.  Something good to listen to on the TV and a cup of tea.  I was there way longer than I expected. 

Raw wood works as a diffuser as well so any drops running down from the top will go down the center of the spool and be absorbed.

I am not sure that taking the time to seal the outside did much.  I was hoping to make the edges more warmed tone.  You don't see much of the spool at the end.

This wool was a left over from a sweater which may have shrunk.  I cut it 1" wide and 3" long.

There was a bit of pink on the edge which inspired me to  use pink thread on this one.

I split my embroidery thread into 3 strand lengths.  It is great to work with this material as there are not unravelling edges and it is quite thick.

I just made it up as I went which a rudimentary knowledge of some embroidery stitches.

Here I put different border stitches and daisies around the center.

The felt pieces on the top and bottom are cut about 1" across.

I chose medium sized pink buttons for this one.

On this ornament I used the pattern in the wool to guide my embroidery in the middle of the spool. 

The turquoise 100% cotton thread I used was not standard embroidery floss.  I split it as usual but I had a really hard time keeping it integral.  It would just come apart sometimes.  I will keep it in it's 2 strand version next time.

Turquoise felts on the top and bottom with tan buttons which matched well with the fabric I used.

I did not have any regular embroidery floss in the right color.  I am not sure where I collected this thread as it is packaged like the other stuff.  It was for sure at a Thrift store.

On this ornament, I embroidered white snowflakes on the navy blue portions of the fabric.

I managed to do the blanket stitch along the top and bottom edges.

White felt on top and bottoms with smallish navy button over the that layer.

I did not have any trouble when I used the regular embroidery thread, in this case white.

This fabric as other colors and patterns to it will make more spools and they will look different.


The wool on this ornament was very thick and the colors were quite mottled.  You can see that the fabric sticks out quite a bit from the wood edge.

I chose a denim blue embroidery thread and put blanket stitch along both edges.  I put diamond shapes around the middle.

The wool circles on the top were denim blue and here the buttons are a bit larger and I think it works better.

Again, I think this fabric was a shrunken wool garment and that is why it is to thick.

I think esthetically the fabric is a bit too thick as I just wanted to fill in the well on the spool.


On this last one, I chose the fabric for the color and it was cotton flannel instead of wool.  This comes with challenges. The edges are not integral.  On this one I folded the top and bottom edges to the inside and that worked well.

The biggest challenge was finishing the edges where the ends meet.  That had to be finished with a folded edge and I sewed that with regular thread.  Then when it came to connecting them at the back I used the red embroidery thread as I had been on the others.  The bigger buttons for sure look better.

I would not use flannel again, it was just too much work.  Three layers of layers fills in the space on the spool the nicest.

I do have some pieces of wool suiting which might be a better weight but may have the same edge problems as this flannel.

These are ones for now.  I have other styles I want to make.   I found the dimensional ones sold the best last year.  Stuffed hearts are easy and I can make snowmen and gingerbread men as well. 

Saturday, April 15, 2023

Sylvia's Simple Shots

We had the reception for the "It's a Tactile World" show this week. 

The pieces were from the Allied Arts Council and the Sculptors' Association of Alberta.

I loved the felted wool tea cup, the mobile of rice paper and a small ceramic vase with wax dipped nature. It is a great show and nice to have other artists share our space.

I added another Leslie Sansone DVD to my collection to offer me a lot of variety of routines for my areobic session.

I did some research about ones I would like and sure enough this one was at the thrift store this week.

I am sticking to a 30 minute areobic session as I want to add a walk outside as a warm up before the session and my regular shoulder and knee exercises following.  That comes to 1.5 - 2 hours of exercise activity a day.


Three Weeks in Paris by Barbara Taylor Bradford is my second by this author. 

Four girls attended the prestigious Anya Sedgwick School of Decorative Arts in Paris seven years ago.  They have been invited back to celebrate Anya's 85 birthday.  The girls had a falling out just before graduation and are unsure about how they will be received by the former friends. 

The four have flourished in their respective careers but some are struggling in their personal lives. Infertility, tragic disappearance of a lover, divided loyalties, and doubts about her work are some of the issues faced by the girls.  Anya wants the past conflict resolved before her party so she has arranged a get together to work it all out.

Once communication is restored the girls work on solving the problems they face. 

There are happy ends for each of the girls and a glamorous party for Anya.

I have started cooking pasta in my rice cooker.  What a game changer.  I no longer have to stand at the stove to stir and mind the cooking.  It's always whole wheat or whole grain for me so it takes longer. 

Pasta, water, and a bit of oil set it to cook and just check on it a couple of times during the time it is cooking.  

Loving it!


The Unfinished Garden by Barbara Claypole White.  This was a great read.

James Nealy has sold his business and moved to deal with the noise in his head. He has a plan to build a garden at his new house which will help him deal with his greatest fear.  When he meets Tilley Silverberg who has wonderful gardens and runs a wholesale garden business he believes she can help him.  She is not so sure.

Tilley returns to England due to a family emergency. The small village is pretty much the same but the characters involved prove challenging.  Her best friend, an ex lover, her mother, and suddenly James is in England too!

Once Tilley and James start working on a garden project together they come to see how they can help each other.  Very good book!


I was looking for some supports to raise the TV so that the music player and the DVD player could live below it.

These wooden crates were a great solution.  It adds storage as well which can be hidden but makes my exercise video readily available.  They will have to be sanded and oiled.