Showing posts with label punchies. Show all posts

Saturday, January 6, 2024

Sylvia's Simple Shots


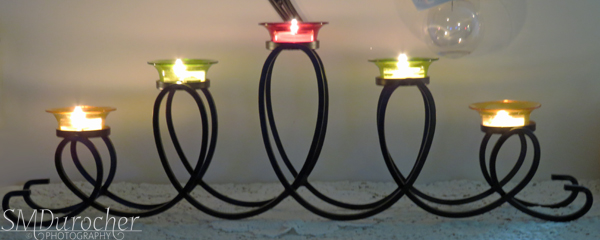
 This tealight candle holder is likely the replacement for my Advent Wreath which is broken parts.

I bought it for $5 at a Thrift Store between Christmas and New Years. I like the lines, the fact that it holds 5 candles, and that there is space below to add decor for occasions throughout the year.  It will stay out all year long.  At a thrift store on Tuesday I found these beautiful tealight holders in green, red and amber glass.  Gorgeous blown glass holders. They are Christmas colors.

I have a year to find other candle holders.  I would like to have crackle glass ones again, crystal would be nice, cut glass as well.  What I want is the shadows on the wall which I had with the other one.  I recognize that my lifestyle is going for downsizing so this will be smaller than the other one. 

I bought this Stampin Up punch recently.  I think I will be making watercolor ornaments for Christmas cards and this was a good price.

It is from the Gleaming Ornaments Punch pack which included 2 punches and a stamp set.

I will be designing my own images to trace onto the watercolor punchies. 

You can see I was working of the lines for the hanger on the right hand one.


I was looking for a small scissor sharpener for my embroidery scissors.  I visited a couple of fabric stores and found this one.

I would say it is not the top quality but it has improved the sharpness of the blades so I can cut embroidery thread reliably.

The price was not as high as the Fiskars one I was looking for but the same basic design.

It has improved my experience so for that I am grateful.

It is dangerous to go into a fabric store.

I did come out with 3 small remnant pieces for about $1 each. Check out those flowers on the lace! I hope I can dye them, we will have to see.

The other two pieces are 100 cotton so they will dye nicely. Gauzy fabric to create texture easily on my big embroidery project.

I did buy heat and bond hemming for quick basting of my embroidery projects.


Another World War II story.  The Lost Girls of Paris by Pam Jenoff.

I love strong female leads and Eleanor Trigg is no exception. This story runs in 2 time lines - 1944 London and Paris during the war and 1946 New York just after the war.

She works for the Special Operations Executive in London for the British Forces. Their male agents are being captured. There is the language and they don't fit in as well as needed. Eleanor is "just a secretary" but she proposes using women which would be less visible. Once the project is approved, she recruits female agents who will be working in occupied France assisting the resistance forces. Radio operators, couriers, and as it turns out much more dangerous tasks. 

Marie and Josie are 2 of these women.  They are sent to Scotland to train in the highlands. Combat, firing a gun, repairing radios, endurance training, learning cyphers to code messages being transmitted and received. 

Grace finds a suitcase at Grand Central Station one day and inside finds photos of 12 young women.  She is compelled to take the photos and she is not sure why.  She eventually learns the suitcase belonged to Eleanor who was killed that day just outside the station. When she returns to the station to put the photos back the suitcase is gone. 

She does eventually learn the names of the girls most of which perished in France just before the D-Day battle.  She learned who Eleanor Trigg was and her purpose for being in New York that day.

Very good book.

Sunday, October 8, 2023

Calendar - Countdown - Simple Bethlehem


Frames: I used discontinued Tolsby 4x6 frames from IKEA for this calendar.  It the past I have packed these in plastic and decided not to this year.  That created some issues to overcome - mainly how to store the marker and ensure it does not disappear while on the craft table.  I created a clear plastic loop which I adhered to a piece of white 4x6 card stock with clear tape.  I then used silver glitter washi tape to make it pretty and visible. I also used a piece of clear tape to hold the marker to the frame until it is purchased. I had thought of using bubble tea straws for the loop but I mislaid them so I had to just move ahead. With the new by-law these may become a thing of the past.

Markers: The first set of markers I purchased did not have erasers included.  I spent a day spinning ideas about making dry erase board erasers and just decided to buy markers with felt erasers attached. Having to do it again I would have searched for all black markers. Maybe that is not so much fun for the kids which is the whole point.

Images:  I have designed quite a few digital Christmas cards in the past so that was pretty easy to mine my archives to find images.  Also did a photo shoot of Christmas images you can see here. Birthday is a completely different story so I just resorted to using scrapbook designer paper with banners for that side.

Tags:  I made up 2x2.75 inch tags that document the way to use the calendar. I attached the tag to the base of the frame since I decided not to enclose these in plastic.

The Bethlehem image used here is one I created digitally a while ago.  It has been created with a light blue oval background. I have used it in several projects over the years.  Here I designed a 4x6 photo with the digital Bethlehem add the words "Days until Christmas" then had the photo printed.  The challenge is to have a place light enough that the numbers will show up. The birthday side is bright designer paper in red with royal blue balloon punchies with black strings. 

Thursday, June 16, 2016

Wedding Anniversary - 40th

I made this card for my sister and brother-in-law who are celebrating 40 years of marriage at the end of the month.

I started with a Stampin Up Cherry Cobbler card.  I punched the 2 hearts from deep red glitter card stock.  I color printed the greeting onto a piece of Whisper White which was just under 3" wide.  I adhered the 2 hearts above the greeting with Zots. I ripped the bottom edge of the greeting layer. I layered it onto a piece of Basic Black and did the same to it's bottom edge. I placed 2 pieces of white twill ribbon on the diagonal to the upper right hand corner and adhered them to the card front.  The first one has a small fold in it.  I trimmed the ends with scissors. I then layered the heart layer onto the card front leaving a small border top and right hand side. 

Submitting the the following challenges:

Fab Friday #89 - Sketch

Saturday, March 26, 2016

Baby Boy - Artemis

I made this card for my nephew's son who was born in Feb 2016.  We will see him for the first time this weekend on Saturday evening at a family celebration.
I started with a deep teal card folded in half to make a large card. I cut the designer paper by Adornit - Carolee's Creations - Cold Water Collection - Ice.  I printed the first part of the sentiment onto it along with the banner and then trimmed it to leave a small border.  I then adhered his name in large letters which I had cut from the same card stock as the card with my Sizzix Shadow Box Alphabet dies.  I adhered them along the bottom but as you can see not quite straight.  I added confetti triangles to repeat the ones in the banner.   The card colors complement the gift wrap I used on the gift.


Thursday, April 9, 2015

Class - Great Time!

We had a great time at class last night in the north end.  There were 7 ladies who participated. Sandy provided a hot cup of tea and most everyone got the cards done in the 2 hours.  We had some creativity happening as ladies interpreted the design in their own way.  That is so great!
Here are the cards I made from the Ready 2 Go Stack Card kit.
This yellow card is a wonderful color.

This sample of the ribbon threader puts the ribbon at the top which provides still another layout for this versatile layout. 


On this pink card I just cut the bottom of the back layers on at an angle then shifted the grey one up and voila another look!

Wednesday, April 8, 2015

R2G Occasion Card Stack Kit - Ribbon Threader

This is the next card in the  Ready 2 Go Stack kit.  This card has no greeting and could be used for any occasion.  I started with a brown card with a top fold.  It could also be used wide with the fold on the left as in the sample below.  I cut the Spellbinder A2 Ribbon Threader layer from a neutral solid card stock. I ran a piece of ribbon through the threader and flagged both ends with scissors.  I taped the back to ensure the ribbon stayed in place.  The layer was then adhered to the card front. I then layered a piece of designer paper cut 3.25 by 3.00 inches.  I added 3 leaf punchies in coordinating colors.

The designer paper and card have been coordinated as well as the ribbons and punchies.  This turned out to be very time consuming. Lesson learned.


I'm glad that the card is very versatile in orientation and based on the colors can be used for a guy or a gal.

Monday, January 6, 2014

Gift Card Holder - Black & White Hearts

This is a wedding gift card holder.  I started with a piece of 5.5" x 12" piece of card stock.  I scored it at 3.5", 6", then 8.5" from each end.  I placed the 2.5" mountain fold in the center which fills the middle of the card.  This fold is glued together at the edges on the 3 open sides.  This will hold the gift card so put adhesive only along the outer edges. I then used the Stampin Up! word window punch to create a slit along the fold.  It takes almost 2 lengths of the punch to make the slit wide enough for a gift card which is usually 3.5" wide.  I used the SU! Tab punch to create the part circle dip below the slit.  This will allow the recipient to easily pull out the gift card.  I placed 2 pieces of white bond measuring 5.25"x 2.87" on the front flap and back flap which give the giver a place to write their sentiments to the one receiving the gift.  I used the SU! Slot punch to create the holes in the centre edge where the ribbon holding the holder closed is slipped through and knotted.  A knot is better than a bow because I find most people will avoid a bow every time. The finished size is 5.5" tall by 3.5" wide and fits in a standard A2 envelope.

For the front: I cut a piece of black and white DP which says Congratulations over and over.  I punched 2 hearts, one from pearl white and one from silver.  I embossed the white a bit.  I added piece of white 1/8" satin ribbon across the width of the designer paper then adhered it to the card front.  I adhered the hearts to the card with 3D foam tape. I added an embossed SU! Modern label punchie in the pearl white also raised with 3D foam tape. I cut 3 lengths of satin ribbon - silver, white and black with silver edges, pulled them through both slots and knotted them.

Sunday, October 2, 2011

Calendars - Coaster

I made several of these coaster calendars for my Card Club members who signed up for the full semester.  I started with round coasters to which I glued decorative paper.  These were pressed overnight to ensure good adhesion. I produced the calendar in publisher and then cut it down to 12 small sheets.  I stapled those to a piece of cardstock which was glued to the calendar.  Then I decorated them with words, punchies, brads, buttons, and such embelishments.  I'm happy with the way they turned out.  I put sheet magnet on the back so they will stick to file cabinets, etc. in a crafter's area.