Showing posts with label sequins. Show all posts

Friday, April 18, 2025

Cards - Donation - Teachers Appreciation

I made a few cards for my niece who is working on a project for Teacher's Appreciation Day which is May 7th this year.

I dipped into my decorative paper stash and found a few pieces I could work with.

Top card is black A2 card base with a wide strip of gold card stock adhered to the card front. I then glued a black/gold decorative paper and then 2 diamond gold punchies.

Next, is black and grey marbled paper which I mounted on a Stampin Up Smoky Slate card base in the wide orientation. 

I afixed a narrow strip of the same card stock along the bottom edge of the decorative paper.

I then added 5 black round sequins onto the grey strip held in place with Bling Zots.


This card is a black card base onto which I mounted a piece of handmade decorative paper from India with silver leaf motifs.

I added a black strip of card stock along the top and then a SU Decorative Label punchie topped with a silver daisy punchie, sequin and black brad.

These were all given a white quarter sheet insert and envelope.

Thursday, September 1, 2022

Christmas Card Challenge - Watercolor - Silver Foil Joy

I had some small Christmas note cards featuring a wreath and Joy in silver foil on white card.

I decided to trim the card front off and water color the background with the Stampin Up Watercolor Wonder crayons.  I left the center of the wreath white.

On this card I used Tempting Turquoise with salt.  Once it was dry I trimmed it a wee bit. I added the TT Thread with a large round silver brad to hold it in place aligned the left hand side.

I adhered it to the Tempting Turquoise card base with double side tape.

This card features the same silver foil wreath with the Old Olive watercolor. 

This one was just a basic wash on the background again leaving the inside of the wreath white.

I found some coordinating round sequins in my stash and mounted them with tiny silver brads.  I chose some green and some silver.

The watercolor layer was adhered to the Old Olive card base with 3D foam tape.

A seasonal insert with a white envelope completes the card.

For this card I used the Brave Burgundy watercolor and created a gradient wash with it being light at the top and darker at the bottom.  I actually painted this upside because it works better to start dark and add water as you get lighter.

I chose 4 large silver star brads for this card.  I put them in the four corners.

I adhered the greeting layer to the card front with 3D foam tape.

I made 2 of each color so I have 6 more cards in the Christmas card box.

Tuesday, June 1, 2021

Cards - Exchange - June

I chose the theme of pink and gold for my card exchange this month.

I chose a white A2 card base with a portrait orientation.

I added a pink textured layer which was embossed with the Stampin Up Subtle 3D folder.  I asked permission to use it before I delivered it to her last month.  Very nice folder. 

I chose a piece of white with foil stars decorative paper and adhered it to the pink layer.  I then punched a slot on the left and right hand side with the Stampin Up slot punch.  I pulled the white grosgrain ribbon through both and tied in on the front. Trimmed both ends.

I added a couple of gold star punchies and a pink handmade paper flower adorned with a gold flower sequin and attached with a gold star tiny brad.

I added a Stampin Up Modern Label punchie greeting color printed in pink, adhered with 3D foam tape. 

I followed most of the supplies from the first one.  

Started with a white card base A2 and put it in the landscape orientation this time.

Same treatment of the pink layer.

Added the ribbon and taped the ends to the back of the pink layer.

I added the gold foil star decorative layer over the ribbon onto the pink layer.  The trimmed piece of grosgrain ribbon I adhered behind the gold star layer and trimmed the ends. 

I added the Modern Label greeting with 3D foam tape above the bit of ribbon. 

I adhered 3 small gold confetti below the ribbon with Bling Zots.

These are off to my partners.

Thursday, March 4, 2021

Christmas Card Challenge - March - Large Greetings

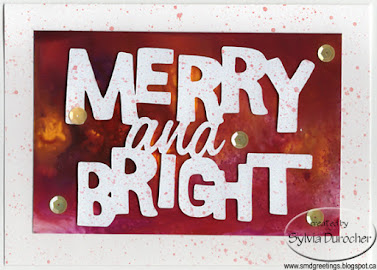
I decided to make Christmas cards with large greetings for my March cards.

It was easy to find some greetings on some of my Cricut cartridges.  They are easily sized and cut.  I chose the Winter Frolic cartridge.  It's hard to tell how large they will be on the first cut so I ended up with some larger die cuts than I planned so I used 5x7 cards (A7). 

The large greeting was cut from white pearl card stock at 3.5" T.  

Of course, the fun part was making acrylic ink background with photo paper.  These are 4x6 sheets and I used my Nick Bantock liquid acrylic colors for these. The colors were: Deep Turquoise, Cerulean Azure, Prussian Blue, Chrome Yellow, Chartreuse Leaf, Vermillion Lacquer, and Sapmoss Green.

I added colored sequins to the card fronts adhered with Bling Zots. For the first one the sequins were Christmas green, the red one was gold,  and the other was red and green.

I used a bit of color watered down to spatter the card fronts once I was done which helps to marry all the elements.

For the 5x7 cards I needed a clean pull of color across the 4x6 as I could not trim it.  Sometimes I end up with white edges or finger prints in the corners as I turn them over.

I see that I ended up with some pink sequins as well as red on this card. Not my intention but that's how it goes.

I have documented these in my Cricut manual so I can get smaller die cuts next time.

Always nice to have a few larger cards in my Christmas card box.

Super happy with these.

Friday, January 15, 2021

Christmas Card Challenge - Jan - Handmade Paper

I started on my 2021 Christmas Cards. I was inspired by a photo shoot I am planning.  

I used small sheets of handmade paper in light warm blue color.  I chose a deep warm blue card base.

I color printed a star and a greeting from the Stampin Up Bright and Beautiful set in Baja Breeze.  I heated embossed them with clear powder.  I cut the stars by hand and ripped the top and bottom edges of the greeting.

I used tiny blue brads to attach the star and greeting to the sheet of handmade paper.  I added a small sequin to the star and a snowflake sequin behind the greeting.


I have four cards in the card box.

I have not used handmade paper sheets in forever.  It was nice to get some onto cards.

Tuesday, August 4, 2020

Exchange Cards - June

I am really late on these cards. 

I started with the Dandelion paper I made a while ago which features navy, ultramarine, and turquoise with white pearl as colors on a yellow base.

I ripped the right hand side. 

Wrapped a piece of white seam binding around it on the left hand side and tied a knot.

I added pearly sequins to the center with Bling Zots. 

It's great that the paper can be used tall or wide. 

For this card since it mostly has one flower I added the seam binding to the left hand side to fill in the space.

Pearly sequins for the center of the flower again held in place with Bling Zots repeats the white pearl in the paper.

For both cards I used the navy card base but I had selected a turquoise and medium blue as well.

Quarter sheet inserts work for both of these.

These are off in the mail today.

Thursday, July 30, 2020

Birthday Card Mom

A birthday card for my Mom who celebrates in July.   Her favorite color is blue so I have chosen a true blue card base.

I added a layer of designer paper in coordinating colors.  I then added a strip of blue card stock and then a narrower strip of green trimmed to the card edge.

I added flower sequins with Zots and a Stampin Up Decorative Label with a circle greeting.  This accent was chalked then mounted with 3D foam tape.

Tuesday, March 26, 2019

Shared Birthday Card order

I had a request from a friend for a spring looking card for her aunt who shares her birth date with my friend.

I chose to recycle a commercial card featuring Goldfinches. I trimmed it so that there was an even border on a 5x7 A7 large card.

I added a purple layer which was cut into 2 triangles which were adhered in the bottom left and top right corners.

I printed the aunt words onto the same card stock as the card and punched it with the Stampin Up Modern Label punch.  It was adhered to the top left hand corner with 3D foam tape.  I added the rest of the sentiment to the insert on this inside of the card.

Iridescent sequins were added to the card front with Bling Zots.

Monday, March 25, 2019

Sympathy Card

I made this card for my friend who lost her Dad a week ago. 

I have recycled a commercial card front into this 5x7 A7 large card. 

I trimmed the commercial card on both sides.  I trimmed extra on the right because there was some pink which I wanted to remove. With only the purple left I chose a purple card to coordinate. Purple is her favorite color so that should be appreciated.

Now I had to add a bit of cardstock on the right to make an even border.  I cut a strip from the back of the card and cut it with my Deckle Edge scissors. I taped the edge to the straight edge with tape.   I added a length of purple satin ribbon over the join and tape the ends to the back of the layer.  It was adhered to the card front.

I added iridescent sequins to the card front with Bling Zots. It will be on it's way tomorrow.

Thursday, November 1, 2018

Christmas Card Challenge - Green Tree

I cut some bright green designer paper into triangle trees.  This is a very efficient use of paper.  I used a 6x12 piece and cut 7 trees with 3 inch base and 5 inches tall.

I cut a piece of My Mind's Eye designer paper featuring triangle trees into rectangles 4.00x5.25 inches.

I chose 3 different card base colors to coordinate with colors in the paper. Kraft, white and Soft Sky.

I glue the triangle tree onto the designer paper.  I added a sequin star at the top with a Bling Zot.  I added one white snowflake and red sequins on the tree with Zots.

The greeting was cut from ribbon.  It was adhered with double sided tape at the bottom of the tree.

As you can see from the samples below I chose different colored sequins too!


Thursday, September 20, 2018

Recent Photos

It was our first Welcome to my Kitchen since our summer break.

We had a good number in attendance with a few regulars busy elsewhere today.  We had one new retiree who has decided to join our group. 

Maybe I was hungry today but I had wolfed down my toast, fruit and coffee cake before I remembered to take photos!

I was not able to find details about this cup so if you know it leave me a comment.

We had a great time of catching up on our summers, our devotion "Dedicated to Love" was based on Romans 9:1-5.  We had many prayer concerns.

We even had a couple of choruses which was a real blessing.

Our hostess was celebrating a milestone birthday so I made a birthday card for her.  We had several others celebrating September birthdays turning 73-88 years young.

This card is a DSP Split with double sided paper by Authentique - Renew - Blossom featuring aqua and yellow.

I cut at 3.5 inches, flipped the top piece and taped the pieces together with the join covered with ivory grosgrain ribbon.

I punched a large circle from ivory card stock, stamped the sentiment in the center in Baja Breeze. I then added silver and white sequins and small handmade paper flowers around the center.  Added a bright yellow on in the center.  These are held in place with Bling Zots.

I should have made cards for those on our prayer list. Next month.


There was significant frost on my world yesterday morning.  As you can see the Rudibeckias had been frosted and were sparkling.

It was wonderful for photography but I had to keep moving to keep warm.

The camera was cold and so were my fingers despite gloves.

It was good to be out for a walk and be in the fresh air.


Wednesday, May 30, 2018

Exchange Cards - Spinner Art Paper Overpainted

I chose a piece of my spinner art paper for these cards.  I wanted to lessen the punch of the spots so someone suggested over painting the sheet.  That was a good idea.

I selected ink from the original art Ultra Blue which was diluted significantly with water to produce a light color.  This was painted on the sheet with a foam brush and it was allowed to dry completely.  It was flat again when dry.

I cut the 4x6 sheet into 2 pieces and trimmed the edges to ensure no harsh band of color.  I glued it to a piece of red card stock leaving a wide border. It was placed on a turquoise card base. 

Where the colors have mixed a purple color was produced so I chose a purple greeting.  It was printed onto card and punched with the Stampin Up Decorative Label punch.  It is mounted onto the card front in the top left hand corner with 3D foam tape.  I added some turquoise sequins with Bling Zots as a final accent.

On  this card the piece of red leaves a small border of the turquoise card. 

I used a similar greeting and the more of the turquoise sequins held in the same way

These are off to my Card Exchange partners for May.


Friday, March 4, 2016

Decorative Paper - Card Set 2

This decorative paper was done with liquid acrylic paint applied to a piece of acrylic board. I then picked it up with a 4x6 photo paper.  This features a warm yellow with deep blue and where they merged a deep green.  I trimmed the decorative paper to leave a small border.  I adhered it to the front of a dark green card.  The greeting was color printed in navy on vellum and clear embossed.  It was trimmed and placed in the bottom third of the card and held in place with tiny navy brads.  I added green sequins onto the brads then added a few more held in place with Bling Zots.


This card features letterpress decorative paper in pink and navy.  I added a piece of navy crisp ribbon across the bottom third of the card.  I added a white and blue silk flowers and a white sequin all held in place with a tiny navy brad.  This accent was placed on the right hand side and is offset with a scallop oval greeting in the top left corner.

This paper was created with watercolor onto heavy bond paper.  It features teal and purple colors in a very diluted colors.  I cut the paper to leave a small border. I ripped the top and bottom edges of the vellum greeting.  I placed the heart to the left then put adhesive under it and added it to the card front. I cut the wedding couple with the Cricut and the Stretch Your Imagination cartridge.  It was cut at 4 inches with the silhouette option.  I cut it from brushed white card stock.  I used quick dry adhesive applied with a very narrow tip to get the glue only where I wanted. it.

Thursday, December 3, 2015

R2G Card Kits - SU - Festival of Trees

Another Ready2Go Card kit for a kid's Christmas Party!

This kit has a Ruby Red card base.  I cut the greeting layer to 4.00W x 5.25T and created it with the Festival of Trees Stamp Set.  The tree outline is included on this layer.  I provided a white triangle tree cut to 2 7/8 W X 3 7/8 T onto which strips of Certainly Celery card stack was adhered.  Once I was happy with I just trimmed the green to the edge of the white triangle with scissors.  I adhered the strip tree onto the card front using the outline printed on it for alignment. The gold glitter stars were cut with the Sizzix Stars#2 die. I trimmed the pot with scissors leaving a small border all the way around. I adhered sequins on my tree then added the gold glitter star and the red pot with 3D foam tape.

I provided plenty of green strips and sequins to meet any kid's desire.

Monday, March 23, 2015

Card Club - March - Birthday Wish


I created the white greeting layer and then color printed.  I trimmed it to 3.75 x 5.00 inches.  I had placed my Stampin Up Little Letters thinlits as I wanted them on my magnetic platform.  I placed registration marks as to where the corners needed to be aligned.  I put wax paper between my card stock and the dies so they would fall out easily. With this prepared cutting went really well.  I then placed a small piece of copper metallic paper behind the cut out word.  This layer was then adhered to the card front.  I then placed 3 copper sequins to the card with mini Zots.  I provided some kits with silver foil paper and silver sequins for behind the word.

Monday, November 24, 2014

Card Club - November - Chalkboard Christmas

I started with a black card.  I added a gold metallic layer leaving a small border.  I then glued the Merry Christmas chalkboard layer to a white layer leaving a border.  With a bit of extra space at the top I wrapped a length of thread around 3 times and knotted it.  This layer was then adhered to the metallic layer with 3D foam tape.  I added gold star sequins to the card front held in place with tiny Zots.

The kit included a gold metallic and red metallic where the stars matched that layer.

Tuesday, May 6, 2014

Card - Challenge - Sequins

I made this card for a challenge on Canadian Stamp Talk.  It is to use sequin on your card.

I started with a blue card.  I embossed a line across the landscape card with the Cuttlebug Anna Griffin Foulard border embossing folder. I tied a piece of white seam binding around the card front above the embossing. Then, I cut a white felt flower with the Tim Holtz Tattered Flowers Sizzix die.  I added a black glitter Stampin Up Five Petal punchie to the center then a large green sequin with a small flower sequin in the centre.  These are all held in place with a tiny black brad.

I'm sending these out as my exchange cards as well.

Sunday, June 16, 2013

Card - Birthday Flowers

I made this card for my sister.  I will be with her for her birthday this year which has not happened in years. She has moved closer so I anticipate it happening more often.  It is so good!
I think the card is Marina Mist. I layered onto it a Spellbinders A2 Fancy Ribbon Threader white layer.  I run a piece of blue seam binding through the bottom threader which matches the card really well.  I found a complimentary piece of designer paper trimmed it to not quite square and adhered it above the threader.  I layered onto it 3 flowers cut with Sizzix Flower Layers #10.  The large ones cut from pearl vellum and the small ones from matching card stock. After making holes through the flowers and the card front with a push pin I added a small white sequins to the tiny white brads which hold the flowers in place.