Showing posts with label micron. Show all posts

Thursday, September 11, 2025

Watercolor Card - Landscape

I whipped up some waterolor paper this morning.  I used 140lb cold press paper measuring 11x15 inches.  Fortunately, I unpacked my glass shelf and a couple of plastic craft work sheet and taped the paper down.

I decided to use some Stampin Up reinker in water based dye ink which works the same as watercolor but will match the card stock I have.  I chose Always Artichoke, Only Orange, Baroque Burgundy. 

I used regular salt on one sheet, coarse salt on another and cling wrap on other.

I trimmed the watercolor paper after I decided what my bottom layers were going to be. I chose deep green card stock, deep red card stock and More Mustard card stock.  Ripped the top edges and layered them front to back and then taped the back with clear tape. I trimmed the watercolor paper to fit just below the top edge of the accent. I adhered it to a More Mustard card base in the A7 size. I adhered the ripped paper accent to the bottom of the card. With the scrap of green I cut a Sizzix Pine Small which I inked the edges with Always Artichoke ink pad. I then glued it in place ont the right hand side. I punched a 1 inch circle from Summer Sun card stock and adhered it on the left hand side. I then used the watercolor I had used this morning and painted with like colors to help it blend in the sky. I added 3 birds with my black Micron marker.

I put it to press for several hours. I gave it a white insert and a warm yellow envelope. I will see her tomorrow! Yeah!

Friday, August 15, 2025

Thank You Cards - Finally Set 2

The card base is SU Taken with Teal in the A2 size in portrait orientation.

Trimmed the rough edges off this piece and ripped the bottom edge.

I saw flowers in the salt marks in this piece so I took my fine black marker and drew them in.

Added stems and leaves reaching to the bottom of the paper with additional grassy strokes.


It pays to save bits of ephemera.  The green yarn came in really handy.

The A2 card base is SU Pumpkin Pie with a watecolor panel marked with saran wrap on wet color and left to dry.

I punched 4 holes with the 1/8 inch punch. Two on the right and 2 on the left.  I taped the end of the green yarn found in the stash and was able string it through the holes and knot both ends.

I added a SU Artisan Label punchie colored with pencils and held on the yarn with a orange clip.


With the yarn still on my table I used in this card.

I trimmed the waterolor to crisp straight edges.

I layed a strip of double sided tape to the back of the watercolor piece.  Layed my pieces of green yarn then added another piece of ds tape and adhered it to the SU Dusty Durango card base.

Once adhered, I picked apart the strands of the yarn to create this wavy row of goodness.

I added an 2 inch oval punchie greeting below the yarn frill.

The A2 card base is SU Island Indigo.

I added a piece of SU ribbon in So Saffron and flagged the bottom end.  Trimmed the top edge to the top of the card.

I mounted the piece of rough edge watercolor panel over the ribbon aligned along the top.

Each card has a white quarter sheet insert with a white envelope.

Friday, May 23, 2025

Slow Stitching project - May - Tiny Fabric Book

I wanted to add a small fabric book to my slow stitching project in which I would write my favorite authors.

I started with a dark blue piece of fabric paired with a bit thin blue fabric. I handstitched the outer edge and turned it right side out. I top stitched the outer edge to close the slot used for turning.

I cut a piece of white cotton for the pages on the inside. Finished it measures 2.75" x 2.25 inches.

I spent quite a bit of time thinking about how to get the words in the book.  I knew I was not stitching them.  I investigated adding sizing to the fabric allow me to hand write the words. Finally, I decide to use freezer paper on the back and a Micron black marker. That worked really well. I then hot ironed the white cotton to set the ink.

I added a small elastic closure on the right hand side and a tiny blue button on the front cover to hold the book closed. 

This book was stitched onto my books square for the May slow stitching project I am working on. 

Monday, March 17, 2025

Sympathy Watercolor

I did this watercolor as a sympathy card for a cousin who loss her Dad recently.  He passed away fairly quickly so it will be an adjustment to life without him.

I reused some watercolor paper that had art on the other side.

A simple landscape with a river, trees, hills and birds in the sky.

I used a small Winsor and Newton set I picked up at the ReUse Center recently.

I added definition with a Micron black marker.

Mounted on SU True Thyme A2 card base.

Headed out of town for the funeral today.


Sunday, March 16, 2025

Cards - Watercolor Abstract

I wanted to add some cards to my stash so I chose to reuse the bright watercolors I created in this post.

I cut the watercolor art into pieces.  In this card 4x5.25 inches.  I then used a Micron fine black marker and outlined the shapes in the watercolor.

I followed the idea of neurographic art and rounded the intersections of the black lines.  I added a border all the way around. Added circles to some of the white dots.

I used a black marker to darken the edge of the watercolor paper.

Mounted on Stampin Up Island Indigo card stock with a quarter sheet insert on the inside paired with a white envelopee.

For this card I cut the watercolor art to 3.5 inches square.

Again, added black marker lines around the shapes in the watercolor.  Soften the intersections and circled some of the dots in the art.

Added a black border all the way around.

I mounted it leaving even edges around 2 side onto a SU Gumball Green A2 card base.

Added a white insert and envelope.


This one had a good variety of colors so there was a good choice of colors for card base.

In this card, I chose SU Pacific Point in the A2 size.  These I did mount all in the portrait orientation but they could be landscape (wide) as well.

I love the bright spot of pink in this piece of watercolor. 

Again, black marker to outline the shapes in the watercolor with a border all the way around.

A white quarter sheet insert and envelope.


The card base on this card is an A2 in the SU Kiwi Kiss color.

The watercolor was cut to 3.5 inches square.

Mounted to the card front with double sided tape.  I added white quarter sheet insert and an envelope.

Pressed under books over night and is now sitting in the box.

These were fun to do and allowed my art to shine again.


Tuesday, October 22, 2024

Inktober 22 Abstract Leaves

Inktober 2024 Challenge

22 Abstract Leaves

I penciled my sketch then traced it with a Micron permanent black marker.

I create several shades and tones of green watercolor on my palette.

Placed the background light patches.

Painted the leaves with my greens.

Spattered the final piece with some light and dark watercolor. 

Friday, October 18, 2024

Inktober 2024 - 18 Bridge

Inktober 2024 Challenge

18 Bridge

Micron Black Marker in couple of sizes on Canon Fluid Mixed Media 154lb paper.

I created a wash for the sky above the hills and left white spaces for texture.

Water was painted another shade of blue.

The hills in the background are green. 

Dark for the towers and the deck.


Wednesday, October 9, 2024

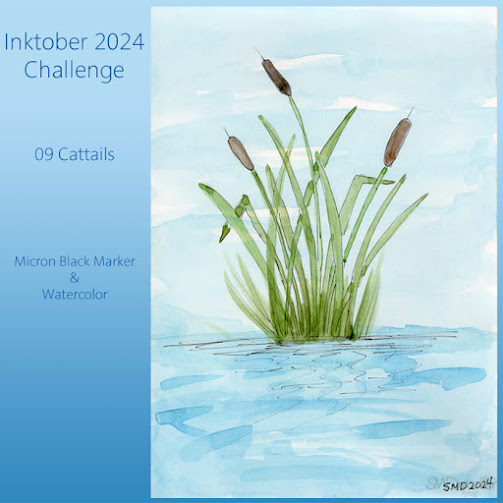
Inktober 2024 - 09 Cattails

Inktober 2024 Challenge

09 Cattails

Micron Fine Black Marker & Watercolor


I got up this morning with no idea what I was going to sketch.

With my photography I see cattails/bulrushes all the time. I know these quite well.

I chose a fine marker .005 today. I did a pencil drawing in grid paper in my sketch book, then transferred that to my 5x7 Fluid Mixed Media 154lb paper.

I washed the whole surface in a very light rough wash.

I then watercolored the cattails and added some extra color and then some extra lines with the marker. I then added more watercolor in the background as needed.

Friday, June 16, 2023

Card - Watercolor Pansies

This is a card for my sister.  She celebrates her birthday soon and I wanted it in the mail so it arrives on time.

I found a coloring book page on line to help me with the line drawing of these flowers.

I used Stampin Up Wonder Watercolor Crayons so it would match with the card stock I selected.

The colors are Night of Navy, Elegant Eggplant, Daffodil Delight, More Mustard, and Always Artichoke. Once painted and dry I outlined the image with a fine Micron permanent black marker.  It pressed overnight under several heavy books.

The back petals are a mix of Navy and Eggplant, the center ones are EE and the front one is Daffodil with darker marks with More Mustard. Put a pale background with Night of Navy on the top and Always Artichoke on the bottom.

I chose to trim the watercolor piece to 3.75 x 5 inches. I taped a couple of lengths of grosgrain ribbon in the AA and EE to the back of the watercolor. Brought them forward and held in place with double sided tape and trimmed the ends on an angle. This was adhered to an Eggplant layer leave a small border.  Then that was adhered to the Always Artichoke A2 card base.

Tuesday, July 12, 2022

Watercolor - Birthday themed cards

I worked on some more cards for upcoming birthdays.

I am not choosing to put greetings on my cards these days but the subject matter helps to communicate the sentiment.

I created birthday candles on this one.  I put an odd number of them.  These were penciled in then traced with the black marker then colored in bright colors.

I drew various patterns on the candles.  Some were made with the black marker and others were added once the first wash was dry.

Once the candles were dry then I added some spatter with orange and blue.

The paper is 140lb rough water color paper trimmed to about 4.00 x 5.25 inches.

Mouunted to Tango Tangerine card base with a quarter sheet insert on the inside with a white envelope!


The cards above are based on a similar process.  The one on the left is presents on a Pink Passion card base. The one on the right is balloons on an Elegant Eggplant card base with a wrap of purple crochet thread wrapped around the accent layer and tied to the front.  These will go in the stash for the summer birthdays coming up.

It was a good idea to create watercolor cards this year.

Friday, June 17, 2022

Watercolor Cards - All Occasion

I needed a  few cards for upcoming birthdays so I decided to follow the trend of my Christmas cards and make them with watercolor.

I searched the internet for simple floral images - bouquets so that I could see how the stems interacted, etc.

I trimmed my 140lb water color paper to 3.5 x 3.5 inch squares.  Loosely following the compositions I found on line I drew flowers with a pencil.  Once I was happy with it I traced the pencil lines with black permanent marker again making adjustments if needed.

Once the ink was allowed to dry a bit I erased the pencil lines and was left with the black lines.  I used my Stampin Up Watercolor Wonder Crayons to match my card bases.

I chose flowers which were non specific so I could paint them any color, rather than recognizing the flower and saying that must be pink or whatever.  I also added some spatter of each color to tone down the white of the paper.

For the first card the flowers are a pale version of Rich Razzleberry and Garden Green for the leaves on a Pixie Pink card base.

Card number 2 is Elegant Eggplant card base with Old Olive for the stems.

Card number 3 is Marina Mist card base with Always Artichoke leaves and foliage.

I chose Mellow Moss grosgrain ribbon wrapped around the front of the card with the ends taped under the watercolor accent.

The floral watercolor is adhered to the card front with 3D foam tape. 

I decided to go with no greeting so I can use it for any occasion. 

Quarter sheet insert on the inside with A2 white envelope and 3 more cards ready to give.  One for my aunt, one for my sister and one for Mom.  I still have a couple of sisters who have birthdays this summer.  Another session to follow soon.