Showing posts with label teal. Show all posts

Sunday, April 6, 2025

Cards - I Win - Acetate Butterflies

I make some cards for the I Win charity.

 I was at ReUse Center yesterday and found a 12x12" sheet of acetate with pink butterflies on it.

I cut the sheet into 4 pieces I could use. The one corner had butterflies too big for my A2 cards.

Then I dug in my stash to find paintable 12x12 card stock.  I used some of my alcohol inks to stain the paper in 4 different colors.

On this card I chose a scallop patterned paintable card stock and added green alcohol ink diluted with rubbing alcohol applied with a sponge.

I mounted the acetate and green paper to the Kiwi Kiss card base.  Greeting and white insert was added.

For this card I chose a heavy 110lb white card base.

I trimmed the acetate to be a bit smaller than the purple paintable card stock layer.  These are held together with black tiny brads. Then this layer was adhered to the card base with double sided tape.

I added a SU Word Window punchie greeting in black to coordinate with the brads.  It is mounted to the acetate with 3D foam tape.

A white insert was added.


Love this one!

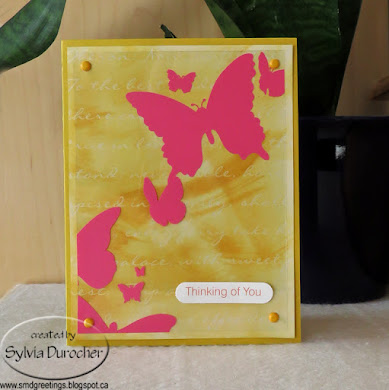
The A2 card base is SU Crushed Curry.

I added a paintable card stock layer which has script on it.  It has been painted with yellow alcohol ink diluted with rubbing alcohol and applied with a sponge.

The paintable layer and the acetate had held together with yellow mini brads in each corner.  This is adhered with double sided tape.

I added a SU Word Window punchie greeting in pink.

A white insert and we are good do go.

I will press these over night.

The card base for this cards is Stampin Up Taken with Teal.  

The paintable layer has a script pattern. It was colored with alcohol ink diluted with rubbing alchol and applied with a sponge.

I attached the acetate and the blue painted layer with white tiny brads in each corner.   This was then adhered to the card base with double sided tape.

I added a blue SU Word Window punchie greeting in the top left hand corner.  It is attached with 3D foam tape.

A white insert and we are good to go.

Thursday, October 31, 2024

Self Closing Cards - Dots & Christmas

Another set of self closing cards before everything gets packed away.

This is a pretty dots one made from wall paper actually. They are macaron snacks.

There was coordinating paper so the piece of pink is wall paper too.

All adhered to a olive green card base cut 6 inches x 12 inches. Scored at 5.5 and then just less than 1" for the flap.

Double sided tape on the flap and a generous insert.


This is a Christmas Card for which I borrowed the Tim Holtz Winter Wonder die from my niece. 
I used this wonderful sparkly decorative paper as a background and cut a snowbank and punched a star from a piece of warm pearl paper.

I added the snowflake which is part of the die and place it on his belly. 

All adhered to the teal card base of 6x12 inches with a score at 5.5 inches and just less than 1" for the flap.

Double sided tape on the flap with a generous insert.


More of the sparkly paper on royal blue card base which measures 6 x 12 inches.  It is scored at 5.5 and just less than 1" for the flap.

I cut a Sizzix Snowflake #2 from silver foil card stock and layered a MS Snowflake punch on top.  It was cut from Pale Plum card stock as well as the SU Modern Lake punchie under the greeting.

There is a silver sequin in the middle and this element is adhered to the card with 3D foam tape.

Double sided tape on the flap with a generous insert.

More sparkly paper with the Sizzix Snowman and Hat die. The snowman was embossed with the coordinating folder.

I cut the hat from black card stock and added some sparkle with a gel pen.

The color on the snowman was done with Sharpies to be sure it did not rub off.

Another pearl snowbank which the same card stock as the snowman.

The card base is navy linen texture cut 6x12 inches. Scored at 5.5 and then just less than 1" for the flap.

Double sided tape on the flap with a generous insert.


Friday, September 13, 2024

Cards - Christmas - Self Closing

 I am carrying on making Christmas cards.  Again, these are the self closing kind which require no envelope and use up some of the 12x12 card stock I have in my stash.

For this card I used a warm green for the card base.  Cut 6 inches high and left 12 inches wide.  I then scored it at 5.5 inches then just short of 1" on the other edge for the flap.

I used the Tim Holtz Tattered Poinsettia die with heavy red card stock.  I used scrap green card stock to cut 3 leaves. 

I adhered a strip of the same red as the flower along the right hand side. Then a piece of gold gift wrap paper on the left hand side with a ripped edge overlapping the red strip. 

A white insert and some double sided tape with carrier on the flap and it's ready to go.  

I used a teal card stock for the base of this card. 

The decorative paper is from Stampin Up. I trimmed a bit off the bottom and top to have the pattern evenly placed on the card.

I spattered a strip of red with pearl metallic watercolor from my recent purchase. it was adhered on the right hand side.

I cut a star with the Sizzix Primitive #2 die and embossed it with it's folder.

I wrapped a length of red cotton ribbon over the DSP, taped the ends to the back, and adhered it to the left hand side.

The embossed star is adhered with 3D foam tape.  A white insert on the right with double sided tape with carrier on the flap.

This is the second piece of warm green card stock.

I added a piece of gold gift wrap on the left hand side an then added a strip of Soft Sky card stock with ripped edge to the right hand side.

I punched a branch with a border punch by Martha Stewart.  It was adhered with QuickDry glue carefully placed along the stem and leaves.

I cut an ornament with the largest of the 2011 Nestabilities Ornaments from a winter botanical DSP. I cut the hanger from warm green scrap and adhered with QuickDry glue. I punched a snowflake in the center from the same light blue card stock and held it in place with a tiny gold star brad. After punching a hole in the top of the hanger I added a length of Baja Breeze seam binding to it.  The ornament is adhered with several pieces of 3D foam tape.  A white insert and a bit of double sided tape with carrier on the flap and it is ready to go.

Saturday, August 17, 2024

Slow Stitching - No. 031 - Shisha and Kutch Area in India

I have caught up on my slow stitching.  This piece is for week 31 of K3N Cloth Tales Slow Stitching Challenge.

The shisha are the small decorative mirrors on Indian clothing.  I chose a plastic sequin since I anticipate this piece being put into a possible quilt. This is washable.

I decided to use a piece of salmon colored linen on a cotton foundation cloth.  I also decided to make a paisley pattern with the shisha at the round end.  I traced with a white marker.

I managed the stitching on the shisha. The proceeded with satin stitch.  I had a really hard time when I  stitched through a single strand.  

I added the a blanket stitch around the outer edge of the paisley then closed it with a row of back stitch. After my problems with the satin stitch I took the easy way out.

I used 3 strand embroidery thread in several colors. I made several circles around the shisha.  Then I followed the inside edge of the with a couple of rows of satin stitch. Then I added the daisy flower and filled the field around it with satin stitch.  I used gold, teal, purple, yellow, and pink thread in various places.

I put a border in blue at the bottom and an upper in gold. 

Saturday, August 3, 2024

Flooring Project - Thank You cards

I made a few Thank You cards for those who helped in this big flooring project. 

This was for the sister and her husband who came to the city to help me remove the carpet from the living room and dining room and expose the cement floor on a very hot and sweaty day.

I chose Stampin Up Rich Razzleberry card base in A2 size. I dipped into my commercially made handmade paper and cut a piece of this wax resist in teals, rich purples with swishes of gold.

I left the beautiful deckle edge on the bottom and taped it to the card front.

I stitched 3 small gold beads in the top right hand corner.

A white insert and envelope.


This card has an Old Olive card base.

I chose an origami paper front layer which was taped on.

I added a gold star sequin in the left hand corner.  To balance I added 2 square brads in the bottom right hand corner with a green one in the middle.

This paper has beautiful gold details.

This card is for the folks from whom I bought the flooring which answered all my questions during the process.


I chose a SU Kraft A2 card base for this card.

The front of the this card is a piece of botanical pressed wax paper.  A nice little flower and a piece of green leaf.  It needed to be mechanically adhered as it resisted taping.  

I wrapped a length of gold thread around the top a few times and then knotted it.  I then place the gold mini brad over the knot and pressed it through the card front. I added a gold bulb pin in the bottom right hand corner which went through the wax paper and card stock front.

A white half sheet insert to hide the metal pieces which have gone through the card stock.

A white envelope to finish it off.

This is for the flooring company which recommended the underlay which saved the project.

This card is for my niece who dropped everything on the Monday morning to pick up the 2 large rolls of underlay and deliver them to my brother in law who was going to install the floor.  Saved me a round trip to the south.

The card base is SU Always Artichoke.  I found this piece of lacy handmade paper in the stash.  Lightly glued to a piece of white card stock.  Trimmed to fit across the card front and taped in place.

I added a coordinating button with gold thread held in place with a Zot. White insert and envelope.
Started with a piece of Not Quite Navy card stock.  

Layered a piece of marbled paper in blue tones with copper accents on the card front.  I added a copper star sequin held in place with a Zot.  Then I added a coordinating bead held in place with a star copper tiny brad.

White insert and envelope. 

This is for my brother in law who installed the floor and my sister who hosted me at her house.  We did a few fun things while he was working at my place. There was a bottle of scotch delivered with the card.


I am loving the lacy curtains casting a wonderful shadow on the vinyl floor!

Tuesday, April 23, 2024

Art Show - AAC - Redux Show 2024 - Upcycled Every Day Carry Bag

This my second piece in the Spruce Grove Gallery - Form Redux Show which opens today.

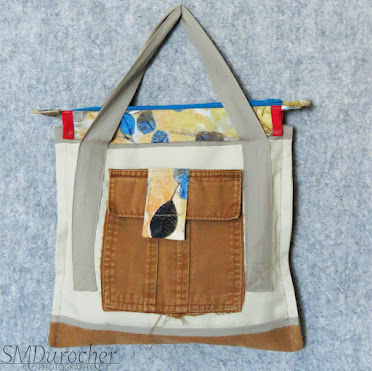
It is an Every Day Carry Bag which was made with upcycled fabrics from a box of fabric given to me by Michelle at ReImagined Fabrics. You can find her on Instagram #reimaginedfabrics  Other bits were chosen from my thrifted/reclaimed stash as well as pieces collected from the ReUse Center.

I made myself one of these bags several years ago.

Title: Upcycled Every Day Carry Bag

Size: 15.00 T x 13.00 W inches

Medium: Fabric Bag with embellishments


I started with the beige cotton fabric for the main part of the bag.  All the seams are finished inside so no raw edges anywhere.  I added a zipper insert made from a beautiful leaf patterned fabric from this box of scraps and squares with a teal zipper chosen from my stash of reclaimed zippers.

I chose a taupe microfiber for the handles which means they will last a long time.

The bag features 3 pockets. The front pocket was made with the accent fabric and I added a coordinating blue button that I found in my stash. The back pocket is a reused Carhartt pant pocket with a velcro closure. I sewed the pocket to the back of the bag which creates a pocket and added an accent fabric tag to the help with the opening the Velcro on the ginger colored pocket. I added some teal slow stitching to the flap of the pocket.

The ginger heavy weight fabric was added to the bottom to show less dirt and will wear much better than the beige cotton fabric. 

A few pieces of tomato red bias tape was added as an accent color which was again pulled from my thrifted supply.

I added a little bling on the zipper pull which was brought from a ReUse Center donation.  

Inside I added a clip for your keys which again was found at the ReUse Center.

It is on display at the gallery and is for sale.  The reception is Saturday April 27th at 1-3pm.


Information on "My Bag" line:

Saturday, March 30, 2024

Slow Stitching - No. 013 - Friendship Star

The prompt for week 13 of the slow stitch challenge 2024 at K3N Cloth Tales was  Friendship with a nine patch square as the technique hence a Friendship Star.

I am not a traditional quilter so nine patch is something I have not done before. Then to make on a small scale and hand stitch it was another level of challenge.

I started with 2 inch squares but somewhere along the way I ended up with extra fabric I had to cut off the the center square was a bit too big.  Math is not my strong point.

Friends are important.

I chose to put the print on the star and the aqua on the surrounding squares. I then added the yellow and teal strips around the square to make it work better when I put these squares into a project at the end of the year.  Once the nine patch was done, I added a white cotton layer on the back and id the top stitching.  Really happy with this piece.

Friday, March 1, 2024

Sewing Project - Recycled Fabric - Everyday Carry Bag

I made a bag from all recycled materials.  The fabrics came from the box from Michelle at ReImagined Fabrics.

The bag is beige cotton duck fabric. 

A beautiful leaf pattern cotton fabric was used for the zipper insert, the tab on the front pocket and the tab on ginger pocket.  

I added a piece of ginger cotton denim to the bottom of the back to improve wear ability and keep it cleaner. 

I chose a small piece of red for the trim on the zipper insert, the loop on the front pocket and the key hook on the inside.

The bag features 3 pockets - the front leaf patterned one, the back ginger denim one, and the space between the ginger pocket and the bag.

It has a teal zipper at the top in the normal for me completed finished zipper insert

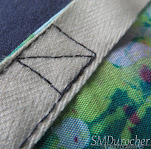
I used taupe cotton poly blend for the handles and made them as long as I could. They are placed on either side of the pockets.  They are well reinforced in the stress areas.

The the seams are finished which looks smart and there are no raw edges in sight.

I added a tab on the ginger pocket so that it provide better leverage to open the velcro closure. It is center which the velcro was not.
This button is from my stash of recycled materials as well as the teal zipper.

It was the perfect color to match the teal color in the patterned fabric.


I included a keys hook on the inside so they will always be at hand and easy to find in the bag.

The bag measures 12x12 square so it is not a big bag.  I guess, you would call it purse sized.  


For information on the "My Bag" Line

Tuesday, January 30, 2024

Sewing Project - ReUsable Bags - Polyester

 
I finished another 5 bags for donation today.  I had a piece of polyester fabric which I had bought when I thought I would be able to sell ReUsable Bags.  This fabric was great colors teal, cream and chocolate brown.

I managed to get 5 bags from the piece.  They measure on average 16 inches wide and 18 inches tall.

The seams are all nicely sealed french seams as the fabric frays like crazy.

The top hem is 1.5 inches folded over double.  I inserted the handles on the first seam at the bottom of the hem then pulled the handles to the top and top stitched the top edge of the hem to secure the handle in the upright position giving them 2 seams to keep them in place.  That should do. 

The handles vary from grosgrain ribbon in a variety of widths and lengths and one regular ribbon.  I made them as long as possible given the length of ribbon.  The ribbons mostly came from the ReUse Center so they have become useful and will be returned to the center.

This is the last of the polyester fabric so I am glad of that.

Saturday, August 19, 2023

Take Out / Take Away Bag

In my city, the Single-use Item Reduction bylaw came into effect on July 1, 2023. That means when I order take out food at a restaurant - some single use items would only be provided when requested and some would be offered at a cost. Plastic bags for take out were banned and paper bags would come at a cost of $.15.  I am okay with that but I still need a bag to bring my food home in so that it does not end up spilling in my car.

I set out to make such a bag.  I generally would need a small bag when I hit Tim Horton's or Wendy's but I got Vietnamese food the other day and that container was much larger.  I determined that I needed a bag around 9 inches square, the sides not too high and a way to close that would keep the food inside. Would be nice if it folded flat when I stored it in my car.

Here's is the result.


The floral fabric is a couple of strips of heavy cotton fabric I found for free at the ReUse Center last week.  The weight was a good start to having a sturdy bag. The strips were only 8 inches wide so I had to piece the bottom and I made it double layer so the inside would be nice with no seams showing.

I cut 2  pieces of 9.5 inch wide and 8 inches tall. Then I cut 2 strips of 9.5 inch wide and 2 inches tall to supplement the other pieces to end up a bottom that was 9" square finished.

I sewed the narrow strips to the large pieces on the 9.5 inch side.  I then ironed them and top stitched the seam.

Once both were done and put right sides together and sewed all the way around leaving a space to turn it right side out. Then I ironed that flat.  

The side piece was cut 8" tall and 38 inches long. Once layer was floral and the back was teal microfiber fabric which will be on the inside. Stitch all the way around and turned it right side out.

I pinned it to the bottom with lining on top of the bottom.  Once I identified the corners every 9 inches and sewed a seam from top to bottom of the eight inch length on all four corners. This will help stiffen the sides.  Then I went ahead and sewed the sides to the bottom matching the corner seams with the corners on the bottom piece.  The ends were overlapped on the front of the bag, again to help stiffen the front of the bag. 

The inside of the bag is floral on the bottom and teal on the sides.  The take out container fits perfectly on the bottom of the bag.

The handles are asymmetrical in the front loop is short and the bag loop is long.  They are made of teal microfiber.  The strip was 6 inches tall and about 38 inches long.  I folded the strip in half and iron it flat.  I then opened it and iron each half to the center.  I top stitched along both the open side and the folded side which helps to provide some stiffness to the handles.

To close the bag the long back loop is pulled through the short front loop and the bag is closed.  The join is above the center of the bag so it stays level.


I had to make it pretty as well.  I cut a large scallop circle from the floral fabric and sewed it over the ends of the front handles with a zigzag stitch

I hand sewed a teal button in the center of the flower for a final touch.

I am very happy at how this bag turned out.  
  • It is large enough to handle any take out order I will make, 
  • It will hold the contents securely inside the bag, and
  • I have a loop handle to carry it along with anything else that is in my hands
  • It folds flat and I can tuck it into a pocket in the car so it will always ready at hand when I need it.

Friday, July 28, 2023

Sewing Project - Pinafore Jumper

I had a desire to make a summer jumper.  This is very unusual for me but I said to myself - okay.

The pattern was based on Cross Back Apron I made a few years ago.  

It hangs on your body from the shoulders and is easy to sew and easy to wear.  It just slips over your head and it adjusts to size very nicely.

I still had this apron so I chose that as the basis of my new project.

I had some purple fabric that I was going to use for the outer layer.

After some thought and discussion I decided to use microfiber for the lining.  It would be slippery, dark and make the garment not see through.

It was a deep purple color so fortunately it would be okay with the fabric I had chosen.

I decided to make the lining  my pattern since I had lots of that fabric and could cut another if I needed to.


Since the apron did not meet in the back I knew I would have to add some including a seam allowance for the back seam.

Top Left - I added a wedge in the front by leaving the top on the fold and added a good amount in the front and some to the length too.

Back - I added several inches - this would fall about mid back for me.

Back - I then kept the angle down to the bottom hem area and added length.

Front Bib - Added just a bit for a seam allowance.

I sewed the back seam and then "tried it on" to see if it was going to be big enough and not too tight.  It seemed pretty good.  I did cut a piece of brown paper as a pattern.

I had to change my mind about the outer fabric because the width of the first fabric was not wide enough.  I chose a tie dyed white cotton from a duvet cover I bought for the fabric.  That was plenty wide enough to cut the piece.  I tried to keep the colors to the purple and turquoises in this fabric.  You can see some pink/coral on the straps and some at the very back.  It would be okay with the purple lining fabric, too.

I then sewed the back seam.  I then placed the 2 layers right sides together and sewed the top seam around the bib and across the back and back up the side of the bib.  I then turned the garment right side out and ironed it and top stitched. 

The straps were cut 3 inches wide, sewn and then ironed with the seam down the middle of the back side of the strap.  I top stitched both side of those.  I then sewed one end of each strap to the corners of the bib. 

Then I started figuring out where the straps should cross and where the other ends of the straps should be sewn to the back to hang properly.  Once pinned I sewed those in place with a square with back stitching.  I then folded it in half front wise and evened out the bottom edge and then folded it the other way and did a bit more adjustment. The bottom hem is .5 fold over then 1" hem sewn by machine.

It turned out nice but I felt it was a bit on the light color for me so I had a discussion with my sister about dying it.  I had purchased Rit Dye in Teal which is a hot water process.  I did not have what I needed to do hot water so I took the Dylon fabric dye she had in Sea Green.

With the cold water process the dye gets dissolved in hot tap water and the same with the salt. These are then added to the water in the plastic pail which is enough to cover the garment. 

The garment is wet before putting it into the dye bath and then it has to be stirred constantly for 30 minutes and then regularly for the next hour. I did it every 15 minutes.  Then the garment is rinsed until the water runs clear.  I did this in the white bathtub and that took 5 times.  I did dye some of my white flannel for unPaperTowels with the left over dye.  Once that was rinsed as well I just ran a small  regular load of laundry.

Here's the final pics.  It did even out the background so that is a good thing.  I was expecting to get more color than I got with this process.  I expect that a cold process may produce lighter results, maybe the color was supposed to this light but the water still had color in it.

Pockets - I am glad to have added the narrow strip on the slant of the pockets.  I did have to move them up about 3 inches and I forced myself to do right away otherwise it would have been frustrating to use them.

It was a great project.

It will go faster the next time as this was a learning process for making the pattern and the dyeing process.


Sunday, January 8, 2023

Small Gifts - Car Cup Holders Coasters - Bunch 3

Another set of bespoke Car Cup Holder Coasters for nieces and nephews.

Top row - A new house for a niece who is moving in the new year.  A daisy for the wife of a nephew. An "D" initial for a nephew.

Middle row:   Yellow stars of a compass on navy with navy cotton and navy tabs.  I'm not sure I succeeded with my representation of a tire on the middle one. Red background, black tire and 2 tone grosgrain tabs. Black maple leaf on red for a niece with white tabs.

Bottom Row:   Airplane for the pilot nephew - ivory on black with grey cotton and ivory tabs. "T" initial for a nephew in orange and brown background, grey cotton and orange tabs.

Small Gifts - Car Cup Holders Coasters - Bunch 2

I made another set of Car Cup Holder Coasters.

These are for the guys in the family.

The first is J for the car he drives. A grey felt "J" on black fleece with black cotton on the back with two tone grey black grosgrain ribbon tabs.

The set on the right features the ocean and sunset in felt on teal fleece with teal cotton on the back. Yellow grosgrain ribbon tabs. 

Left again are 3 leaves in yellow, green and orange felt on green felt with orange grosgrain tabs.

Bottom right features an acorn designed with felt on black felt with black cotton on the back and brown grosgrain tabs.

Bottom left is the evergreen tree with sun and hills with yellow denim cotton on back with black grosgrain ribbon tabs.


Sunday, October 16, 2022

Small Gifts - Oil Diffusers - One of a Kind - Set 3

I am loving this creative process of making cool felt diffusers for these diverse type of containers. 

Here, I have a two inch square crystal napkin holder laid down flat with the hole facing up.  I made a different type of felt flower for this one.  You can find the tutorial for this flower here

Teal Blossom - I chose teal felt and cut six 2 inch circles then a yellow one for the center of the flower and a green one for the base.  I thought the green one suggests leaves without having actual leaves imposing onto the edge of the glass. I really wanted to be able to see the 4 corners of the napkin holder.

The video suggests hot glue but I chose to stitch this flower together which makes a cleaner end product.

I then stitched it to a white felt ball which helps the flower stay in place on the napkin holder.

This flower design is full and very easy to put together.

On the right is a photo of the top. 

With the oil being placed on the yellow center it will keep any discoloration to a minimum.

With Love Cup - This is a beautiful Mikasa - With Love pattern ivory bone china cup from the early 1980's.  

I decided to make the diffuser an ivory felt stuffy decorated with a  round petal pattern. 

I found this Petal Pattern video on line. The opening of the cup measures 2.75 inches but I needed to add some for seams and for puffiness. I cut 2 ivory felt circles measuring 3.5 inches in diameter and sewed them together with a 1/4 inch seam leaving an opening to turn it inside out. I then stuffed it with cotton batting and slip stitched the opening closed.  I then created the petal pattern according to the video using warm rose yarn to match the cup.

To accent the center I added a warm green circle topped with a gold metal filigree accent which was stitched on with the same yarn. 

I have created a spacer to place under the petal to keep it at the top of the cup.  I could keep the drops of oil to the center to lessen an discoloration of the ivory felt.  This diffuser would fit in nicely in a kitchen, a dining room, a reading nook or even on a bedside table. 

Time to Unwind - A ball of variegated yarn to encompass many shades of brown and reds which brings in the colors in the basket as well.  I created the ball by hand to be just the right size for the basket.

I created custom sized knitting needles from skewers cut down to about 4 inches.  I glued wooden beads to the blunt end.  Once the beads were dry I used Distress Ink of Antique Linen and Vintage Photo to add some color to the needles to be more in keeping with the overall color scheme. 

I added the More Mustard tag which was color printed and punched with the 2 inch circle punch.

Perfect quiet time to enjoy the aromatherapy of essential oils.

Triangular Trio - A set of three felt flowers with white pom pom centers set in a triangular bottle.

The flowers are purple, grey and light blue.  Each has a yellow fringe surrounding the white pom in the middle.

Each flower has a twisted silver wire stem which is terminated at the bottom with a iridescent ebead just before the end curl.

I have wrapped a length of yellow grosgrain ribbon around the neck of the bottle to repeat the yellow in the bouquet.

The essential oil can be applied to either the felt or the pom pom. The essential oil may discolor the white centers.

I wanted a less flowery option in a diffuser.

Tiny Beer - This diffuser started with a vintage etched crystal shot glass with a nice handle. It measures 4 inches tall. 

I rolled a piece of ginger colored felt to be the beer and placed it in the bottom of the glass.

Now I needed to create the frothy foam at the top of the drink.  I rummaged through  my yarn stash to find a messy white yarn which I wrapped around a white pom pom.  I secured the head to the beer with hot glue.

I think it looks great!

Wednesday, October 12, 2022

Small Gifts - Car Cup Holder Coasters

A car coaster collects the drips, drops, spills, crumbs and other stuff that ends up in our car cup holders.

I made up some with supplies I had on hand. These were made with felt circles.

I started with an 3.25" circle which was hand cut.  I stacked onto it 3 more circles of various colors and sizes.  I took them to the sewing machine and stitched in a spiral manner from the outside to the center of the coasters. Since the circles were felt buttons I added a coordinating thread through the whole coaster and knotted it on the front.  This can be used to remove the coaster from the holder.  These can be washed and reused. 

I made 10 sets so we will see how things go.  I mixed and matched a bunch of colors.  Red and White Canadian in the top left corner, the Elks one in position three in the top row with a few summer colors and Christmas red white and green.  The tags are 2.5 inches with rounded corners and it was placed between the 2 coasters which are back to back. They are stitched on with white cotton thread. 

Monday, January 17, 2022

Art Portfolio Carry Bag

As I de-clutter I am finding pieces of art so I decided that I needed a place for those to be stored all in one place. I decided a bag to hold a mat board sandwich would work. I have a piece of mat board 32"W x 25"T.  After checking the pieces of leftover fabric stash, I had a navy piece that would work with the mat board.  When we emptied Mom and Dad's apartment a piece of batik fabric that was made by my brother in art school was returned to me so I decided that would be appropriate for this project.  I chose a couple of other colors to complement the bag.

I needed sturdy material for the handles so I chose polyester twill tape in an warm white color.  They will run the full height of the bag to distribute the weight.

I wanted a flap over the top because I did not have a zipper long enough to close the top.  By adding a piece of teal which matched the batik that worked well.

I added the piece then worked out the flap and where the bottom would be.  The bottom was just a folded edge and I thought it needed to be reinforced so I sewed a narrow strip of the navy along the bottom. I also sewed box corners to allow for the depth of my mat board sandwich.

The mat board sandwich will be 2 pieces of similar sized mat board stuck together at the bottom with duct tape. 

I will leave about an inch of tape between the 2 to allow the sandwich to grow.

It is quite big but I thought I would maximize the use of the fabric and board I had.  Maybe I am destined to do a large art piece.  The sunrise piece is quite large.


The batik piece on the front serves as a pocket.  You can see a pad of drawing paper peeking out of it in this picture.

It is quite large and should fit any type of paper pad I need should I eventually take to a class.

A button on the pocket keeps its contents in place. A twill tape loop slips over the large purple button.
All the stress point have been reinforced.

Now I needed to keep the top closed and I decided that I would use a couple of pieces of velcro 3 inches wide near the handles.  The pieces were sewn on to the front and the closing top flap.

Now, I had stitching  showing on my flap so I placed a strip of batik fabric across the flap to look pretty and cover the stitching.


Next,  I needed a visual reminder as to where the velcro was and a grabbing point to pull on the flap.  

I added 2 short loops of the same twill tape I used for the handles.

I think this bag will work well to store my art pieces and allow me to find them when I am needing one of them.

I need another piece of mat board before I can assemble my sandwich.

Happy with this project.