Showing posts with label bling. Show all posts

Tuesday, April 23, 2024

Art Show - AAC - Redux Show 2024 - Upcycled Every Day Carry Bag

This my second piece in the Spruce Grove Gallery - Form Redux Show which opens today.

It is an Every Day Carry Bag which was made with upcycled fabrics from a box of fabric given to me by Michelle at ReImagined Fabrics. You can find her on Instagram #reimaginedfabrics  Other bits were chosen from my thrifted/reclaimed stash as well as pieces collected from the ReUse Center.

I made myself one of these bags several years ago.

Title: Upcycled Every Day Carry Bag

Size: 15.00 T x 13.00 W inches

Medium: Fabric Bag with embellishments


I started with the beige cotton fabric for the main part of the bag.  All the seams are finished inside so no raw edges anywhere.  I added a zipper insert made from a beautiful leaf patterned fabric from this box of scraps and squares with a teal zipper chosen from my stash of reclaimed zippers.

I chose a taupe microfiber for the handles which means they will last a long time.

The bag features 3 pockets. The front pocket was made with the accent fabric and I added a coordinating blue button that I found in my stash. The back pocket is a reused Carhartt pant pocket with a velcro closure. I sewed the pocket to the back of the bag which creates a pocket and added an accent fabric tag to the help with the opening the Velcro on the ginger colored pocket. I added some teal slow stitching to the flap of the pocket.

The ginger heavy weight fabric was added to the bottom to show less dirt and will wear much better than the beige cotton fabric. 

A few pieces of tomato red bias tape was added as an accent color which was again pulled from my thrifted supply.

I added a little bling on the zipper pull which was brought from a ReUse Center donation.  

Inside I added a clip for your keys which again was found at the ReUse Center.

It is on display at the gallery and is for sale.  The reception is Saturday April 27th at 1-3pm.


Information on "My Bag" line:

Saturday, June 25, 2016

Wedding Card - Purple Hearts

I made this card for the wedding today. 

I used a piece of spatter ink background paper I made when working on the gift for this couple.  This was cut leaving a border and adhered to a coordinating purple card. 
I wrapped a piece of 7/8 inch white grosgrain ribbon across the bottom third of the card.  I pulled it through a slit in the fold and brought the other end to the inside of the card and tape down the ends. 
I cut the sentiment from the same purple card stock as the card with one of the Tattered Lace Vertical Sentiment thin dies.  I layered it onto a piece of non shed silver glitter card stock leaving a tiny edge.  I added 3 silver tiny brads to hold the purple to the silver.  This was adhered to the card front with 3D foam tape aligned along the left hand side.
I punched textured card stock painted with the purple and iridescent inks with the Stampin Up Sweetheart punch.  These were adhered to the card front to the right side of the greeting.
I added silver bling rhinestones along the ribbon on the right hand side.

Tuesday, July 15, 2014

Cards- Damask Top Note

I made a couple of these cards for my exchange group.  I started with cards I bought at a craft store.  They were thermal embossed black on white.  As soon as I saw them I knew what I would do with them.  Paint them of course!  I used Tim Holtz Distress Stain and rubbed it all over then wiped it down to bring out the shine on the embossing.  This color is TH Victorian Velvet.  I cut the decorated piece and a solid piece of black with the Stampin Up Top Note die.  I then trimmed the decorated one on the stitched die cut line and mounted it onto the black one. I cut these in half cross ways and used half on each card.  I dyed the small silk flower with the same distress ink then mounted a large white silk and the small onto the half of the Top Note.  All held in place with a black mini brad.  I stamped the greeting in the right hand corner with a clear stamp and Versafine Onyx ink.  Added a bling rhinestone on the i in birthday.
What can you find that allows you to change it and make it your own?

Thursday, May 8, 2014

60th Wedding Anniversary - Wow!

What a milestone!  My Mom and Dad will have been married 60 years in a few days.  We are having a celebration. I made this card for them.

It's the diamond anniversary so I chose a white on white theme. I started with a warm white card onto which I mounted a piece of pearl card stock with was embossed with the Cuttlebug Victorian embossing folder.  I trimmed it to leave a small border. I cut hearts with the Sizzix original red Hearts die from pearl card stock with a silver tone.  I left one plain and embossed the other with the Cuttlebug D'vine folder. I mounted them onto a rectangle of warm white card stock. This was adhered to the embossed layer.  I wrapped a piece of white seam binding around the whole piece and tied a knot on the front.  Trimmed the ends. I created the greeting by starting with one I found on line at Netty's Cards. I printed the greeting, placed a small circle in the centre and another larger one behind it.  This was all placed on a Stampin Up Scallop Circle. This was mounted to the card front with 3D foam tape.  I placed a large bling in the centre of it.

Friday, January 3, 2014

Christmas Card Challenge - January - Embossing

The challenge for January is a technique - embossing with all it`s variations.  You can use embossing folders, heat/thermal embossing, letterpress, hand embossing, stencils with a stylus to mention a few.  What comes to mind for you? This leaves the subject matter totally open.  Give it a try and leave me a comment with a link to your card.

Here`s my card for this challenge.
I chose an embossing folder by Cuttlebug which is called the Three Kings.  I inked up the background side with navy ink so my sky would be colored.  I ran the folder through the Big Shot with a piece of white card stock and then trimmed it down to fit it onto a navy card.   I added the greeting with a small clear stamp in the bottom left hand corner.  I added a bit of bling with an self adhesive rhinestone in the middle of the star. 

Here's my second attempt with a Stampin Up! Lovely Lilac die ink pad.  Gives a different look and is messier. It took several tries to get one embossing I was happy with.  I like the larger greeting on this one, which was done with a clear stamp.  I was able to create some texture in the sky with this ink pad.

Monday, December 23, 2013

Cards - Christmas for Girls

Here's another card for the girl at work.  Same sketch as previous but in a monochromatic color scheme.  I cut the Tim Holtz Cabinet die from Figgy Pudding by Basic Grey.  I selected a warm grey card.  I embossed the vellum with the Cuttlebug Victorian folder.  I placed white silk poinsettias in 2 different sizes and a small white silk in the centre and held them all in place with a pewter flower brad. I wrapped the white organza around the two layers and tied a knot on the left.  Punched the green color printed greeting with the Stampin Up! Artisan Label punch and added a small bling rhinestone above the Merry.  Punched another from silver card stock and cut it in half width wise and offset the onto the back of the greeting.

Card - Christmas Cards for Girls

I made these cards as a result of a request from one of the girls at work for Christmas cards for her girlfriends and Mom.  I chose the Christmas Magic designer paper by Fancy Pants Designs. It was cut with the Sizzix Tim Holtz Cabinet die.  I added a Baja Breeze card and layered a piece of embossed vellum in between.  The embossing folder is Sizzix Textured Impressions Sugar & Starry Night By Basic Grey.  I wrapped white narrow organza ribbon around the die cut and tied it in a knot on the left hand side.  I punched the Cherry Cobbler color printed greeting with the Stampin Up! Artisan Label punch.  I punched another one from Cherry Cobbler and cut it in half width wise and then layered them behind the greeting.  I added a small bling rhinestone above the Merry.  This greeting is adhered to the card front with 3D foam tape.  I placed 2 white silk poinsettias and a deep wine flower in the centre and pushed a hole through all the layers and held them all in place with a coordinating large brad.  The card on the right is punched with the SU Decorative Label punch.

Thursday, September 27, 2012

Card - Invitation Samples

I had a couple approach me to design some invitations for their 60th wedding anniversary which is the diamond anniversary.
Here's the samples they did not select. Check back later for their selection.
I selected a black card.  I embossed a white layer with the SU Elegant Bouquet folder.  I printed a 60 on to bottom right hand corner.  I glued the white layer to the card front then applied several crystal rhinestones.

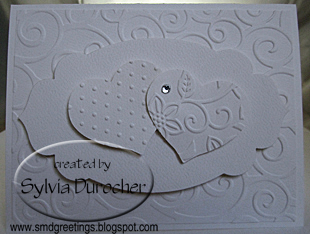
This card was a white on white concept.  I started with a white card and added a layer embossed with the Cuttlebug Devine Swirl folder. The next layer was cut with one of the SU Apothecary Framelits onto which I layered 2 die cut hearts which were embossed with Cuttlebug Swiss Dots on left and Craft Concepts In Bloom on the right.  I added a crystal rhinestone on the left heart.  The framelit die cut and the hearts were raised with 3D foam tape.

I chose ivory card stock for this one.  I printed some SU! Designer Paper from the Beau Chateau series. I slipped a Cuttlebug ribbon slider in Marina Mist onto the ivory organza ribbon and wrapped it around this layer and taped the ends to the back. I added a crystal rhinestone heart onto the centre of the ribbon slider.  I color printed the "invitation" on ivory card stock and cut it with another SU! Apothecary Framelit.  It was mounted to the card front with 3D foam tape.


Here's the one they selected.

I started with a dusty lavender card.  I embossed a white layer with the Cuttlebug Rebecca embossing folder and trimmed it to leave a tiny border.  I cut a lavendar scalloped oval with a Spellbinder nestabilities.  I color printed the information in lavendar onto white card stock then cut it with the corresponding smooth ovals in the SB nestabilities. These were adhered to each other then the element was mounted to the card front with 3D foam tape.

Thursday, July 12, 2012

Card - Angel - Christmas Challenge

I made this card for Holly Jolly's Christmas Challenge this week which is Angels.
I cut the angel with the Cricut and the Best Images of 2008 cartridge. I cut the filigree layer in silver metallic paper and the layer 1 in black card stock. Once cut, I glued the silver one over the black one. I found a scan of the Christmas Carol - Hark the Herald Angels Sing - which I colored in red and re-sized it to fit on the card front.  Once I had decided on red, I added the red thread around the angel's waist. I printed the carol on white card stock and then trimmed it to leave a border.  I selected a red card to match.  I glued the song background to the red card and then glued the angel to the background. I added a bit of rhinestone on the horn.

Thursday, June 14, 2012

Card - Wedding Card

I made this card for a Wedding Card Challenge.  I started with the designer paper and found some taupe card stock to coordinate.  I cut the hearts with the Sizzix Tipsy Heart die in pearl white and taupe.  I glued a piece of DP to the top of the card then cut a scallop border a Die-namics Die.   I added a length of white satin ribbon across the join between the two.  I placed bling on each scallop and one on the heart.

Monday, March 26, 2012

Card Club - Punch reveals greeting

Today is Card club. We have a couple new members.

This is a very simple card.  I chose double sided designer paper.  I cut the top layer at 2.75".  The lower layer is trimmed leaving the small space between them.  The greeting is color printed onto the card itself.  The top piece is punched with a portion of the SU! Decorative Label Punch revealing the greeting.  I added a row of bling under the greeting.

Friday, December 23, 2011

Christmas Wreath

I made myself a new wreath for my office door.  The one have been using is years old and the color scheme came from the eighties.  With all the Christmas stuff on sale at Michaels I managed to get all the stuff on 70% off.  Yahoo!  The pinecones go well with the color of the door and I added a bit of silver accents. I'm considering it a work in progress and may improve it next year when it comes out of the box.

Thursday, August 25, 2011

Card - CST Challenge #15 - SSS Sketch

I made this card for the CST challenge based on this sketch. I started with another photo of a lily from my Mom's garden. It's got this really nice dark purple edge which makes it look exquisite. I printed the lily and cut into an oval. I mounted it onto a coordinate plum textured cardstock rectangle. I chose an cream card to match the center of the lily to which I added a couple lines of embossing on the top half using a border folder. I stamped the greeting in Orchid. I added a moss green satin ribbon. I glued the plum rectangle on an angle. Found a silk flower for the top left corner and bling for the bottom right hand corner.

Wednesday, June 22, 2011

Card - CST Challenge #6 - Bling

I selected a brown card with a top fold. I cut a white scallop border with a Die-namics die and added sticky turquoise rhinestones (the "Bling") in the centre of each bump. I cut my turquoise piece, ripped the edge and glued it over the straight back edge of the scallop border. The blue in each piece match. I placed a dragonfly, a flutter trail and greeting in Corel Draw and printed it onto white card stock. I trimmed the piece then ripped the edge similar to the turquoise layer and glued it onto the card front.