Showing posts with label QAYG. Show all posts

Monday, September 23, 2024

Slow Stitching - No. 039 - Monochrome

Another piece for K3N Cloth Tales Slow Stitching Challenge 2024.

Week 39 - Monochrome - Pick a Color any Color - Green - House Top.

I decided to do my layout based on K3N's Wonky Wednesday last week of House Top.

I chose my bright piece in the center and then hand stitched my strips around till I had covered my foundation piece.  I trimmed all sides when I was done. 

I then top stitched in green thread along the inside edge of each strip. Going around the perimeter of the center green square. 

Tuesday, June 25, 2024

Slow Stitching - No. 026 - Quilt as you Go (QAYG) Hexagons and Applique Dots

 Another week with Kathryn at K3N Cloth Tales and her slow stitch challenge.

Week 26 - half way point in the challenge and the year.  The prompt this week is inspired by the QAYG Hexagon at Marion's World and the Applique Dots by Jeri Bellini.

I made my hexagon almost 5 inches across at the widest because I am putting them on quilt squares.

I found the pink fabrics in my stash pretty fast but I had to dig for the dark grey cotton fabric to match the leaves in the printed fabric.

I chose the Fly Stitch with white embroidery floss to go around my circle.  I added a layer of natural batting.  I then placed this onto my dark grey hexagon and folded over the edge over once then onto the front of the printed one.  I pinned each side and but a blind stitch to attach the backer to the front.  I let it sit over night and this morning I decided to add French Knots on the polka dot circle in dark grey floss.   This came together very easily.    If I make another I may applique a flower in the center.

Friday, May 3, 2024

Sewing Project - Picnic Placemats - QAYG - Red,Yellow and Blue

This is the last one for a while as I have to get ready for contractors on Monday.

The deep floral fabric in this placemat was the inspiration.  It came in the box of free fabric I received back in February.

I chose the main colors in it and added coordinating strips in the quilt as you go method. I used flannel as my foundation layer.

The zipper is upcycled and it had been cut along the way so I was able to make it longer.

I chose black for the zipper insert/pocket as well as the backing.

These ties are about 11 inches long.   These will be donated to Grandma Africa sale in June.

Sewing Project - Picnic Placemats - QAYG Warm Blues

These placemats are becoming fun to make, now that I have a system.  Here's the collection of warm blues scraps I had.

I did have more patching to do in this placemat.  Some of the scraps were not 12" long so I had to ad bits.  The zipper insert/pocket was great with a turquoise 9" zipper. The back is a light grey cotton poly so I did put grey in by bobbin so that my back seams would blend. The ties are 12" each.

Thursday, May 2, 2024

Sewing Project - Picnic Placemats - QAYG Warm Greens

After a trip out this afternoon, I made another picnic placemat.

This one featuring warm green fabrics.

I was able to get warm green cotton poly fabric at the thrift store so do the back and pocket of this placemat.

This one feels very nice because the backer fabric is heavier. 

It has a full layer of flannel as well.

Wavy stitching again to keep the layers together.

A dark green tie at 12 inches for both.

Sewing Project - Picnic Placemats - QAYG Blues

Another set of scraps put to good use.

This time I chose all blue fabric. 

I created the navy blue zipper insert/pocket on the right hand side first. 

I chose a piece of grey flannel and chose to make the size of the placemat this time. 12.5 x 17.5 inches.

I sewed on the strips of fabric starting from the right hand side close to where the pocket ended. I continued till I got to the left hand side. 

I created a tie from the polka dot fabric.  The back is a pin striped cotton poly fabric which I cut the size of the front.  I pinned the ties opposite the pocket and sewed all the way around leaving a space open to turn it right sides out.   I trimmed the fabric in the corners, turned it and pressed it nicely.  I put a line of top stitching very close the edge which closed the space I left open earlier.

I chose my wavy decorative stitch to quilt the 2 layers together 3 time across the placemat.

Another done!

Wednesday, May 1, 2024

Sewing Project - Picnic Placemats - QAYG Warm Colors

I sorted through my scraps this morning and gathered like colors to see if I had enough to make the front of the picnic placemat. 

I am trying to keep the pocket on the right hand side distinct from the rest of the placemat. I created the zipper pocket like an insert with the brown fabric.

I then cut a 13x13 inch square of flannel to which I sewed the various strips of fabric. 

I chose a beige cotton poly leftover for the back. 

I created ties from the same fabric.

I laid these layers facing right sides together and pinned the ties on the opposite side to the pocket.  I ran a seam all the way around leaving a space to turn it right side out. I top stitched the wavy line to define the pocket then added 2 more similar seams to quilt the 2 layers together.

I am happy with it.

Wednesday, October 30, 2019

Sewing Project - Quilt 6 - Yellow, White and Navy

I finished another quilt yesterday.  I am using those Crushed Curry floral squares again. You can see the first quilt where I used them.  That was a great deal on fabric.  I have enough for another quilt.

Final Size: 40.50W x 54.00T inches

Technique: QAYG Mom Style

Colors: Yellow, Embossed White and Navy

Squares: 9.5 inches

I decided to quilt as you go the columns this time.  A process my Mom shared with me. It will be more efficient in time and involves not cutting the backing and batting into small pieces.  The columns were sewn together with a pair of squares in matching colors as shown on the left. The backing was left in one large piece and I starting quilt on the left hand side.  On the first column you have a roll of backing and batting in the throat of your machine but as you move right the bulk ends up to the left of the needle.  The first seam was the first column and the navy strip then I ironed the strip over and added the 2nd column.  Stitched again and iron that one over to the right. Left to right goes like this: Column 1, Navy strip, Column 2, Column 3, Navy strip, Column 4

Quilting: Diagonal across the 9.5 inch squares in a pattern which makes these large diamond shapes in the center panel.

Binding: Navy at 2.5 inches.  Sewn to the front, folded to the back and finished from the front to catch the fold over on the back.  Makes a really nice finish on the front.

I decided to leave the striped flannel as the backing to provide a warm and soft layer.

I paired the yellow floral squares with white embossed fabric which adds to the quilt but not another color. Coordinates with the pattern in the yellow squares.

I was limited in the amount of flannel I had so I made it 6 squares tall and 4 squares wide.  I wanted to increase the width so I added 2 navy stripes which helped to bring the navy I was going to use for the binding.

Lessons Learned:
  • This process is definitely faster in putting the quilt together.  
  • I have decided to use a neutral thread on the inside seams. I am getting some cones of thread from a lady at quilt group.  Grey, Black and White.  That will help a lot. Thread is expensive.
  • Adding another row of squares helped with the symmetry in the design of this quilt.

Thursday, September 26, 2019

Sewing Project - Quilt 5 - True Blue & Floral

I completed another quilt today.  When I go to quilting on Mondays and cut squares then I want to get the rest finished.  I can't really keep up this pace.  We will have a 3 week break coming up.

Final Size: 40" Wide x 49" Tall.

Fabric:
Cotton fabric which I bought at the Grandma Africa sale last year.  The True Blue solid worked really well with the cool floral.   I had 1/2 yard of each.  I had to piece 4 squares to get the 10 of each I needed. The back and sashing areTaupe 100% cotton.

Squares:
I cut 10" squares for this one to make it a bit bigger.

Quilting: I sewed the front of each column adding the taupe sashing in the right places.   More about that a little later.  I then placed it on the batting and backer and quilted each square on the diagonal corner to corner.  Once quilted, I cut the other layers to the size of the front.

I almost got all the sashing right but forgot one on column three and only discovered it then I was starting to put the columns together so I had to do some ripping out.  I added the sash between the squares where it belong but now my batting and back were short.  I had to add a strip to both.
I also put one column on backwards and had to rip it out and put it right. There were some distractions going on so my concentration was broken. 

Binding:  I cut binding 2.5 inches wide and 190 inches long from the taupe solid. This time I sewed it to the back and pull it forward and top stiched on the front.  Not sure I would do that again.  Check out the tutorial here.

Column Assembly: I used the Quilt As You Go method to assemble the 4 columns together.  You can check the tutorial here.

My take away from this quilt: 
  • Love the colors!
  • Quilting in columns takes less time and make the quilt softer
  • I used a straight stitch for the tacking down of the sashing instead of the zigzag which was OK
  • The quilting pattern did leave long areas with no quilting so maybe not the best.
  • Quilting and sashing when things have to be in a particular order is challenging.  I did mix up the columns.  It looks good but not as I had planned.
  • Binding should be sewed to the front and brought to the back.


Tuesday, September 17, 2019

Sewing Project - Quilt 4 - Fish Strips

I have finished another quilt.  I wanted to try a QAYG strip quilt which has less stitching as there is no top stitching in this one.

This one is larger coming in at 41 inches wide and 67 inches tall.

I used a piece of fish fabric cotton as the pattern in this quilt.  I added solids in yellow, brown and black fabric. I cut 4", 3.5" and 2.5" strips.

The back is a really soft fabric but I don't know the fiber content. It seemed a shame to cut it into squares so it was a strip quilt.

I added a layer of cotton polyester white fabric as the "batting" in this quilt. I started by pinning the batting to the wrong side of the back.

I started in the center and continued to add strips then iron them over and continued the process till I got to the one edge.  I then switched and went in the other direction from the center.  It is just a series of 14 very long seams. Once the strips were in place I then squared the quilt with my rulers.  I stitched all the way around about 1/8 in from the edge.

The bulk of the quilt was a challenge for the small throat of my sewing machine.  I rolled the quilt to get it through the throat and the length created a large pile behind the machine.

This will make a nice quilt for a boy.

My niece gave me this great piece of fabric from a stash she had been given.  Thanks so much.

This quilt took less time than my regular quilts made with 9.5 inch squares.  I chose grey thread so it would blend with the back.  I added a 2.5 inch binding in black fabric sewed with black thread.
You can check binding tips here.

Wednesday, September 11, 2019

Sewing Project - Quilt 3 - Yellow Turquoise & Navy

I have made another small quilt to whittle down my fabric stash. The fabric in this quilt is all 100% cotton.  The golden yellow print  was paired with turquoise sold.  I used navy as an accent on the yellow squares, the sashing and the back squares.

Squares - The squares were cut at 9.5 inches.  The quilt features 4 squares wide and 5 squares tall which translates into 40 W x 48 T inches. Total squares = 20.

Yellow - 10
Turquoise - 10
Flannelette squares used between the 2 layers - 20
Navy - 20

I used the same Quilt as You Go method as before.  I decided that I needed each square to have quilting to the edges.

I cut navy squares measuring 4" and folded over the edges over a card board 3 inch square.  Once pressed, I removed the card board and placed the navy square on the yellow square on the diagonal in various positions along that line.  I sewed down the diagonal, around the edge of the square and carried on to the opposite corner.  I then returned with another line of stitching about 1/8 inch apart and along the other side of the navy square and ended back where I started.

I placed a similar double line of navy stitching across the diagonal on the turquoise squares.

Sashing Method - I used Teresa Down Under's - Quilt-as-you-go with narrow sashing tutorial. I highly recommend this method.  It works so well.  I did  not hand stitch and instead used a decorative stitch to tack down the sash on the front of the quilt.

Binding - I used a 2.5 inch wide binding in navy cotton in the length of 180 inches.  I used this video to add the binding to my quilt.  How to Bind a Quilt: Foolproof Tips for Great Results | Quilting Tutorial

The back squares and sashing were done in the navy.  The thread I used was polyester.  I used 2 spools and filled the bobbin 4 times.

I started cutting square on Monday Night and finished by supper time on Wednesday. 


Friday, June 28, 2019

Sewing Project - Quilt 2 - Teal Turquoise Leaves

I have finished another quilt.  I wanted to improve the sashing process and cut down on the about of stitching to make it softer.

I chose this blue ivory leaf patterned fabric.  I paired it with an aqua and teal solids.  These are cotton polyester fibers and seem thinner than 100% cotton.  As these were large pieces I just could not cut it into small pieces.

I cut 9.5 inch squares with my quilting ruler from the blue leaves patterned and the aqua solids.  I cut 10 from each for a total of 20 squares which were placed in a grid of 4 across and 5 rows.

I needed to decorate the squares somehow. I decided to add a contrasting strip which will be top stiched to the square.  I cut a strip of fabric at 4" wide and the length of the fabric. Using a 3" card stock (pink) template I ironed the .5 inch sides over.

I laid the strip across the square leaving 1" margin at the top and bottom so it would not interfere wit the corners. 

I pinned and trimmed to the square edge.  The angle was right for the next square so it was very efficient use of the strips.  I put the aqua solid on the patterned and the opposite for the other squares.

It was top stitched very near edges.  I was able to sew all 10 square in a chain process then just cut them apart.  Another efficient process.


The 20 back squares are dark teal and cut again with the same 9.5 inch square quilting ruler.

I used a white cotton flannelette sheet for the "batting" in this quilt.  These 20 were cut to 9.5 inches square.

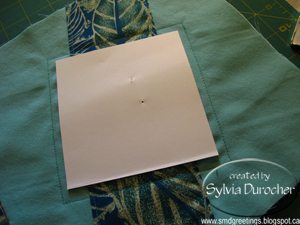
I needed a pattern to hold the 3 layers together.  I decided to cut a 4" square of card stock and then pin it to the square sandwich aligned along the decorative strip.  I just followed the edge with my sewing machine foot.  Repeated for all 20 squares.

In hindsight I could have quilted the squares when top stitching the decorative strip.  Remember that for next time.

The sashing between the squares is also dark teal.  I found this video produced by Teresa from Down Under. Quilt as You Go with Narrow Sashing. I followed the instructions and the quilt worked out really well.   The sashing between the squares was cut to 10 inches in length then trimmed once assembled.  She suggested hand stitching the back sashing but that was not going to work for me.  I selected a decorative stitch with thread that matched the teal really well to close the back sashing.

The sashing between the rows was cut to 40 inches in length.  The process for putting the rows into the quilt was the same as the assembling of the squares into rows but just wider.


That left the binding.  Again it is in the dark teal fabric.  I needed 170.5 inches of binding.  I cut strips of 3" until I had what I needed.  You can check this video The Ultimate Quilt Binding Tutorial with Jenny Doan of Missouri Star which gave me all the information I needed.  Even how to finish your binding so there is no sign of where you ended.  Worked perfectly.  I used the same decorative stitch to machine bind the edge of the quilt.

I am really happy with the overall look of the quilt, the weight is lighter, and the assembly really came together really well.

Monday, May 20, 2019

Recent Photos

I found a few open blooms on the ornamental chokecherry tree at the park this week.

It seems I have been waiting for them for a while.

Love these wonderful white flowers.  I hope to get some of the deep pink and burgundy ones as they open.


These are the birds I captured in recent days.  The top left is a female Red Winged Blackbird.  I did not know they have red on their wings as well until I saw this one spreading her wings.  Top Right: Male Red Wing Blackbird Of course, the males as always ready to strike a pose.  He was singing his heart out.
Bottom left is a Yellow Warbler.  These are so hard to spot.  I could hear it but it took me about 10 minutes to spot it in the tree now that leaves are appearing.  I swear it is the size of my thumb so it takes quiet and stillness to spot the movement way up there.  The bottom right is a Chipping Sparrow.  The birds were all in song this week. 

Working on organizing, de-cluttering and de-stashing.  I basically swapped these pieces of furniture.  The tray shelving used to hold the Cricut Machine in the craft space.  Now it holds my dry hydrangea in an olive oil bottle.  My Mom made this for me years ago.  It has not hung in this place and now it has a home.  Very useful to have a quick look before I head out the door.
I moved the tall shelving unit from the front hall to the craft space.  It now holds the Cricut as well as boxes of 12x12 paper.  Much of this will have to go because card making is no longer a product and skill I can sell in my market.

This is the project I worked on most of the last week.  I have a bit of a stash of fabric acquired when I was going to make aprons for Christmas last year.

As a first quilt in years it was a learning experience.  I worked on the Quilt as you Go method.  That was okay but the strips to bind was a bit of a challenge to get straight and cover the edges.

I am happy with the color combination.  This is Stampin Up fat quarters for the prints.  I was able to get a backer fabric in Crumb Cake.  The trio of small blocks was Cherry Cobbler, Crumb Cake and Soft Suede.

The project evolved from a jelly roll concept of strips to blocks.

I still have hand stitching to finish.  I used flannelette sheeting for a batting between layers.  It is quite stiff and heavy not sure it will do for giving to a charity that offers blankets to trauma victims.

Flickr Macro Monday Challenge this week was Copper.  I made a trip to the Antique Mall this week and found this half cup measure.  I love that you can see a finger print in the bottom right hand corner.

You can check out my Flickr photo stream for the photo I submitted this week.

Sharing with

Angie - host of Mosaic Monday #28

Mersad - host of Through My Lens 192