Showing posts with label circle greeting. Show all posts

Thursday, September 8, 2022

Card Exchange - Red & Black Daisies

I started with the plastic daisy accent and built the cards around that.  I added a silver cardstock scallop behind the daisy and held all this together with a black mini brad.

The designer paper is Stampin Up. I chose it for the black and white circles.  I wrapped a piece of grey twine around this layer and taped it in place at the back.  This was then adhered to the front of the black card base. I added the daisy accent in top left hand corner over the twine.

The greeting is color printed circle in red layer over a red Modern Label punchie. This was adhered with 3D foam tape.  A quarter sheet white blank insert was added.

This is very similar supplies with the opposite color scheme based on the black daisy.  I chose the portrait orientation this time. 

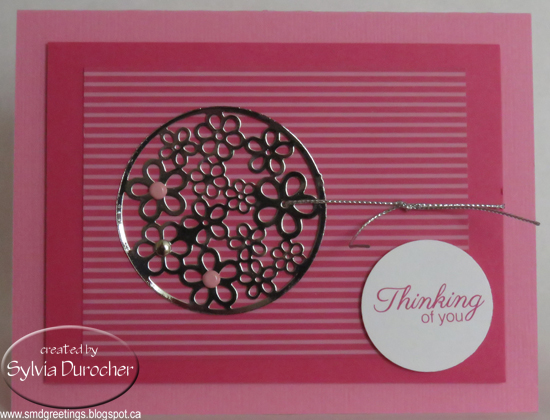
The twine was wrapped on the diagonal off each corner of the designer paper and knotted to the front then taped to the back.  The same paper was used here.This layer was adhered to a Real Red card base.

The scallop circle is Real Red as well and layered the same way.  Adhered to the top left hand corner.

The circle greeting is color printed in black and punched with the 1.25 inch circle punch. The Real Red circle is punched with the 1.38 inch then adhered to the back of the greeting circle.

This this then adhered to the card front with 3D foam tape.  

A blank insert and a white envelope rounds out the card.

These are off in the mail tomorrow.

Sunday, April 17, 2022

Exchange Cards - April

We are starting a new session of card exchange.  I've decided to get my cards ready ahead of time so I will not disappoint folks when I am busy moving.

I had these silver chrome metal earrings in my stash so I off the hanger and mounted them with brads.

I chose Striped designer paper by SU in Rose Red and cut it to about 4x3 inches. I adhered it to a piece of sold Rose Red card stock measuring 4.75 x 3.5 inches. I placed pink and silver brads into the holes in the larger flowers in the metal accent.  

I strung a piece of silver cord through one of the flowers and wrapped around this layer and knotted it on the right. This layer was then adhered to the front of a Pretty in Pink card with 3D foam tape.  I added the round greeting in the bottom right hand side again with 3D foam tape.

On this card it the same layout with different colors.  The card base is Chocolate Chip.  The designer paper seems to have pink and brown lines so I chose those colors for the brads in the metal accent.

I cut the designer paper larger this time to 4.00 x 5.5 inches.  Attached the silver cord in the same way.

The greeting is punched with the Modern Label Punch in color printed in Chocolate Chip with an offset of solid card stock same as the card base. It was adhered with 3D foam tape.

Wednesday, June 16, 2021

Special Birthday Card

My first card made with Stampin Up supplies since the major clear out of card making supplies in my craft space.

The card stock is Certainly Celery topped with a piece of Porcelain Prints DSP. 

I added twill ribbon in the same shade.  I added a short piece of Not Quite Navy tied in a knot.

I punched a couple of Five Petals punchies in those 2 colors. I added a small So Saffron flower in the center all held in place with a mini brad.  I adhered the flower to card front with 3D foam tape.  

The greeting is a color printed circle punchie with a NQN backer.

Wednesday, May 19, 2021

Cards - Thanks

Another few cards for Compassion House.

This is reusing a small thank you card. The words are silver foil.  

I just swiped a bit of watercolor in yellow across the words. Then I paired it with a deep yellow card.  

I added a yellow handmade paper flower in the top left hand corner held in place with a silver flower sequin and a silver tiny brad.

This layer was then adhered to the front of the card.


I reused a nature print I did a long time ago.  This is a maple leaf print using a variety of acrylic paints - brown, red, yellow and orange.  Once dry, I spritzed it with orange red watercolor.

I paired it with a warm red card base.  The nature print was adhered to the card front.

I added an oval color printed greeting in warm orange tones and punched out with the 2" oval.


A deep brown card with a designer paper layer of warm blue grey stripes. I wrapped a length of ivory grosgrain ribbon and tape the ends to the back. This was adhered to the card front.

I added the scallop circle greeting in ivory and warm blue grey.  The punches are all Stampin Up - scallop circle, 1 3/8 and 1 1/4 inch circles.  This was mounted with 3D foam tape.

I arranged the 3 hexagons and adhered with double sided tape.  Cut with the SB Hexagon Nestablities.

Tuesday, May 18, 2021

Seniors Week - June 7-13 2021 - Card Donations

This is the reusing of a nature printing I made many years ago.  

Nature Printing is a process that involves using real leaves, acrylic paint and white card stock.  I spattered the prints with watercolor after they were dry.

I trimmed the green leave nature print to leave a small border.  I adhered it to the front of a medium green card base.

I added a sentiment made with a Stampin Up Modern Label punch from the same green card stock as the card base and a color printed SU Word Window punchie.  This layer was adhered with 3D foam tape.


This card was made with an old card kit prepared for a class at a women's residence. 

The grey card base was punched with a circle border punch.  The sentiment is held in place with a metal circle pronged through the card front.   I added 3 daisy confetti held in place with tiny black brads. The insert is the full half sheet so it will show through the punched border.

I am using up old card kits which did not get used in class.  There was a time when I prepared more kits because I was not sure how many participants would show up. Later, I got smart and made participants pay in advance so I only prepared the number of kits which were paid for.

This card has a lavender card base with coordinating designer paper in the diamond pattern.  Trimmed to leave a small border.

The gold border was wrapped around and the ends were taped to the back.  The purple Lattice die cut was adhered to the designer paper too. Then this layer was adhered to the card front.

I added a flower accent and a Stampin Up Modern label sentiment where the purple punchie was offset from the white one. This was adhered with 3D foam tape.

Another old kit.  

This card has a black card base with a piece of striped warm blue green designer paper trimmed to leave a small border.  I wrapped the ivory grosgrain ribbon and taped the ends to the back. This was adhere to the front of the card.

The three hexagon shapes in the same color scheme as background were cut from designer scrap book paper with Spellbinder Hexagon Nestabilities set. These were adhered aligned along the ivory ribbon. 

I added a ivory tag sentiment with navy cording.  It was adhered with 3D foam tape.

The stack of card is growing!  I delivered them on Friday, May 21st.  They were gratefully accepted.

Sunday, March 21, 2021

Cards - All Occasion for my box

From the kits prepared for Compassion House a year ago I made a few cards for my upcoming family birthdays.

This is beautiful deep teal card base with a half circle of decorative paper, caramel seam binding tied on the fold, with a butterfly accent.  

The butterfly cut from deep teal with the Sizzix Winged Beauties thinlit set mounted on a ivory circle to highlight it's shape.


On this card it is a true blue A2 card base with polka dot designer paper in the half circle with the navy seam binding tied on the fold. 

Same Sizzix Winged Beauties thinlits set diecut on a white circle. 


Same supplies of the first just arranged in the portrait orientation.

On this true blue card base I added a circle greeting above the butterfly accent.


A bright orange card base with a geometric patterned half circle with a Hampton Arts tree diecut and a circle greeting. 

 A couple of nice male themed birthday cards with the same supplies as those above. 

The greetings are color printed and punched with the Modern Label punch by Stampin Up.


Thursday, July 30, 2020

Birthday Card Mom

A birthday card for my Mom who celebrates in July.   Her favorite color is blue so I have chosen a true blue card base.

I added a layer of designer paper in coordinating colors.  I then added a strip of blue card stock and then a narrower strip of green trimmed to the card edge.

I added flower sequins with Zots and a Stampin Up Decorative Label with a circle greeting.  This accent was chalked then mounted with 3D foam tape.

Tuesday, June 2, 2020

Ready 2 Go All Occasion Stack Kit - Set 02

Hexagon Trio

I chose an ivory card.

I wrapped the ivory grosgrain ribbon across the designer paper and taped ends to the back.  Adhered it to the card front.

I adhered the 3 hexagons to the bottom half of the card below the grosgrain ribbon.

I assembled the greeting by adhering the greeting to the colored circle then to the scallop circle.  The whole greeting was then adhered over the grosgrain ribbon with 3D foam tape.


Masculine DSP Split

I selected a kraft colored card.

I chose a designer paper by Creative Imaginations featuring stars.  I cut it to 4.00 x 5.25 then cut again at 3.5 inches.  Turned the small over and tape to 2 pieces back together.

Wrapped the designer paper layer with ginger grosgrain ribbon and taped the ends to the back.  Adhered to the card front.

Assemble the star accent and adhered to the front with 3D foam tape.

Nature Sticker

I layered the nature sticker onto coordinating card stock and trimmed leaving a narrow border.  I added 3D foam tape to the 4 corners on back.

I adhered an embossed layer leaving a small border to the card front.

Adhered the strip of black card stock onto the embossed layer.

I adhered the nature sticker to the card front.

I added the aligned on the black strip

Monday, June 1, 2020

Ready 2 Go All Occasion Stack Kit - Set 01

Split Square

I cut a 4 inch square of designer paper into 2 equal triangles by cutting top left hand corner to opposite corner with a paper cutter.   These were glued to the card front aligned to the top and the bottom.   That leaves a nice band of card color on the diagonal. 

I wrapped a length of white grosgrain ribbon around the card front and knotted on the front.  Trimmed the ends on the slant.

I assembled the flower accent by putting the small flower then the large flower onto the brad.  Press the prongs apart on the back.

I added the 3D foam tape to the back of the flower accent and adhered it to the card front.

A quarter sheet insert is glued to the right hand side.

Nature Sticker

I layered the nature sticker onto coordinating card stock and trimmed leaving a narrow border.  I added 3D foam tape to the 4 corners on back.

I adhered an embossed layer leaving a small border to the card front. 

Adhered the strip of black card stock onto the embossed layer.

I adhered the nature sticker to the card front.

I tucked the circle greeting just under the corner of the sticker.

Hexagon Trio

I chose an ivory card. 

I wrapped the ivory ribbon across the designer paper and tape ends to the back.  Adhered to the card front.

I adhered the 3 hexagons to the bottom half of the card below the grosgrain ribbon.

I assembled the greeting by adhering the greeting to the colored circle then to the scallop circle.  The whole greeting was then adhered over the grosgrain ribbon with 3D foam tape.

I am glad to have a couple of customers who want card kits during this isolation time.

Friday, May 29, 2020

Exchange Cards - May

I started with the focal element which is a sticker.  I found these in a book I was clearing out the other day.  Who knows how long they were there!

I adhered it to a piece of bright green card and trimmed to leave a wide border.  I chalked the edges with black.

I chose a bright turquoise card and added an embossed light blue layer.  It was embossed with a Cuttlebug folder and adhered to the card front leaving a small border.

I added the black accent strip aligned to the left of center.  The sticker accent is mounted with 3D foam tape.  I added a Modern Label punchie greeting with offset green card stock.  It was also adhered with 3D foam tape.

I will mailing these today.


This card is similar in as the first one.  I laid it out in landscape format.   The sticker got a light blue layer behind.

I chose a bright green card this time and added a Swiss Dots embossed light blue layer. 

Once the black strips were adhered I used 3D foam tape for the sticker accent.

I added a round greeting layered onto the same green card stock as the card. I just tucked it under the corner of the accent.

Tuesday, April 21, 2020

Birthday Card - Paper Strips

With using a lot of 12x12 inch designer paper I generally end up with a strip at the end with about an inch and the credits.  I have a lot of paper strips in my scrap drawer.  I decided to try in find a design to use them in a card layer.


I pulled from my stash, paper that fit within a certain color scheme.  I then used my small paper cutter to cut the paper into strips about .75 inches wide.  I cut a piece of card stock just under the 4.00x 5.25 inches I need for the layer.
I started with the single strip that goes from top to bottom. The next strips I layed perpendicular to that first one on the left side and created 2 sections on the right hand side. I dontinued to add strips until the cardstock was completely covered. I turned it over and trimmed the strips to a bit away from the edge.  I reused bit I cut off to stay within the color scheme.

I chose a deep teal card base.  I adhered the stash busting background to the front.

I added a piece of large rick rack in white along the left hand side.  It was wrapped around the full card front and the ends were taped down which falls under the greeting.

To add the greeting I punched a scallop circle from one of the prominent designer card stocks.  I then added a dark grey 1 3/8 circle punchie then the color printed greeting at 1 1/4 inch.  These were layered and adhered then glued to the card front with 3D foam tape. 

Wednesday, April 15, 2020

Exchange Cards - Paper Strips

I have tons of strips of paper cut off from 12x12 designer paper.  I was looking for a way to use these so onto the internet to find solutions.

This is a technique I found.

I cut the designer paper strips to half inch and sorted them into similar colors schemes.  Selecting designer card stock that I am not inspired by I cut it into 4.25 x 5.5 pieces.

I applied glue stick to the quarter sheet and laid my first long strip.  I then applied the other piece perpendicular to the first one.  I continued till I had covered the whole piece of ugly card stock.

I trimmed the strips close to the card edge and pressed them under books to let the wet glue to set up and dry.   After several hours I trimmed this background to 4.00 x 5.25 inches.

I then chose a warm dark blue card base onto which I adhered my paper strip background.
Then I added a piece of white rick rack wrapped around the card front.   I taped the ends under the accent.  The accent is a scallop punchie, a 1 3/8 inch circle then a white color printed greeting.  These were adhered into an embellishment.  It was adhered over the join of the rick rack with 3D foam tape.

In the tiny gaps between strips I applied chalk to lessen their impact. I chalked the edges as well.

The pink background was adhered to a bright pink card base.  It also received a scallop greeting.

These are headed to my card exchange partners.

Friday, February 14, 2020

Thank You Cards - Compassion House

I worked on my Thank You cards for Compassion House which I will deliver next week.

These are mainly DSP Split lay outs with a variety of greeting styles.

This one is red and grey designer paper in stripped and geometric. Paper cut to 4.00 x 5.25 inches then cut again at 3.5 inches. The smaller piece turned over and taped back into one layer. 

I added white grosgrain ribbon across the join then adhered to the front of a deep grey card. 

I added a scallop greeting in red and white with grey text.  The greeting is adhered with 3D foam tape.

Some are leftover kits from the class at the house.

Looking forward to my class.

Wednesday, January 8, 2020

Exchange Cards

I made a couple of cards for my exchange buddies today.

I chose some backgrounds I made a while back which I cut to leave a small border.  I adhered it to a warm green card base.

I cut some teal card stock using the Memory Box Row of Poppies die.  I adhered them to the decorative paper layer with double sided tape on the base and quick dry glue behind the poppies.

I ripped a piece of brown card stock and adhered it to the card front aligned along the bottom.

I added a circle greeting in the top right hand corner adhered with 3D foam tape.


Similar layout with different supplies.

I cut the poppies from teal again.

I chose a brighter piece of decorative paper and a bluer green card base and cut it as before.

A ripped piece of brown card stock for the dirt.

I inked a clear stamp with a marker and stamped the sentiment on a white banner which was adhered with 3D foam tape.

These are off to my exchange buddies.

Friday, December 20, 2019

Card Exchange Cards

I started with a Pea Green card base. I placed a piece of organza ribbon across a strip of designer paper, taped the ends to the back then attached it to the front of the card.

I used a coordinating desinger paper which I cut square, adhered to a pink paper from the same set cut just a bit bigger.  These were adhered together then I added 2 iridescent snowflakes with pink brads.  This was adhered to the card front with 3D foam tape.

I added a Stampin Up Word Window greeting on the left with 3D foam tape.

I started with a olive green card base.

I assembled my trees by cutting the black strips and adding one to each tree with a tiny brad. The trees are adhered to the card front with double sided tape.

I used a Zot to adhere the silver stars above the tree to the card front.

Ripped a white card stock to create a snowbank.  Adhere to card front then trim it to the card edge if necessary.

Layer the white circle greeting onto the black larger circle. Add the 3D foam tape to the back and adhere to card front as shown.  

These are headed to my card exchange friends today.

Monday, June 3, 2019

90th Birthday Invites - Samples

I was asked by a friend to make custom invitations for her 90th birthday celebrations.

I put together two samples and met with her on today to review the options and finalize the details for the insert.

This sample features designer paper K&C Company - Classic K - McKenna.  It is a pad of coordinating patterns in pink, green and ivory in 12x12 size.

I cut a strip of the striped paper to 1.5 inches by 5.5 inches wide.  I wrapped a piece of ivory & gold organza ribbon across it and taped the ends to the back.  This was then adhered to the card front.

The accent is a pink layer cut from another sheet in the collection to 2.5 inches square.  The text layer was printed in Rose Red & True Thyme on a piece of warm green card stock which was cut to 2.00 inches square. If features a frame from Pixabay.  The accent was adhered to the card front with 3D foam tape.

This sample features designer paper by Frances Meyer - Suzanne Nicoll - blue floral.

It features dusty blue flowers with ivory highlights.

I chose an ivory card base with the same ivory and gold organza ribbon. 

The accent is a scallop circle punched with the Stampin Up punch in navy blue linen card stock.  A 1 3/8 inch circle of white card stock then the text layer in ivory.  The circle text features a frame and the text in Night of Navy.

I cut the designer paper to 4.00 x 5.25 inches and wrapped the ribbon across at 1.5 inches from the top.  The ends were taped to the back.  This layer was adhered to the card front.

The assembled accent was adhered to the card front over the ribbon with 3D foam tape.

Sunday, April 21, 2019

Birthday Card - Circle Greeting

I made a card for my sister who celebrates her birthday this week.

A No.8 card using designer card stock as a base.  Great blue and green graphic design.

I added the required card stock strip in the center of the card. 

I punched a 2 inch circle from the same navy card stock, added a 1.75 inch color printed greeting.  This was adhered to the card front with 3D foam tape.  On its way to her today.