Showing posts with label OSW1. Show all posts

Thursday, April 18, 2019

Card Making Session - OSW Cards - Fundraiser

I have been making cards with a friend once a month.

This is a One Sheet Wonder card kit.  I brought the kit to Compassion House and these are the left overs.  The ladies there wanted the Thank Yous so I have birthday greeting in this set.

These cards are designed with the One Sheet Wonder design which makes efficient use of designer paper.  This my OSW1 layout design for 6x6 inch paper.

The greeting is from the So Happy For You stamp set in the same color as the card was trimmed with scissors to the frame. The greeting is cut to 3 inches. It was then layered onto a square of white card stock.  This layer is adhered to the card front with 3D foam tape centered on the card front.

The greetings are for these 2 card are designed with Stampin Up So Happy For You, Owl Occasions and Blooming Marvelous stamp sets.

The designer paper is from the Patterns Print III pack.


These will be in a Greeting Card Gift Set in our fundraising event at Welcome to my Kitchen.  This effort was unsuccessful as only 2 of us brought contributions.

Tuesday, March 19, 2019

2019 Cardmaking - CH - Class 3

Another session of card making at Compassion House tonight

These cards are designed with the One Sheet Wonder design which makes efficient use of designer paper.  This my OSW1 layout design for 6x6 inch paper.

The designer paper is Stampin Up  Print Pattern in Ruby Red with the matching card stock.  The piece of designer paper is adhered to the right hand side of a wide card. The strip of solid card stock is glued over the left hand edge of the designer paper.

The greeting is from the So Happy For You stamp set in the same color as the card was trimmed with scissors to the frame. The greeting is cut to 3 inches. It was then layered onto a square of white card stock.  This layer is adhered to the card front with 3D foam tape centered on the card front.

The greetings are for these 2 card are designed with Stampin Up So Happy For You, Owl Occasions and Blooming Marvelous stamp sets.

The designer paper is from the Patterns Print III pack.

The colors I chose are Certainly Celery and  Almost Amethyst on Lovely Lilac card.

These layouts are very versatile and can be put together wide or tall.  The images can be used for young and older recipients alike.   

Monday, August 13, 2018

One Sheet Wonder - Card Set 4

Another set of cards on which I used this swirly pink burgundy designer paper.  Paper cut with the OSW1 plan.

On this card I changed things up a bit and trimmed the one piece to 4 inches wide added a coordinating piece at the top and bridged the join with a strip of blue card stock. 

Punched the butterfly with Martha Stewart Butterfly from the same color as the top piece of paper.

Adhered it to the card front with Bling Zot.


You see the long strip turned over on the card to the left and the full 4.25 piece used in the one on the right. 

Saturday, August 11, 2018

One Sheet Wonder - Card Set1

I am making a set of cards for friends who have lost a loved one this week.

I am using the One Sheet Wonder concept.  For these cards I used my OSW1 layout.  I used a very versatile designer paper with a bunch of colors called Disco Ball by Recollections.

The layouts can be change as desired.  Here I have chosen landscape and placed my designer paper on the left hand side.  I am using ivory card stock strips to coordinate with the designer paper. Here I chose brown but I see that green would have worked well also. On the next set!
I was able to choose 3 different colors for my card bases because of the wonderful colors in the designer paper. I chose blue and salmon. For the bottom 2 I put a brown butterfly created with the Martha Stewart Butterfly punch.  On the first I chose blue for the butterfly.  They are held in place with Bling Zots.

Tuesday, July 5, 2016

Ready2Go Christmas Stack Kit - Winter Bright

I used the Stampin Up Winter Bright Designer paper which features Wild Wasabi and Bashful Blue.  I selected card stock in the main colors.  I chose a .5 inch red cotton ribbon.  The focal element features large and medium white silk poinsettias with daisy confetti in a coordinating color.  The DSP was cut with a One Sheet Wonder Template.

On this first card I chose to match the DSP with the card color - Wild Wasabi.  I cut the card stock at 4.25W x 11T inches and scored it at 5.5 inches.  I glued the DSP measuring 4.25W x 3.00T inches along the bottom edge.  I adhered the red ribbon over the top edge of the DSP and taped the ends to the inside of the card.  I used a push pin to make a hole in the ribbon and card front and the red daisy confetti.  I placed the prongs of the tiny white brad through the confetti, the medium then large poinsettia then through the card front, opening the prongs on the inside of the card.
 
For this second card, I matched the card color - Bashful Blue with the Winter Bright designer paper. Again, the card is cut at 4.25W x 11T inches and scored it at 5.5 inches.  I glued the DSP measuring 4.25W x 3.00T inches along the right hand edge.  I adhered the red ribbon over the left edge of the DSP and taped the ends to the inside of the card.   I used a push pin to make a hole in the ribbon and card front and the red daisy confetti.  I placed the prongs of the tiny white brad through the confetti, the medium then large poinsettia then through the card front, opening the prongs on the inside of the card.
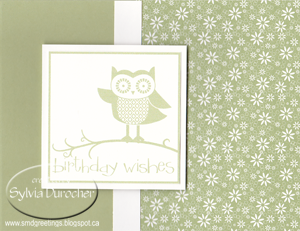
For this third card, I chose the card color - Wild Wasabi and the Bashful Blue side of the Winter Bright designer paper. Again, the card is cut at 5.5W x 8.5T inches and scored it at 4.25 inches.  I glued the DSP measuring 5.25T x 1.75W inches along the right hand edge of the card.  I adhered the red ribbon over the left edge of the DSP and taped the ends to the inside of the card.   I used a push pin to make a hole in the ribbon and card front and the red daisy confetti.  I placed the prongs of the tiny white brad through the confetti, the medium then large poinsettia then through the card front, opening the prongs on the inside of the card.


The cutting pattern I used is the OSW1.  I tipped the orientation of card 3 to tall instead of wide based on the layout template.

Check out my R2Go Stack Kits page.


Monday, April 18, 2016

Card Club - April - One Sheet Wonder

This card is designed on the One Sheet Wonder concept which allows many cards to be made with a limited amount of designer paper.
This one is Stampin Up  Print Pattern in Sahara Sand with the matching card stock.  The piece of designer paper is adhered to the left hand side of a wide card. The strip of solid card stock is glued over the right hand edge of the designer paper.


The greeting if from the So Happy For You stamp set in the same color as the card was trimmed with scissors to the frame. The greetings were cut to 3 inches. It was then layered onto a square of white card stock.  This layer is adhered to the card front with 3D foam tape centered on the card front. The second card is Really Rust. 

Monday, August 24, 2015

All Occasion Cards Boxed


I made a set of All Occasion cards as a donation for an event being held in September.  It will be used for a prize for a golf tournament.  I used One Sheet Wonder 1 and One Sheet Wonder 2 layouts with 2 different colors to create 12 different cards.
I used a black and white double sided card stock by My Mind`s Eye called Lush Black Floral.  This paper as floral on one side and polka dots on the other. I was able to combine it with almost any color.  I cut the neutral strips from a warm white card stock to .5 inch width. They were adhered over the edge of the DSP in the center of the card. Because the white is a white warm I chose jewel toned card stock in cherry and plum. The flower accent is created with the Stampin Up Blossom Party original die.  I cut the center with a warm white circle.  I chose black for the large flower and the same color as the card for the slimmer one.
I packaged them in my standard 6x6 clear box for a nice presentation.

Sunday, May 31, 2015

R2G Christmas Stack Kit - Christmas Cocoa

Here's my next set of Ready 2 Go Card Stack kit.  In this one I chose the OSW1 Template which produces 3 card layouts per 6x6 DSP. 
The Stampin Up DSP is called Christmas Cocoa and has Real Red, Soft Suede and Whisper White as it's colors.
The greetings stamp set I chose is Owl Occasions in those colors.  The accent layers are the opposite from the card color so Soft Suede on the Real Red the other way around on the Soft Suede card.  Each of the accents have both colors included.  The greetings were cut to 2.75" with an accent layer of 3 inches.

The card layout presents 2 wide cards and 1 tall card. Of course, the pieces can all be changed in orientation to make cards the as you prefer. The kit makes 12 cards.

Tuesday, May 5, 2015

R2G Occasion Stack Card Kit - Happy Birthday

This is a birthday set of cards in a Ready 2 Go Occasion Card kit.  With 12 cards suitable for boys and girls you will be set for the summer parties.
The set is based on the One Sheet Wonder for the 6x6 I designed earlier.
The designer paper is adhered to the card front.  A strip of white is placed over the edge of the designer paper. 
The greeting is color printed and then trimmed very close to the edge of the frame.  The greetings were cut to 3 inches. It is then layered onto a square of white card stock.  The greeting is adhered to the card front wit 3D foam tape.  The greetings are designed with Stampin Up So Happy For You, Owl Occasions, Punch Bunch and Blooming Marvelous stamp sets.  The designer paper is from the Patterns Print III pack.

The colors I chose are Certainly Celery, Almost Amethyst on Lovely Lilac card and Really Rust.
These layouts are very versatile and can be put together wide or tall.  The images can be used for young and older recipients alike.  

R2G Occasion Stack Kit - Big Greetings

Another set of Ready 2 Go Card kits.  This time I designed large greetings with Stampin Up digitals.  The layouts are from the One Sheet Wonder that I designed a while back.  You can check it out here.

The greetings were color printed then trimmed right to the edge of the frame. The greetings were cut to 3 inches. It was then layered onto a square of white.  The designer paper is from the Patterns Pack III set.  I chose Ruby Red, Close to Cocoa and Certainly Celery.  Once it was cut it was adhered to the card front based on the layouts.  A .5 inch strip of white was placed over the edge of the DSP.  The greeting is adhered to the card front with 3D foam tape.  The greetings included are from the So Happy For You stamp set. 

The layouts are very versatile as they can be put together wide or tall.  This kit will put 12 cards into your stash ready for the giving. 

Sunday, April 26, 2015

R2G Christmas Stack Kit - Winter Green

Here's another Ready 2 Go Christmas Stack Kit made with the 6x6 One Sheet Wonder cutting plan and card layouts
This time I used a retired Stampin Up DSP called Winter Green.
I chose the stripes as well as this bold floral pattern. I pulled 4 sheets of 12 x 12 which I cut into 6 x 6 pieces.  I decided to not use the set with the Stampin Up credit in the corner and besides I needed a some paper to make my card samples so it was a win win.
I picked Always Artichoke, Soft Sky and Certainly Celery for the card bases.
I chose the Owl Occasions Stamp Set.  The greetings are put on white card stock and cut to 2.75" square.  The greetings are mounted to the card front with 3D foam tape.
I chose Sage Shadow for layers on 2 of the kits and Certainly Celery for the other kit as I did not have enough of the Sage Shadow.  Good to have options.  The layers are 3.00" square.  The card stock strips are .5 inch by 5.5 or 4.25 inches.

The cards can be oriented in either wide or tall orientation.  The inserts provided allow the maker to choose.

This kit puts me in good shape for my June Christmas Stack Class.

R2G Christmas Stack Kit - Winter Frost

Here's the next Ready 2 Go Stack Kit designed with the 6x6 inch One Sheet Wonder cutting plan.
For this kit I used the Winter Frost 6x6 DSP pack. the designs I selected are this small snowflake and the other is bolder chain looking design. I choose Pool Party for the cards for this set.  I chose Basic Gray for the greeting, the square and the strip for the snowflake paper and Island Indigo for the bold chain design.  I ran out of Pool Party so I made 1 card in each design with the colors reversed (Basic Gray card with Pool Party layers) for the ornament.


The DSP and the strip were aligned with the fold and then trimmed on the open side as needed. The greeting layer is mounted over the strip with 3D foam tape.
The stamp sets I selected are: Calm Christmas, Keepsake Ornaments with Owl Occasions greeting and Come to Bethlehem. 
You can check out the Season of Style red and green kit here.

One Sheet Wonder - 6 x 6 inch DSP - 3 Cards

I did research a while ago for One Sheet Wonder plans.  For me I had hoped to find the cutting plan and the card layouts to go with it.  There were a few who included both pieces.  I was working on Christmas cards so repetition was okay with me.  My kits are 12 cards so I wanted a cutting plan that produced 3 cards per 6 x 6 sheet. Here's my inspiration posted by Sharon.

I believe the card layouts are very versatile because the cards can be assembled wide or tall.  The designer paper is double sided so you may be able to turn the paper around and get another look.  With the layers all being the same color, it cuts down on the complexity when cutting and stamping.  I suppose if one color would do across DSP designs that would be better.  Maybe black, grey, and some of the neutrals may work for several DSP designs.  I will put that in my thinking cap. 

I'm really happy with how my kits turned out.  I am posting another in the next post.

The greetings are cut to 2.75" with an accent layer of 3 inches. 

R2G Cmas Stack Kit - Season of Style

I've been working on card kits for my Christmas Stack class on June 8, 2015.  I designed these cards on a One Sheet Wonder of designer paper.  I will post the details in the next post.

On this set of cards I used the Stampin Up Season of Style 4x6 DSP Pack. I used the Cherry Cobbler stripe and the large white dots on Crumb Cake.
I chose 3 different images and greetings. The greeting, the square behind the Window Frame die cut and the images on the Window Frame are all the same color.  On the red I put Always Artichoke layers and on the Crumb Cake I used Basic Black layers. The strips of card stock are half an inch wide.


I chose Cherry Cobbler/Bravo Burgundy, Night of Navy/Not Quite Navy, and Early Espresso/True Thyme for the cards.

The stamp sets I selected are: Calm Christmas, Keepsake Ornaments with Owl Occasions greeting and Come to Bethlehem.  I'm really happy with the set and the concept.  I will use it again.  I've used another set of DSP so check the next couple posts.