Showing posts with label ebeads. Show all posts

Monday, October 28, 2024

Tree Scent Ornaments - Spools

A few additions to the collection of 1 of a Kind Tree Scent ornaments.

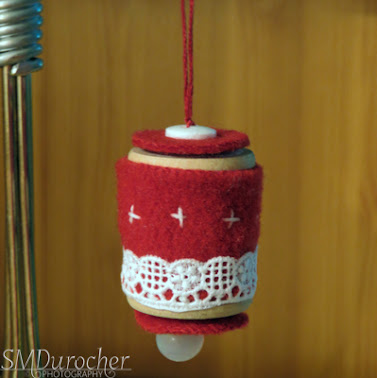
Vintage wooden spool wrapped with red felt. I stitched a length of white lace to the bottom and added a bit of white stitch above it.

Cut two 1 inch circles of red felt to put on each end. 

The bottom features a white pearl drop bead and the top a small white button. All hung with red wool yarn.


A wooden spool wrapped with lime green fleece.  

Once that was stitched on I wrapped the spool with dark green embroidery floss onto which I placed matte gold EBeads along the way.

I cut 1" circles for the bottom and top of the spool.

I added a gold button with a shank on the bottom and a gold bead at the top above the green felt circle.
 
All hung on variegated green yarn.


I stitched a length of plum wool ftlt with a few stitches in green, white and yellow.

This was wrapped around a vintage wooden spool . 

I cut two 1" circles in mustard felt for the top and bottom.

I added a plum colored button with a shank on the bottom and a tiny green button on the top over the felt circle.

All hung with plum embroidery thread.


I used a traditional red and green color theme on this Tree Scent ornament. 

A red felt piece was stitched with white and green thread then stitched onto the wooden spool.

I selected 2 red buttons to go on the bottom and top of the ornament.

I cut two 1" circles of dark green felt for the top and bottom of the spool.

I ran red wool yarn to hold all the peices together and knotted at the top with several knots along the way.

These can be used as personal passive oil diffusers as you relax.

Sunday, July 23, 2023

Fairy Light Memento

After Mom's Funeral in April and the internment of both Mom and Dad I felt a need to have a memento to remind me of their love, commitment and my gratitude for having them in my life for over 60 years.

I love glass and have enjoyed looking at vintage, crystal and depression glass on several You Tube channels. 

I decided that I wanted a Fairy Light as my memento.  I could light it when I wanted comfort and a tangible reminder of them.  The vintage ones are hard to find and very expensive. Contemporary examples are more reasonably price.  One of them is by Fifth Avenue Crystal and those still were running about $100 on line which I was not prepared to do the online thing. I could not find anything in my area on Kijiji so I put out the word what I was looking for as most folks did not know.

About mid May I got a call from one of my sisters that she had found a Fifth Avenue one for $30.00 on Facebook. I said YES!  She was kind enough to pick it for me.  Towards the end of May I was able to collect it from her house but with the craziness going at my house it stayed in the box for a while longer.

I did start my plans for how I wanted to decorate it and light it.

This some pictures from on line because I did not take pics of mine before I started.

As you can see the base where the tealight would sit is not flat so I needed something to fill in that space and allow my tealight to sit nicely and safely.  I looked at several ideas for something small and clear like vase filler or seed beads.  Vase filler was going to be way more than I needed and clear sead beads with out silver lining were not available.  Durign the few days I spent with my sister in late June we visited a Dollarama and I found these.
These clear plastic diamonds were small enough to fill in the space, they were clear and the price was right.

Once I was home, I poured the bag of the smallest diamonds in the base and then set the clear plastic tealight holder on top.

It was perfect. They filled the cavity below the tealight exactly the way I needed.

The bottom right hand photo is seeing the candle wax completely melted in the clear plastic tealight holder and you can see the diamonds below.

There is the risk of spilling the diamonds out of the base as they are just sitting there but that is okay.

I knew I wanted green and blue glass beads so the light would go through them.  Dad's favorite shirts which Mom made for him were forest green and Mom's favorite color was blue.  Not cobalt but a true blue.

The Fairy Light offered 2 places to put some sort of decoration.  The indent on the shade and the one just above the base.

Here's my first attempt with EBeads on the base.  It's hard to tell in this photo but we received a small locket at the funeral.  We cleared Mom's stuff at Easter and we had slated her clothes to be donated. When the time came my sister could not send Mom's favorite dress to the thrift store and she decided to make it into mememtos for the kids and grandkids.  She put a small piece in the lockets for the boys and the girls received a scarf from the fabric.

The locket is still a memento from both Mom and Dad.

During this time my mind was working on what to buy for beads.  I did enjoy the Fairy Light a few times lit late at night.  

As you can see in the above photo only the shade is lit with the tealight at the top of the base.  I made the decision a few years ago to limit my use of real candles and switched to wax for scent.  I do have a few real tealight candles because sometimes in photography nothing but a real flame will do.

The thought crossed my mind that if I could find a light which the Fairy Light could be placed on then it would not be fire and the base would be lit as well.  

The brainstorming began.  I have an etched crystal block which has a LED light in the base which lights it up. Okay, that one has several colors of lights that rotate through - red, green, yellow and blue I think.  Well I knew I did not want colored lights. Now, I want a white LED light round base.  I put that into Google and stuff came up. They do sell LED light bases for crystal and glass figurines, etched glass items, and gemstones etc.  Again, none easily available in retail stores in my area. But I persisted!  Eventually, I found round puck light which can be placed under your upper cabinets.  They are battery operated and light when you press the center of the puck. I brought a tracing of the Fairy Light base with me to make sure that it would stand safely on this puck. I was a the big orange store which on line indicated there was 16 in stock.  After asking several customer service reps for assistance I received what I needed. A couple of guys checked the inventory and sure enough there was supposed to be some in stock.  A sharped eyed young man said there the right number on that box way up there! Up they went and brought down the box, I check the diameter against my tracing and walked out of there with 3 for less that $20 and the AAA batteries were included.

This is starting to fall into place.  Beads are next.

I decided that Michaels would by my starting place for beads.  The day I was there the shelves were mostly empty.  Supply chain issues? I don't know. I found some green faceted beads in the size that would work but no blue ones.  Another girl in the aisle said she was going to visit a Michaels in a city south of ours as there were fewer customers there and hoped the selection would be better.  After giving that some thought I decided to follow here lead.  Into the car and headed south on the big highway.


Sure enough, there was the same green ones in the the 4 different sizes and cobalt blue ones in the 8mm size which were on sale! One of the green strings was 8mm. Perfect.  They were faceted.

I used strong beading cord left over from my Christmas tree project

I placed the green and blue glass faceted beads alternating the colors until I had enough to go around the shoulder of the shade.  I tied my knot then added a few more for dangles.  I added an EBead and a silver crimp bead at the end to keep the beads in place.
 

I chose to use silver lined EBeads for the string of beads on the base of the Fairy Light. Again, I chose deep green and cobalt blue for color. I tied the cord tight with 3 knots.

I added the hinged locket on the string and let it sit over the knots.  That worked out really nice.

One of my sisters had the lockets in her stash of craft stuff and brought them with her.  It was great to be able to have something from that day.

As you can see it is hinged so I may put a bit of Mom's dress in it.


I am so happy with how this project turned out. It took almost 3 months for all the pieces to come together but it is so gorgeous.  I will enjoy it for years to come.

I love you Mom and Dad!

Saturday, April 13, 2019

"Save the Bees" Textile Project

This is the project I am submitting to the AAC "Uncommon Threads" show.   I am delivering it today.  It is a piece which speaks to the need to save our bees.  We would have nothing to eat if we did not have bees as pollinators.

Plant Flowers
Provide Water
Build Beehouses
Save the Bees

It took me over 2 weeks in January to make it.  The background is handpainted, the flowers are all hand stitched and the layers are held together with a blanket stitch edge. 

The materials are fleece and felt.  Fleece was used for the background.  The flowers and house are felt. I used sequins and e-beads to enhance the flowers.

The thread is embroidery thread split in half and the edge is all six strands.


Color Experiments

I spent some time figuring out if I could color the fleece and the felt the way I wanted. 

Some colors were not permanent and others worked really well.   I sprayed a small tab of white fleece with diluted color from each bottle.  They were allowed to dry over night.  I then rinsed each of them to see if the color was permanent.

The Rotring and Dayler Rowney FW Acrylic were permanent.  The Radiant Rain sprays were not permanent though stained the fiber.


 Colors Chosen and the Process

I chose liquid acrylic ink to color the white fleece background.  The colors are Raw Umber Hue, Sap Green, Olive Green, and Indian Yellow.
Nature has lots of shades so I tried to reproduce that with the colors I had in my stash.

I cut 2 pieces of white fleece larger than the 12x12 piece of chipboard. 

I placed the fleece on a large piece of glass. I used a spray bottle to apply the color.  It allows even color and specific placement of different colors as I needed.

I placed it over rods to allow the most exposure to air to assist in the drying of the fleece.

Again, drying overnight.


Laminating the Layers

I cut the fleece layers down to a generous 12x12 inches with a rotary cutter.

I placed a piece of interfacing in the zigzag stitching to prevent stretching of the fleece.

I stitched the 2 layers of fleece together before I stitched the elements to the front.  I did put a zigzag border all the way around and then I chose to apply organic lines in the center rather than evenly spaced lines.  Most will not show.

I love the color!

Elements

I created the BeeHouse from black felt.  I stitched pieces of wood for the roof along the angled top edges.   I used round donut beads which mimic pieces of bamboo which creates holes for the bees to live in.  These houses provide shelter solitary bees which do not in hives.

The bees on the piece are buttons.  They are a great color and just the right size.

I cut rain drops to which I added blue sequins and beads to represent providing water for the bees. 

The water should be moving or regularly changed.

The flowers were cut with dies.

1) Sizzix Flower Layers & Leaves
2) Flower Layers #10
3) Flower Layers #7

I chose turquoise, purple, pink, grey, yellow, white felt for the flowers. 

Flower sequins in small pink and medium sized in silver.  Round sequins in several colors.  E-Beads in blue, white, pink and black to coordinate. 

The thread was chosen to coordinate with the felt in the flowers.  The flowers were stitched to the background with many stitches to ensure they stayed in place and did not droop.


Finishing the Edges & Hanging the Textile Art

I chose a coordinating piece of fabric in purple for the back which covers the knots and stitching done the front (flowers, raindrops, bees, and house).  I cut it 13x13 and folded the edges over. 

I sewed 2 tabs at the top of the piece to allow a skewer to be placed into them which will provide support when the piece is hung. 

I then used green embroidery thread to place a blanket stitch around the edge of the piece. This was very difficult as there was 3 layers of fabric and the interfacing to be punched through.  I used a thimble but my fingers and hand on my right hand were very sore when I was done.

I printed details and the small instructions on a piece of fabric and stitched that to the piece.

I added the instructions card stock hanging below the bee house so they will be visible when on display. I added a turquoise glass bead below the details.

This was an extreme reach from my regular paper crafting experience.  I learned a lot and some of the tools from paper crafting came in handy.  

I hope it strikes a cord with the folks who visit the gallery.
Tuesday, January 15, 2019

Recently

My work is progressing on my art work for the gallery show.  I now have a plan.

I cut felt with Sizzix Flower Layers #10 in three colors - purple, turquoise and light blue.  I took them to the ladies group last night and sat with needle and thread. I put stitching on the large ones and chose to put glass e-beads in the center as you can see on the inset. 

I am working on coloring my background and have determined with colors are permanent.

I have installed a command hook in the kitchen for my apron.  It is very near the electrical panel and I was concerned about putting nails in the wall.  This option makes it safe and changeable.

It is now ready for my sunflower apron so I need to put that project on the to do list.

I was inspired by the creative process I have used for the art show.  It lead to my painting this water color of a lady holding a red umbrella during a summer rain. 

I tried salt to create the rain drops but did not work so well so when I got home I added spattered blue spots with a paintbrush snapped against a stick.  I did it from quite high up and I am happy with the results.


I am happy several projects are moving forward so every day has new things to do and try.