Showing posts with label reinkers. Show all posts

Sunday, August 15, 2021

Sympathy Card Digital

 I created this digital card for my cousin and his wife who lost their daughter in a tragic accident last week.

I started with a re-inker background which I made while trying to take an abstract photo for the upcoming art show.   The resulting photos were not what I wanted and not to waste the ink I captured the color onto a 4x6 piece of photo paper.  I tried several color variations

This morning I cut the piece of arty photo paper to 3.75 x 5 inches and started doodling.  I drew the flower and the ground and added texture with a black marker.  I then mounted it to a piece of coordinating card stock.  I scanned the card and added the sentiment.

The colors were bolder than I wanted so in my photo editing software I soften and manipulated the colors a bit.

I am really happy with the final result.  I was able to send my sympathies by email.

Sunday, December 20, 2020

Christmas Card Order - JOY Nativity

I received a request for a large order of Christmas Cards late in November.  I prepared 3 samples within a price range which fit their budget. They made their selection quickly and I got started.  I proposed 4 different colors of card stock to provide some variety in the cards. I did not have enough card stock in any one particular color either. I used Stampin Up card stock for the project.  Very good quality card in 8.5 x 11 size and I planned to use the coordinating ink in the spatter final touch.  

The holy family die cut was cut in heavy black card stock with the Penny Black Manger die. It was adhered to a white card stock layer where the J and Y were printed in black and the die cut was the O.  The die cut was held in place with a mini star brad.  The JOY layer was adhered to the card front with double side tape. The quarter insert was glued in with glue stick.

There was pressing when the card was folded then again when the JOY layer was adhered.  The spattering was the final step and then they were dried overnight.

The card stock is Lucky Limeade.

The spatter was mixed from other reinkers as I did not have that particular ink.  I had to experiment a bit. In the final color I used 4 drops of Old Olive to 2 drops of Kiwi Kiss.

This card stock is Lovely Lilac. When I checked the package which had been opened I discovered 4 sheets of textured card.  Another bit of variety to the overall project.

With out the exact reinker color more experimenting was needed.  The final color was 3 drops of Orchid Opulence to 1 of Brilliant Blue.


The card stock for this card is Buckaroo Blue.

It's interesting to see the weight of the card stock change over time.  It has become quite a bit thinner over the years.

I had to mix this ink for this one as well.  After some experimenting the final was 1 drop of Brocade Blue to 1 drop of Baja Breeze.

I was very happy to be able to create the colors I needed and it went pretty well.


The card base for this is Regal Rose. 

I had the exact reinker for this color so that was a breeze and it was a good thing as it was the last set.

I am sure the cards will be a blessing to those who receive them.  I expect some folks are just not doing Christmas at all this year which includes no Christmas cards.  

With no craft sales to attend this year, sales were way down so I really appreciate this order.
 

Saturday, January 3, 2015

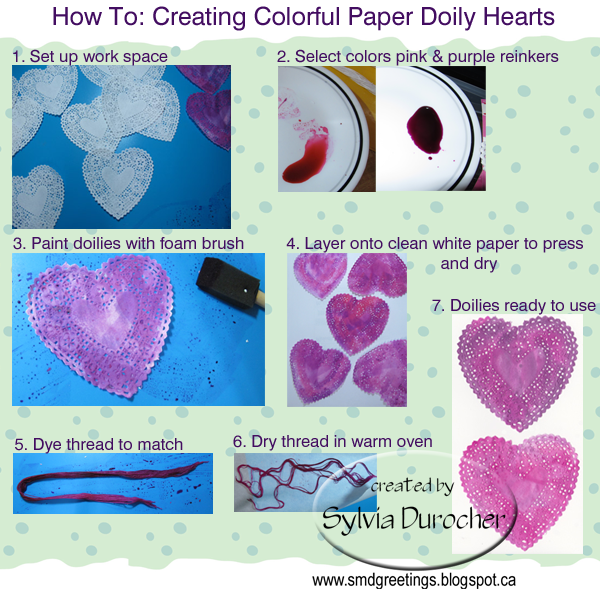
How To: Color Paper Doilies

I created colorful doilies for a Valentine project I'm working on.  I have put together a How To Tutorial.
1. I set up a plastic mat on my counter so I would not stain it.  I have to get gloves so I don't stain my hands cause that will take a few days to disappear.
2. I selected pink and purple as my colors.  I am using dye stamp pad re-inkers.  The colors are Nick Bantock Passion Plum and the hot pink I've owned forever from the Great Canadian Stamp Company.
3. I diluted the ink with water and applied it with a foam brush.
4. I placed the dyed wet doilies onto white computer paper with extra sheets to absorb the moisture and pressed them under heavy books.
5. I'm going to need thread to match so I dyed some heavy crochet cotton at the same time to ensure that the colors match perfectly.  I placed the wet thread on parchment paper and placed that on a cookie sheet and put it into a warm oven - I had turned it off.
7. Several hours later I have perfectly flat and wonderfully colored doilies ready to use.

Keep an eye out here for the project in the weeks to come.

Thursday, August 7, 2014

R2G Card Kit - Noel

Another card kit, this time with Stampin Up elements.  I watercolored with a paint brush, chipboard coasters with reinkers in Glorious Green and Real Red. Once dry, I cut the letters with the Typeset Alphabet Bigz Dies. I embossed the bottom of the card with the Petals a Plenty embossing folder.  I added a .75" strip of Whisper White with red and white zigzag washi tape on it.  I added a piece of Glorious Green 1/4"gross grain ribbon across and taped the ends to the inside of the card.  I tied on a shorter piece with a knot. I adhered the NOEL chipboard letters above the strip.

Sunday, March 3, 2013

How To: Re-purpose Blah Paper

Do you have paper in your stash that does not inspire or speak to you?  The top left corner of the picture here is the original glitter paper.  I bought it on sale and thought I should be able to do SOMETHING with it.  Well I decided to paint it with diluted Nick Bantock ink.  The colors I chose were Turquoise, Lamp black and Sap Moss Green.  That stuff goes a long way because it just took a drop or two to get this color.  I just watered it down then applied it with a foam brush.  I pressed it down as it dried. I'm so much happier with it now.  Keep an eye out here for how I will use it.
Think about what technique you could use on blah paper.  Paint it, print on it, stamp on it, distress it, think outside the box.  You are not inclined to use it the way it is so what have you got to lose? I way nothing so go for it. Let me know what you do and how it turns out.

Thursday, September 16, 2010

Cards - All Occasion

A couple more cards for my "ready to go" stash. I used cardstock similar to Crushed Curry then added a layer of Rich Razzleberry. I used a daisy punch to accent the decorative paper which was made with Mambo Melon, Crushed Curry and Rich Razzleberry ink. I added brads in coordinating colors.

Make our own paper to match exactly using re-inkers. Great fun and perfect for your next card.

Tuesday, June 1, 2010

Card Club - May - Butterfly

I love this color combination. Some had pink cardstock and others the curry color. The decorative paper was created with a temporary stamp pad of Rich Razzleberry, Crushed Curry and Melon Mambo. Make your own decorative paper with a bit of ink from your re-inkers. The butterfly is a Sizzix die cut. I cut a second piece in black to highlight the body. Be sure not to glue down the wings and just bring them up on the crease a bit to have the wings flutter a bit. The greeting was in black and the brad on the daisy is black.