Showing posts with label terra cotta. Show all posts

Thursday, March 18, 2021

Cards - 4x4 set 2 - Thanks

A few more 4x4 photograph cards.  More photos from my calendars.

Great Black Capped Chickadee on a purple card base.

I have added a Modern Label punchie greetings adhered with 3D foam tape.


A Yellow Warbler on a textured yellow card base. I added a circle greeting which I mounted under the 4x4 photograph.


 A Koy Fish in the pond at the Japanese Gardens.  

I selected a terra cotta card base.

I added a Word Window greeting mounted onto a Modern Label punchie.

These will be donated to Compassion House.

Friday, May 29, 2020

HB Paper Strips Card - Stash Busting

I made this card for my brother that is celebrating a birthday next week.

Still stash busting paper strips of designer paper.  I chose colors to coordinate with the terracotta colored card. I just laid the first one starting in the top left corner the placed the others perpendicular to those.

The greeting is a Stampin Up Decorative label punchie with color printed words.  Adhered to card front with 3D foam tape.  I chalked the edges to match the card.

It will be on it's way today.

Wednesday, July 20, 2016

HB - Stripes

I started with the designer paper features thin stripes in grey and terracotta.  I used a dark grey card stock to punch borders with the Martha Stewart Arches Lattice border punch.  I adhered these to the top and bottom edges of the designer paper.  This layer was adhered to the card front.
I cut the greeting twice with the Memory Box Jumbled Happy Birthday thin die.  Once, with the back side terra cotta of the designer paper then another with dark grey card stock.  I layered these having the grey create a shadow and adhered them with Quick Dry Adhesive.
I glued the greeting on the designer paper. I added a strip of terracotta designer paper below the greeting and adhered it to the card front with 5 tiny brads.

Sharing with the following challenges: Come and Get It Challenges - Checks or Stripes.

Wednesday, July 13, 2016

Thanks - Rounded Squares

I started with a cinnamon colored card onto which I printed the greeting in black open letters at the bottom of the card.
I chose some double sided card stock to coordinate.  I punched 3 large and 3 small squares with the Creative Memories Double Square punch.  I corner rounded 2 opposite corners then layered them onto each other.
I placed a piece of black grosgrain ribbon across the top third of the card and taped the end to the inside of the card. I mounted the 3 squares over the ribbon with 3D foam tape.

Sunday, January 17, 2016

Birthday Card Order - Set 1

I made several birthday cards for a friend.  She wanted cards for their sons and daughters.

Left: For this card I chose double sided designer card stock by Webster Pages called Winter Wonder and placed the fold at the top.  I cut the Spellbinder A2 Ribbon Threader die in white card stock.  I added a length of pink seam binding threaded through the slots, tied a knot and trimmed the ends.  I adhered that to the card front.  I then printed the greeting which features a background I designed with the sentiment in a shaded oval.  This was trimmed and adhered in the center of the die cut.

Right: I chose double sided designer paper in this hounds tooth type pattern by Authentique - Autumn
Three.  I selected a deep terracotta color for the card base.  I tied a piece of dark chocolate brown seam binding about the DSP before I adhered it to the card front.  The  knot was placed to the right so I could place the greeting on the left.  The greeting was designed with a digital rope oval frame into which I added the sentiment.  Once printed, I cut it with the Stampin Up Window Frame framelits.  I added a square (2 3/8") of the same card stock as the card behind.  This was mounted to the card front with 3D foam tape.

I started with a light green card base.  I cut a layer from the Winter Wonder DSP as I used in the first card.  I tied a piece of pink seam binding around the DSP aligned on the right side.  I then tied another piece onto it to make the bow. This was then adhered to the card front. I created a digital version of the pop bottle flower from this project.  I designed the greeting with the digital flower, an oval and the sentiment in dark grey with a frame. It printed and trimmed to the edge and mounted to the DSP layer to the left of the bow.


This card is made with the reverse side of the designer paper from card two on the same card stock.  I tied a piece of dark chocolate seam binding across the bottom third of the DSP then adhered it to the card front.  I then printed the greeting with a tree from CKLER.  I added the square measuring 2 3/8 inches of the color as the card.  This was adhered to the card front with 3D foam tape.

Sunday, December 15, 2013

Photo - Nativities Three

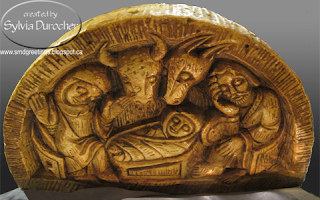
Here are 3 more nativities from my visit to the exhibit a couple of weeks ago.  To the left is another holy family figurine where Joseph is embracing his small family.  We can only see the head of baby Jesus but he is there!
This one on the right is quite rough in design but has all the main characters including the livestock in the stable.  Makes it all be in one piece of art and easy to place.
This one on the left is a terra cotta ornament.  I really liked the turquoise accents painted onto it for highlights.

The variety in presentation, material and design is great.  You can find my previous postings here and here.