Showing posts with label watercolor background. Show all posts

Thursday, September 11, 2025

Watercolor Card - Landscape

I whipped up some waterolor paper this morning.  I used 140lb cold press paper measuring 11x15 inches.  Fortunately, I unpacked my glass shelf and a couple of plastic craft work sheet and taped the paper down.

I decided to use some Stampin Up reinker in water based dye ink which works the same as watercolor but will match the card stock I have.  I chose Always Artichoke, Only Orange, Baroque Burgundy. 

I used regular salt on one sheet, coarse salt on another and cling wrap on other.

I trimmed the watercolor paper after I decided what my bottom layers were going to be. I chose deep green card stock, deep red card stock and More Mustard card stock.  Ripped the top edges and layered them front to back and then taped the back with clear tape. I trimmed the watercolor paper to fit just below the top edge of the accent. I adhered it to a More Mustard card base in the A7 size. I adhered the ripped paper accent to the bottom of the card. With the scrap of green I cut a Sizzix Pine Small which I inked the edges with Always Artichoke ink pad. I then glued it in place ont the right hand side. I punched a 1 inch circle from Summer Sun card stock and adhered it on the left hand side. I then used the watercolor I had used this morning and painted with like colors to help it blend in the sky. I added 3 birds with my black Micron marker.

I put it to press for several hours. I gave it a white insert and a warm yellow envelope. I will see her tomorrow! Yeah!

Wednesday, April 30, 2025

Cards - Butterflies - Charity

Another few cards for I Win charity.

These are the last of the clear butterfly stickers I bought yesterday.

I chose Stampin Up Glorious Grape cardbase in A2 size and added a layer of watercolor background cardstock.  Not sure when I created this but it works well.

Added a strip of gold non shed glitter card stock across the top third.  Mounted the sticker onto the glitter.

I added a SU Small Oval greeting in coordinating colors and added a bit of purple around the edge to tone down the white.  Mounted with 3D foam tape.

Blank white quarter sheet insert.

I used the left over scrap of the watercolor background card stock on this Glorious Grape card base set in the wide or landscape orientation.

I added a non shed gold glitter corner on the right hand side of the watercolor layer adhered with double sided tape.

I mounted the butterfly sticker in the opposite corner.

The banner greeting was perfect for the space left by the shorter background layer.  It is mounted with 3D foam tape.

A white quarter sheet insert was added.

The final butterflies were warm toned so I turned to my favorite Stampin Up color - Summer Sun.

I dug in the origami paper envelope and found a burnt orange piece, cut it to size and mounted it to the card front.

I chose a scrap of paste paper in blue and cut to 2.5 inch square and mounted the butterfly to it. I added a strip of gold glitter to the bottom.

A SU Modern Label punchie in the same blue paste paper with a Word Window greeting in orange glued to the front.

A white quarter sheet insert was added.

I chose Summer Sun card base again with a bit brighter orange origami paper for this card.

I added a Pacific Point strip of card stock then mounted the butterfly onto it.  I like that the tips of the wings show off their bright colors.

I added a bit of non shed gold glitter card stock on the blue strip.

The greeting is the same blue card stock punched with the SU Modern Label punchie  with an orange Word Window greeting.  Mounted with 3D foam tape.

A white quarter sheet insert.

Another 4 cards for this charity.

Saturday, March 29, 2025

Sylvia's Simple Shots

It's been snowing and this day the snow was gently falling as I walked around my neighbourhood.

I found this crow in a tree just chilling.

I love how I captured the falling snow and it's large beak.  Unfortunately, the eye is not as sharp as I would have liked.

Nice dreamy shot.


These are the improvements I made to my Tumi Bag while I was at my sisters last week.

The bag is quite floppy and needed some structure.

It has enough pockets for the essentials that I carry.  

In my last purse I had a collection of things like my lip balm, my allergy eye drops, cough drops, and other things that just fell to the bottom of the center pocket.

With wanting to add structure to the bag we headed to the dollar store to see what we could find for organizers. We found these pencil cases. We built a case for them from mat board and duck tape. We added jump rings to the top so I can pull the pocket out easily. 

Now the contents are organized and the bag a solid core.

A sister and her husband came to visit this week.  They are the one who helped with carpet removal in the summer.  They wanted to see the new floor and have a visit.  Their kids were coming back from a ski trip.

I served roast chicken from the grocery store, salad, and fruit and muffins for dessert.

It's been great to have company.


I was gifted these beautiful Jianzhan tea tasting cups from China.  My nephew brought them back for me after I admired one he gave his Mom and Dad at Christmas.

Tea is my thing. Blue and yellow are my colors.  I look forward to using them when I settle in my new place as for now they are packed safely in a box for moving.


A watercolor card I made for my nephew and his wife who gave me the beautiful tea cups.

I chose watercolor paper and painted an abstract with bright yellow at the top running into ultramarine blue at the bottom.  

Once dry and pressed flat I trimmed the piece to leave a medium border and adhered it to the front of a SU Brilliant Blue card base.

I stamped the greeting with dark blue ink.


The Diamond Eye by Kate Quinn one of my favorite authors.

Another WWII story about a woman, Mila Pavlichenko, who transforms herself from a bookish Mom of one to a sharp shooter. Based on a true story of a mother who became a soldier, found her place in the world and changed history.

When she reaches her 300th kill she is pulled from the Eastern front and is invited to the United States on a goodwill tour. She is hosted by Lady Eleanor Roosevelt. 

Danger lurks in every corner both on the battlefield and away from the fight. 

Another wonderful book.

Friday, February 7, 2025

Thank You Cards and Gifts - Renovation

I managed to get my small gifts and thank you cards for folks who were involved with the renovation project at my house that started back in September and finished up a couple of weeks ago.

I am still unpacking and will be for the next few weeks.  

I had some great people working and helping during this stressful time of my life and I wanted to let them know how much I appreciated it.

I was up early this morning in my kitchen and I made some caramel popcorn.  I did not get the opportunity to do that this Christmas as I was living in temporary accommodations.  

I check off the things I needed.

  1. Recipe
  2. Margarine
  3. Nuts
  4. Popcorn
  5. Corn Syrup
  6. Brown Sugar
  7. Stainless Steel sauce pan
  8. Large yellow bowls
  9. Popcorn maker and Ultra21
  10. Measuring Cups
  11. Stirring spoon
  12. Brown Sugar
Where's the brown sugar.  After checking my packing list most of my food Tupperware had not been unpacked.  After unloading 3 boxes I found the brown sugar.  I am good to go.

I made 3 bags of caramel popcorn and 6 cards.

It was great to be back in my kitchen doing what I have done for years at Christmas time.  Well, this year there was a 6 week delay but I enjoyed do it.  I expect the recipients will enjoy the popcorn.


Next the thank you cards. 

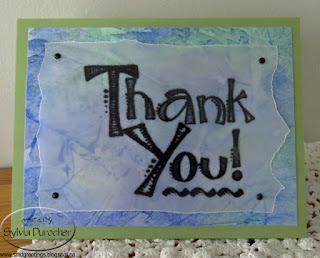
I decided to use watercolor paper I made a long while ago with a clear embossed black greetings.

The greeting is printed on vellum then heat embossed with clear powder.

I downloaded some free graphics from online.

The card stock is coordinated with the piece of watercolor paper then the vellum is trimmed and held in place with brads

The card stock is Pear Pizzaz in the A2 size.

The card stock is Brilliant Blue with the watercolor paper trimmed to leave a small border.

The greeting is cut to 3.5 inches square and aligned along the right hand side.  Held in place with pink mini brads.

The cards are for the tradesmen that worked on the project, the managers that were involved, the staff at the temporary accommodation, and my insurance agent.

The gifts were delivered and were graciously received.

The card stock is Stampin Up Island Indigo.

The greeting is placed along the bottom edge to soften the pink in the watercolor paper.

Held in place with silver tiny brads.
The card stock is SU Soft Suede.

The greeting was just designed with fonts on my computer.

Ripped the top and bottom edge of the vellum.

Held in place with brown mini brads.
The card stock is SU True Thyme.

The greeting was aligned with the bottom edge and held in place with tiny black brads.
The card stock is SU Elegant Eggplant.

The greeting was aligned with the top edge and held in place with deep purple mini brads. 


Sunday, October 27, 2024

Inktober 2024 - 27 Sunflower

Inktober 2024 Challenge

27 Sunflower

I penciled the sunflower then went over it with Micron Black Marker 03.

Three layers of watercolor on the flower. All over yellow then some Cadmium Yellow then some mixed orange toward the center.

Deep brown for the center.

Sap green for the stem and leaves. 

I was nervous about the background but I prepared some colors and it turned out better than I expected. 

Saturday, October 26, 2024

Inktober 2024 - 25 Camera

Inktober 2024 Challenge

26 - Camera

This is the only prompt from the official list that I have followed.  I chose an antique wood camera for its height in this format.

Pencilled then traced with a black marker.  This mixed media paper has worked very well.

I mixed a sepia colored watercolor and added an overall wash to give an old feel.


Thursday, October 24, 2024

Inktober 2024 - 24 Flower Garden

Inktober 2024 Challenge

24 Flower Garden

I used my refurbished technical pen to draw the flower free hand onto the blue green watercolor background.

I created ground and added the tall flowers, then the medium height ones then the shorter ones.

I added water color to some of the flowers knowing that the Quink ink is not permanent.  Not the best idea.

Live and learn.


Tuesday, September 24, 2024

Card - HB - Watercolor Oak Leaves

A watercolor for a guy who celebrates his birthday this week.

I created a warm watercolor background then let it dry.

I cut one piece for the background of the card, then cut the leaves and acorns from the rest.  

I then added definition to the leaves and acorns with watercolor. Painted the white edges with dark brown watercolor.I added gold accents as well from my new watercolor set.

The card base in dark brown measures 6x12 inches.

A white insert and a length of double sided tape with carrier on the flap.  Ready to go.

Friday, September 6, 2024

Cards - Self Closing Cards - Christmas & Poppies

I made this card the other day but did not have double sided tape to complete the cards.

This is a card that does not need an envelope because the tape on the small flap will close the card once you have written in it.

This card has a turquoise base that measures 5.5" W x 6" T and a 1" flap to close.

I place a piece of lavender origami paper which was spattered with watercolor.  The white frame was cut with the Stampin Up Clear Oval Accent die with the matching mover shaper die. Spattered with same watercolor.

I cut the flowers with the Row of Poppies die by Memory Box in the same card stock as base. 

They were adhered to a watercolor background with Scotch Quick Dry Glue but they are difficult to glue down.  An insert was glued to the right hand side. Finally, tape with carrier for the flap.

I have not used this type of double sided tape for a long while because I don't run classes anymore and I am always crafting at home.

I needed it for the flap so that I could put it on when making the card.  I could have waited till I prepared them in December but having to cut tape then would have been a pain.

My sister let me know I could buy it at Dollar Tree.  This roll should do it.


I folded the card so that the pattern was on the inside to keep the solid side for addressing.

I cut the arch with the TH Arch Frame die out of deep red card stock.
I cut the Nativity with the QuicKutz Nativity long die.  I just cut my So Saffron cardstock to 5.5 inches and took the characters I could get with was the Shepherd and lamb. I adhered the manger section onto the deep red arch.

I added gold stars with a paint brush and metallic watercolor.  I painted the large star onto of the stable too.

I added a plain insert which I will just hand write when I prepare them in December.

Tape on the flap.

This card base is royal blue linen finish card stock cut 6x12 inches scored at 5.5" and then 1" for the flap.

I cut the ornament with Sizzix Ornaments #4 die in blue, then cut just the hanger from silver card stock. I used a decorative paper background from my stash as the background. The ornament is held in place with a silver glitter swirl brad. I added a few more around the card.

I added blue vellum on the left hand side to add some interest adhered with vellum adhesive.

White insert and d/s tape on the flap.


I created 2 Snowman cards.  One with a royal blue card base and the other with a grey card base. I cut the snowman with the Sizzix Snowman and Hat die.  On this card there enough space for the hat! I added a ripped snowbank. Painted buttons on this front and a face, added a ribbon scarf.  I watercolored the hats which turned out great. Added a snowflake die cut/punchie in the top right hand corner. Really happy with these.  The white insert on the right hand side and tape on the flap.  I can always stamp a sentiment later on the insert.

Monday, May 27, 2024

Cards - Watercolor - No Greetings

I used some of the leftover watercolor pieces from my entries for the senior show.

Here I have cut a 4 inch piece of watercolor then I mounted it to a SU Cool Caribbean A2 card base.

I added a embossed strip of SU Coral Calypso mounted on the left hand side with a teal blue large dot brad attached.

I added a quarter sheet insert and a white envelope.

I pressed it over night and it is ready for the card box.

I gave my niece another set of cards on the weekend so the box needs refilling.

This card started with a 4.00 x 5.25 inch piece of watercolor paper.

I chose a SU Groovy Guava A2 card base.

I placed a piece of SU Coral Calypso grosgrain ribbon across the watercolor piece and taped the ends to the back. 

I added 5 small handmade paper flowers held in place with tiny brads.  I colored the dark flowers with the leftover watercolor on my palette. Handy!

This layer was adhered to the card front with double sided tape.

I added a quarter sheet insert and a white envelope.  Sitting in my card box.

Wednesday, May 8, 2024

Cards - Christmas Ornaments

I have to get started on Christmas Cards because it is already May. 

I created the green watercolor paper yesterday.  The water color paper is 9x12". It cut it 3.75 x 5 " so I would have leftovers.

I cut red velvet paper with the Sizzix Ornament #2 die.  I chose gold foil paper for cutting the hanger.

I had enough leftover watercolor to punch 4 SU Scallop circles. I chose a gold heart brad as the accent and it will hold the 3 layers together.

I chose a SU Real Red A2 card base.  The water color layer was then adhered to the card front with double sided tape. I then a length of Real Red grosgrain ribbon which I just inserted into the hanger and adhered with ds tape.  The front piece got another tiny piece of tape. 

I seasonal insert and a white envelope for each of the 4 cards I made.  Onto the book press for the rest of the day then into the Christmas Card box for later this year.

Wednesday, August 23, 2023

Card - Thank You

I am so grateful for the physiotherapy I received at the beginning of this year.  

It's been six months since I was released by my physiotherapist. I decided to drop off a thank you card to express in my gratitude in being able to climb stairs, be pain free, and in general enjoying walking and movement again.

It does mean 30 minutes of ongoing therapy at home but I know all my routine and it is keeping  my mobile.

Thank you!


The card base is Stampin Up Lost Lagoon in the A2 size.  I cut a piece of watercolor saran paper I made years ago.  I cut it to leave a nice border all the way around. I wrapped a length of SU Pool Party tiny rick rack around the front of the landscape oriented card.  I cut the word from heavy white card stock. It was adhered with Bling Zots. A few of those also keep the knot in place and the rick rack straight on the inside. 

Friday, June 16, 2023

Card - Watercolor - Echinacea

I watercolored another flower for a birthday card.

I wanted to find another flower so I searched for an image.  This is an Echinacea or Cone Flower.  After making a light pencil tracing I used my Stampin Up Watercolor Wonder Crayons.  

I wet the paper very well then dabbed a bit of Night of Navy and Not Quite Navy at the top of the paper and Always Artichoke and Old Olive on the bottom half.

I used Rich Razzleberry in several different intensities from light to more intense at the bottom of the petals. The petals have 3 to five layers on them. The centers are Daffodil Delight and More Mustard with a brown created.  Then, I used Always Artichoke and some Old Olive on the stems. I used an ultra fine Micron 005 black permanent marker to outline the flowers and stems.

Once it was dry, I adhered it to a A2 Rich Razzleberry card base with the fold at the top. I added a narrow strip of Always Artichoke card stock across the stems on the bottom. I then added a circle greeting with pink words and brushed the edges with the Always Artichoke ink pad.  It was placed just off center. I used a wet brush and clear water to soften the color.   I added a quarter sheet insert. 

Tuesday, November 1, 2022

Christmas Card Challenge - Watercolor - Doves

I created watercolor backgrounds with the intention of using these dove brads for this set of cards. The watercolor has a bit of salt technique.

The doves come in right and left facing styles. I used a Sakura GellyRoll Stardust - Clear Star gel marker for the olive branch.

The circle behind the dove is a 13/8 inch circle punchie.

The greeting is a color printed double flag end banner I designed.

This card is Stampin Up Elegant Eggplant which is a deep rich purple color.  This card is in the landscape orientation.

On this card I used Stampin Up Primose Petal for the card base as I did not have any Rose Red card stock.

The circle is Rose Red.

The greeting is also Rose Red and I chose Peace on Earth in various fonts.

You can see the Sakura Gelly Roll Stardust - Clear Star gel marker on the image on the right. 

It just adds mostly sparkle with little colors so it works well in many situations.


These watercolor backgrounds were created with the Stampin Up Watercolor Wonder Crayons which makes it easy to match to the card stock.  

This card had lots of salt action on the color.

The card base, the circle punchie and greeting are all Marina Mist on the left and Always Artichoke on the right.

Sunday, September 11, 2022

Fall Leaves Birthday Card

Another watercolor card.  This lady is a warm colors lovers so I decided on fall leaves for the image on the card.

I found several fall leaves line drawings on line then created an image which I drew in pencil.

I then used my Stampin Up Watercolor Wonder Crayons to produce some colors for these leaves. Bravo Burgundy, More Mustard, Cajun Craze, Always Artichoke featured in the colors.

I placed a wash of color from the reds to greens to yellows on the 140lb watercolor paper.

The leaves are red with a mixture of some of the other colors.

I mixed some Payne's Gray and some left over color to do the lines in the leaves and tracing the outline of the leaves.

Once the watercolor was dry, I chose a Soft Suede card base in A7 size (5x7) and adhered it to the card front with 3D foam tape.

The greeting is SU Artisan Label punchie color printed and backed with a More Mustard punchie cut in half and glued offset on the back.  It was then adhered to the card front with 3D foam tape.

Thursday, August 25, 2022

Watercolor - Birthday Garden

Another watercolor card for a friend who had a birthday in early August but I was dealing with funerals, etc.

I wanted to paint a flower garden and I think I got parts of it right. I started with a pinkish background made a while ago. I penciled my composition. With a few samples layout on the computer screen I chose a few I liked.  I love the dragonfly and the yellow flower. I think I did a decent job of creating the shorter greenery towards the bottom.  I think the spiky flower is too big. The green stems are too different in color. Should have stuck to warm green. 

I added a Stampin Up Modern Label punchie in Sage Shadow and added a Word Window greeting that coordinated.  I chose a Tempting Turquoise card base to match the dragonfly. It is off to my friend tomorrow.

Thursday, February 10, 2022

Exchange Cards - February - Watercolor Birds


These cards were made back in late January.  You can check the Watercolor Birds post.  This bird really adapted well to different coloring.  I was not sure it would.   

The left one was mounted to Old Olive card base and the right to Lovely Lilac.  They were spattered with brown watercolor by flicking the paint brush.  The ribbon is Soft Suede placed across the card and taped under the focal bird element.

These are off to my exchange partners.

Saturday, January 29, 2022

Card Exchange - January - Watercolor Birds


I have been busy so my Card Exchange cards are almost late.  I decided to use the small bird image I used for the thank you project I did in December.  This time I wanted to actually paint the birds.   I prepared my pieces of watercolor paper with different background colors.  The paper is 3.5 inches wide and I just applied a wash down the sheet changing the colors as I went. It was taped down and allowed to dry completely.

I trimmed the pieces of watercolor paper to squares roughly having a different color in each square.  I traced the bird onto the center of the square by placing the line drawing below my watercolor onto my light table. I used a permanent black fine Sharpie marker to trace the image.  I then used the colors I had mixed for the backgrounds to color the bird accordingly.

Then I matched the card base to the bird color.  The one on the left is Close to Cocoa and the right is Bashful Blue.  I added a length of Soft Suede grosgrain ribbon across the card and taped the ends under the focal element.  The birds are attached with 3D foam tape.  I spattered the cards with a bit of brown watercolor.

These are off to my partners.

Thursday, December 30, 2021

Christmas Thank You Cards


I used some of the cards I had made for the project for Mom & Dad's neighbours in early December.  I really appreciate the gifts and experiences I got for Christmas.  I got to make tourtieres (meat pies) with my Aunt, dryer balls and reusable produce bags from my sister and a blue baking dish which matches my dishes and a big wooden cutting board.

Friday, January 10, 2020

Card for a Friend

I made this card for a friend who is facing uncertainty in her health.

I chose the designer paper with waterolor in green and yellows.  It is glued to a dark green textured card base.

I cut the Memory Box Row of Poppies from an olive green card stock.   I then cut another from a deep yellow card stock.  I the trimmed the flowers from the stems on the yellow and glued them to the corresponding ones on the green layer.

I ripped a piece of brown card stock and glued it to the bottom of the card then trimmed it to the edges of the card.

I added a greeting punched with SU Word Window punch which was layered onto a SU Modern Label punched from the same card stock as the stems of the poppies.  It was adhered to the card front with 3D foam tape.