Showing posts with label cotton. Show all posts

Tuesday, October 6, 2026

Flower in Vase - 07 - 08

I found this scrap of soft jewel toned fabric at the ReUse Center.

It reminded me of a special dress Mom had made for herself.

I thought that would make a special flower.

I made the classic 5 petal flower with 4.5" squares.  I cut a flower from mustard felt and added a yellow button for the center. 

I placed a wooden spacer in the center to accommodate the amount of fabric and provide support for the wire.

I stitched a royal blue felt circle on the back to hide the stitches, etc.

I placed it in a green vase which matches the green in the fabric. I chose a navy wire.  I placed some clear vase filler to hide the bottom of the wire.  I gave it a Thinking of You tag.

I made a 5 petal pink flower from thin cotton fabric in bright pink.  The five petals are a bit smaller about 3.75".  I cut a purple flower for the center and chose a facetted clear glass bead to coordinate with the vase.  I used a button to stabilize the wire then stitched on a purple circle backer to cover the ugly bits.

I wound the purple wire down a bit to fit the pressed glass ball vase.  I used a clear plastic straw to keep the stem in place.  I added some silver and pink crushed glass vase filler with a funnel.

The glass container used to be a bottle so it had screw threads at the top which I wanted to cover.

I cut a piece of the same fabric as the flower and placed it over the opening and tied it in place with purple thread. I pinked the edges to help with fraying. This will be helpful to keep the filler in as well. 

Tuesday, August 18, 2026

Bottle Bag V2 - 02

 I made another bottle bag this morning.

The fabric is 100% cotton vintage I expect. It was a left over I picked it up at the GA fabric sale this spring.  Fortunately, there was enough to make a bag.  I did have to piece one of the cross pieces.

I decided to put the flannel into the seams this time so it was cut 4.5" W x 29" L same as the outer fabric and the ivory cotton poly lining fabric.

I decided to add a band of turquoise blender fabric at the top. It was cut 2.5 inches T by 4.5 inches W. It was stitched to each end of the cross pieces and then ironed to face the raw edge.

I did measure my legs of the cross this time to ensure that the join was perfectly in the center.  I got lucky on the first one.

I top stitched the bottom square then top stitched the four side seams. 

I decided that one strap is enough so I cut a piece 12"L x 4" W, folded the ends in then ironed it in half then folded the raw edges into the center to make a 11" L x 1" W strap.


I tacked it to the right and left sides of the bag once I had decided which was the front.  I chose the bluest side to coordinate wit the turquoise.

I sewed on my "My Bag" tag.  Less time spent this time around.

With the corner seams being top stitched it gives the bag some stiffness which allows it to stand on it's own.

The strap is well reinforced to the bag.

A generous bottle bag which will hold a champagne bottle and hence almost any other bottle.

Super happy with this one.

Sunday, July 12, 2026

Placemats with Zippered Pocket

 I made this pair of placemats for a prize at our family event. 

I chose a piece of cotton I purchased at the GA fabric sale a couple of weeks ago (pink floral with a black background).  I made that the front.  I chose a piece of black polka dot poly cotton for the back.  

I cut the back and flannel backing 12 " T x 17" W. 

The front I pieced because my cotton was not long enough.  I added a piece of raspberry polyester knit on the left and side of the zipper.  The solid color helps to direct the user to the zippered pocket on the left.  I added raspberry colored tabs on each end of the zipper to fill in the gaps. 

I added two 12" ties on the opposite side which will keep it closed when rolled up.

Once I had pieced my front with the zipper and the raspberry piece I placed right sides together onto the backer and sewed all the way around leaving a gap to turn it right side out.

I ironed it and then did a top stitch all the way around closing the gap I had left. 

I then made 2 seams across the height of the placement. 1 to define the pocket and another just to keep the backer, flannel and cotton together.

The pocket can hold utensils and a napkin, markers, crayons, or other crafty things.

The fabric is completely washable. The color helps to hide the dirt. 

When going on a picnic at a park it gives you a clean place to eat no matter the condition of the table.

Saturday, April 11, 2026

Fabric Flowers - Singles 2

Fabric flowers made with circles which I have made before.

I chose this beautiful pink printed cotton and cut five 4 3/8 inch circles. These were folded in half and half again to quarters. I stitched along the raw edges of each petal with a strong thread.  Once stitched I pulled the thread to gather the petals to the center. Tied off the thread securely.  

I used a bit of black wool fabric to fill the hole in the center and stitched it to the cotton flower. 

The bronze wire stem was stitched to the black center through the hole at the top of the stem. 

I placed a yellow felt circle behind the black textured button and stitched them both to the black center.

A black felt circle was hand stitched to the back to cover the stitches and make it pretty.

Burlap Sunflower - I designed a pattern on paper then cut out the ivory burlap to match which measure 4.75 inch in diameter.  Then I cut a piece of brown cotton fabric about 3.25 inches wide with pinking shears.   Then another layer of ivory burlap fabric again just a bit smaller.

The brown cotton center measures 2" in diameter and was stitched with a running stitch around the edge and French Knots in the center with ivory thread.

The 12" bronze wire stem was attached with stitches to the front layers before the cotton center was stitched on.  

The brown cotton backer was stitched on the back to hide all the stitches.

The Purple Tulle flower was designed with strips of dark purple and light purple tulle.  The strips were 1" wide and 5.5 inches long.  Placed on a 1.75 inch ring with half hitch knots. It took about 60 which I alternated with light and dark.

I created the center with a circle of deep purple cotton fabric, some batting and 2" cardstock circles.

The silver stem was sandwiched between the card stock circles and connected with the gold paper fastener. This was stitched to the ring with strong purple thread.

A circle of purple felt was stitched on the back to cover the stitched and make it pretty.  The outside edge of the flower was trimmed with the pinking shears to even out the petals to the same length.

Turquoise felt centered flower has tulle, cotton and felt.

The center was create with stitching felt circles which had been folded in quarters. I put a yellow one in the center.

I added a circle of white cotton to provide texture and definition between the felt and tulle.

The tulle is 10 layers of white tulle which were stitched together. 

The silver wire stem was sandwiched between 2 chipboard circles to provide support to the heavy center. 

I did resort to hot glue to hold these layers together as I was running out of time to have them ready to take to the gallery.

These flowers are at the Art Gallery Gift Shop right now.

Note:  The flowers on average are quite heavy and needed stronger stems than the bouquets as they were just placed in a vase.  During the creation phase I was not thinking of the weight.  Buttons could have been replaced with felt circles. I used tulle to lighten them when I could. Even 8 strands of wire was challenged by some of the flowers. I wanted to make them all unique so that added to the complexity of the project.

Monday, March 30, 2026

Sewing Project - Every Day Carry Bag

I worked on bags today. I was looking for something I could add slow stitching to which I could sell.

Of course, I love Every Day Carry Bags. I have made a couple. Mine and one for a show.

I started with a piece of blue striped cotton fabric. It was cut to 8.75" W x 11.125" T.  

The flannel was cut just inside the seam allowances so it would not bulk up the seams.  It was quilted to the cotton with the curvy decorative stitch in vertical lines matching the lines in the pattern.  I used ivory thread.

The lining is good weight polyester fabric in medium grey.

It was cut the same size as the outer fabric.  I sewed the side and bottom seams on both outer and lining then boxed the corners to 2 inches wide.  I pressed the pieces then put the outer into the lining and sewed the top seam leaving a gap to turn it right side out. 

The zipper insert was assembled separately with 2 tabs on either side measuring 1.5" finished. I sewed the bottom tab to the zipper then top stitched the top tab on top on both sides. Now, I had to finish the ends. I trimmed the ends of the zipper insert to the width of the top of the bag which is 7.5" wide. I added a binding to both ends in the same fabric. With all the edges finished I sewed it to the top of the bag with the curvy decorative stitch. 

Note: My planning was not good because I could have added the pocket to the front panel before sewing that up but I had to do it after. Same with the handles - They should have been attached to the front and back panels before assembly.

A quick access pocket on the outside is always nice.

The top zipper provides full access to the bag.  I embroidered it with a paisley design in the blue and emerald.

A zipper pull is helpful because the zipper tab is small and it is pretty incorporating the emerald as an accent color.

It is fully lined which leaves no raw edges exposed.

The Clip Strip is handy for things you don't necessarily what to dig for in the bag. Keys, cart token, measuring tape, and who knows what else. Maybe even a pen could live there.

The boxed corners helps to give the bag body and space for larger items. Maybe a small book, post in notes, and whatever else.

The straps measure 12" long which gives enough room to sit on your wrist.

Finished size is 10" tall and 8" wide at the top with 5" wide at the boxed bottom.

Saturday, February 28, 2026

Sewing Project - Fabric Collage Vase Cover/Wrap

My sister and I discovered vase wraps back in early February.  I was intrigued so I decided to give it a go.

I started with a piece of flannel 9" x 9" square to allow me to trim it after I had quilted it.

I then used Mom's Quilt as you Go method to sew strips of curated fabric and lace along the length of the flannel. I used 8 strips in varying widths.

There are many ways to finish it into a tube to go over the vase/bottle.

I decided that I wanted a flap to extend from the body of the wrap.  So, I added a strip of turquoise fabric to the lining piece so it would be exposed when I sewed the wrap closed.

I trimmed the fabric collage piece to 8.5" tall and extended it to 9.5" wide with my final piece on the collage. I trimmed my piece of lining to the same size.  I then placed right sides together and stitched all the way around leaving a gap in order to turn it right side out.  Once turned right side out I pressed it well and top stitched all the way around very near the edge with a decorative stitch. 

Then, I wrapped it around the bottle I was going to use as a vase and played with where the seam would be placed.  The option was a bit, none, or lots of turquoise showing. Once, I decided I pinned it as tight as I could and removed the bottle. I sewed the seam along the very edge of the pattern fabric edge. 

The beauty of the wrap is that it folds flat and stores away when not being used.

The bottle I chose is a sauce jar that measures 7.75" Tall, 2.25" in diameter and about 8" in circumference.

You can adjust this design any size bottle you have one hand.

Wednesday, February 11, 2026

2026 Slow Stitching Project - Page 5 - C1 Colors/Chain Stitch/Coil

I have been working on a big project so I am behind in my stitch book.

I am following K3N Cloth Tales Slow Stitch Project 2026.

She chose Couching for her C1.  I agreed and Couched a Coil of CottonTwine with Chartreuse thread on my page. Then I added a Circle of Corduroy in the middle. I chose scraps of Cotton in Colors that start with C. Cerise, Chocolate, Coral, Citron, Crimson and Cobalt. 

I added a frame in left hand corner with Chain Stitch in Crimson and Cobalt thread. 

Monday, December 1, 2025

Sewing Project - Hot Pad

I decided to make a hot pad so I can use my peninsula for serving food. The plan is to make 3 of them but one is a start.

My sister has made this one.

I did want to make a removable cover so that if this is not my final color choice at least the time making the pad was not wasted.

I chose a pear fabric for the top and a deep yellow fabric for the bottom.


I tested the fabric sandwich before I started sewing.

Cotton cover top and bottom.

Pad
  1. Flannel - snowflake
  2. Terrycloth - navy
  3. Insul-brite Thermal Batting
  4. Terrycloth - yellow
  5. Flannel - snowflake
I heated my iron to the hottest cotton setting then set it down on the sandwich with out steam for one minute. The counter was slightly warm but not hot to the touch at all.

I set about making the pad.  I decided to make it about 12x12 inches square. My casserole dishes are around 9x9 inches.

I pieced together the yellow terry cloth and the navy terry cloth layers until I had the size I needed.

I cut the Insul-brite to 12x12 inches.  

I used my walking foot to stitch these layers into a cohesive piece.

Installing the walking foot took a long time.  After a couple of videos, I worked it out but my needle was hitting the foot.  I verified I had the right foot for my machine so I kept trouble shooting. After replacing the not quite straight needle I was finally able to stitch the middle layers together. It worked really well.  It's been at least 2 years since I bought it and had not used it.

Then I cut a piece of snowflake flannel to 14 x 28 inches which will be the pad cover. I sewed the 3 edges to just encase the middle layer. I inserted the middle piece into the case and folded the open end to the inside. I top stitched all the way around at about 1" from the edge. Then I closed the open end with a seam closer to the edge.  I top stitched a cross in the center but that may not have been the best idea was that is where the loft needs to be to protect the space below. 

NOTE: Keep the stitching away from the center.


Now I could get started on the removable cover.  Upon inspection of the pear fabric the pieces were smaller than I needed. I decided to apply a couple of fabrics to a foundation layer with the Quilt As You Go method.  I started with my foundation piece being bigger than I needed. I started with the pear fabric, and alternated strips of yellow and pear until I ended with pear fabric. 

I cut the deep yellow fabric to 13 inches by 15 inches which I thought was plenty but forgot about the thickness. My seams ended up at .25 inches and I zigzagged the edge as well.  I was going to felt the seams but there was not enough fabric for that. I sewed pear pieced fabric and the deep yellow fabric on the 3 sides, trimmed the corners to the zigzag and turned it right side out.  Ensured that the pad would fit inside. Good to go.

I was able to made a generous hem on the open end and top stitched that edge.

Now I could place the pad into the removable cover.  Paying attention to getting the far corners aligned properly.

The cover is just a slightly bit deeper than the pad.

It is reversible so I could use the pear side or the deep yellow side as the top.


The pad and cover now all settled in place provides about 12 x12 inches of protection for my counter.

Should the cover get dirty from the bottom of pans or casserole dishes it can be removed for laundering. 

Of course, the pad is also washable should the need arise. The pad could also be inserted into a new cover based on design or wear. 

There is a potluck at the end of the week so it was the big motivation to get this project done. Besides, I needed a day at home.  Last week was full of activity and being out of the house or contractors in my house.

I enjoyed my day sewing and used some fabric from my stash.

Sunday, November 9, 2025

Tree Scent Ornaments - Round 2

Another set of ornaments today.

I bought these jumbo paper clips at a thrift store.  I thought I could turn them into essential oil diffusers.

I thought it could be a sun or a sunflower.

I cut a circle from yellow felt with my SB Nestabilities thin dies. I couched the circle behind the wire following the spiral in the center.

I need to cover the stitching on the back so I cut another circle from yellow felt just a bit bigger that the last one.  I then added satin stitch all around the edge and securing the points when I came to them.  Worked great.

I am a fan of sunflower so this floats my boat.

I found some bells at the ReUse Center a while back.  They are beautiful! Brass, heavy, textured and sound really nice.

I decided to hang them with gold metallic ribbon making them 3 different lengths. I then pulled all the ends of the ribbons through a large wooden bead.  It had black marker but I was able to sand it all off. So glad. 

I added a bow from the same ribbon and secured it to the top of the ribbon ends with stitching in gold thread.

I hand stitched a gold ring to the top so it will hang.

These are Ghungroo bells used on ankles of belly dancers.

This gold ornament came from the ReUse Center.

I decided to pair it with purple felt.  I cut a circle the same sizie and then couched it to the back with stitches where the holes in the front allowed.

Now I had to cover my stitches so I cut another circle the same size from plaid fleece and stitched around the edge in the holes that were large enough for my needle to go through.

I wrapped some floss around the hanger at the top. Used a piece of satin ribbon for a hanger and it was ready.


I stuffed this wire snowman with cotton yarn pom poms.  I had to trim the one for the head so it would fit. 

I then stitched around the edges of the circle with white sewing thread to secure the pom pom.

I gave him a bright red yarn scarf and a silver cord hanger.

I would recommend only pure essential oils to ensure the best ingredients. This oil will dissipate completely and in general does not stain.  The felt/fleece or pom poms or wood bead will serve as the diffuser. A few drops of oil on the material will provide scent for your personal space.  Choose your favorte scent.

Saturday, October 4, 2025

Sewing Project - Card Wallets

I made a bunch of these card wallets this morning.   I have been sewing for a few days and with all the fabric out and some combos used for the fold over wallets I just powered through.

What cards do you put in these walletsÉ All kinds - credit cards, transit cards, library cards, loyalty cards, business cards (yours or those you need to access regularly) and a few I am sure I have not thought of.


Top Left: This fabric is gorgeous.  It was strips so I just cut the length to 12 inch pieces and sewed them together to get 12 inches wide. I paired it with this raspberry fabric and it may be a bit too pink for the colors in the outside fabric.

I have not sewn snaps into these. My neice will help me with plastic snaps when I see in the next few weeks. It will take just a few minutes instead of hours by hand.

Top Right: This bold navy and white plaid / check is nice heavy fabric.  I paired it with a lemon yellow broadcloth for the lining/ petals.

Bottom Left:  A nice blue on blue plaid cotton fabric I paired it with a taupe cotton fabric.

Bottom Right: For the outside fabric I chose a floral patterned fabric which is part polyester I think.
I paired it with a deep dusty blue.

Wednesday, April 2, 2025

Slow Stitching - April 2025 - Week 1

I chose tea for the subject of my April slow stitching square.

I chose a mottle blue piece of cotton fabric which I invisible basted to a thin cotton foundation layer.

I chose to create a tea bag and tag which adds a border around my square.

The tea bag has been running stitch around the edge of it with seed stitches towards the bottom to represent the tea.  

The green tag is at the other end onto which I added TEA lettered in turquoise.

The string was embroidery with stem stitch in a grey floss. 

Tuesday, October 29, 2024

Slow Stitching - No. 044 - Stitching Blind

K3N Cloth Tales Slow Stitching Challenge 2024

Week 44 - Stitching Blind

This was a challenge and uncomfortable. 

Prep - threaded 3 needles - green, yellow and navy. My base piece looks like wool but it is not. 

I put an applique pin to let me know what I thought was bottom.

I gathered green cotton, white lace, navy ribbon, and yellow yarn as layers on this piece.

I sewed the green cotton on first.  I see that I did not pull my thread taut which left me with loose thread on the front.  I thought this one had gone fairly well. 

Next, I did the lace which I thought was pretty straight but not really. I was using yellow thread but you can see I pulled the thread out of the needle and I just abandoned it halfway through.

The navy ribbon went pretty well.  I had lost one of my needles so I cut the navy thread, knotted it and used the rest of the navy to couch the yellow yarn which went very well. 

I will finish the few stitches so that I have a finished piece.

Saturday, September 28, 2024

Sewing Project - Adjustable Bookmark

I have been thinking of making some bookmarks for the Christmas sale since we share the space with the library.

With a bit of research, I found a few features I would like to incorporate. Adjustable and a pocket for a writing instrument.

After some measuring, I decided to make the it wrap around the book with an elastic and a couple of buttons for adjustment.  A pocket could be placed on the front and maybe some stitching could be included.

I cut 2 pieces of fabric measuring 3"W x 21" T - one patterned one solid.  I decided to use elastic from old face masks. I cut a piece of mustard fabric for the pocket. The buttons and embroidery need to be added before sewing.  The pocket needs to be sewn on the front of the bookmark. 

The elastic was pinned in place at the opposite end from the pocket. Then, I sewed all the way around the long strip leaving a slit to turn it inside out. I trimmed the corners, turned it inside out, pushed out the corners with a chopstick and pressed it flat.  I then top stitched all the way around. It was very difficult to do the buttons and embroidery after the pocket was sewn on.

Notes: 

  • The pencil pocket is too tall and could be narrower. 
  • Stitching and button(s) need to be done before assembly.
  • This is a hard cover book so the overall length of the bookmark could be shorter to accommodate smaller books.
  • I will use this one and implement improvements to future versions
  • The mask elastic may too soft.

Friday, August 16, 2024

Slow Stitching - No. 033 - Nature of Cloth

This week's prompt in the K3N Cloth Tale's Slow Stitching challenge is "Nature of Cloth".  

Kathryn explored her bundle of fabric.  How does it feel? Does it pass the needle test? Does it ravel? Does it have texture?

Once we had selected our fabrics then we were to make a fabric collage.

I chose a corduroy, wool plaid, orange cotton, yellow cotton and a small triangle of mustard colored silk. 

I placed a circle of stitching around the intersection of these fabric pieces.  Then random running stitching, seed stitching, with a sprinkling of French Knots.  This was a lot of fun to make.

Sunday, July 14, 2024

Slow Stitching - 2 more Zokin

With everything mostly packed in preparation for the installation of the flooring I have no access to my fabric stash.

So I dug into my rag bin again and decided to stitch more Zochin - Japanese Cleaning Cloths.   

Generally, I have a hard time throwing away cloths, especially if they are cotton.

Here I just stitched together a pink face cloth which must have some polyester as the center is very thin and a green dishcloth.  They were the same size and the edges were serged so I just went along in both directions.  I used some green and some pink thread.

A cute cleaning cloth.

This is a corner of a cotton tea towel.  I paired it with a brown terry towel.

I used brown thread and stitch the 3 unfinished sides first and turned it good side out.  Then I stitched all the way around starting with the finished edges at the bottom.

I was careful to not  detract from the owl stitching as I went across the cloth.

Another for the cleaning cloth bin. 

Yes, those are my cement floors which I am now waiting for permission to cover. Yeah!


Monday, October 30, 2023

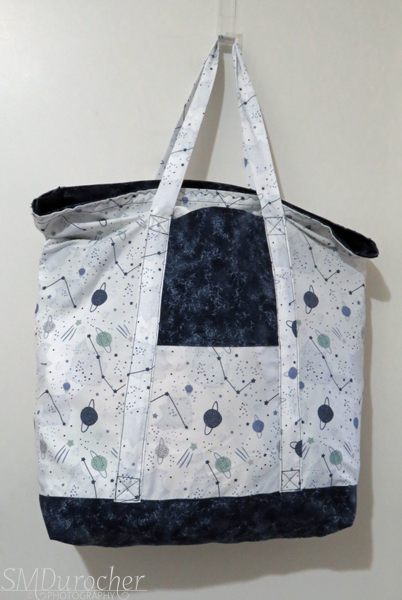
Sewing Project - Large Tote Bag - Stars and Planets

My sister and I had a conversation the other day about projects which we could make to give back. 

I still have quite a few microfiber fabric which can be used for another project.  Originally, they were collected to make Re-Useable shopping bags.

Those were donated and have not sold really well.  I think presentation is the problem. I am moving on.

Morning Star is an organization which supports women in crisis.

There is no dignity in carrying all you own in a plastic garbage bag so large bags can be used to give these women some self worth.

I chose the Stars and Planets pillowcase which is made of deluxe microfiber fabric. 

I paired it with some cotton fabric in deep navy small pattern which was donated to me when a quilter in our group retired and de-stashed her supplies.

I decided to put a piece of navy on the bottom since the fabric is white the bottom of the bag will likely get dirty fast and being a dark color will help.

I layered the cotton over the microfiber which will add strength.

I wanted the bottom to be boxed. I created the corners at 5 inches across then folded the  triangles onto the bottom of the bag and sewed them down.  That will add layers on the bottom and help to add structure to the bottom corners.

I chose a navy thread so it does not show on the cotton fabric.  It is more evident on the microfiber pieces.


I created the zipper insert the same what I made it for my own tote bag.  I used the method explained in this video Tutorial by Crafty Gemini.

This produces a completely finished edges with no open fabric ends.  Tabs are added to the 2 ends of the zipper so it is easy to pull open and shut.

I hemmed the top edge of the bag after I cut off about 10 inches off the top of the pillow case once I had undone the seam that created the top hem.  I used that fabric to make the handles. Microfiber more durable than cotton being handled all the time.  Handles are 1.25 inches wide finished with the seam place in the back center. They are 53 inches long. I tied the bottom of the handles in the cotton bottom for sturdiness. They were sewn 7 inches from the sides. 
 

It is important to have reinforce the stress points to ensure there is some strength is distributed to take the wear and tear.

The zipper insert is the same width as the opening of the bag. It is about 6 inches deep which is slightly more than the bottom but we have to account for the seam to put it in.


Now it is just a matter of pinning it very carefully and sewing the insert into the top of the bag.

I chose this decorative stitch on my sewing machine which produces this wavy seam which adds a bit of pretty to the bag.

Once the zipper insert is sewn in the zipper end tabs can easily be accessed when opening or tucked in when on your shoulder. 

It does allow an addition amount of space for hold stuff when the bag is full.

With the zipper insert the same width it makes the bag well sealed to ensure there are no holes where one could lose items from inside the bag.

The color of the zipper provides some contrast in the dark fabric so it is easy to see.  The tabs also help the find the zipper slider.

I will be making a few more of these to be donated in early December.


Tuesday, September 12, 2023

Sewing Project - Tea Towels


I made a set of tea towels for my niece for her birthday.  A while ago I found a piece of fabric at the thrift store which was a linen/cotton blend and it was mustard color.  Perfect! I said.

I did have to find thread to match so I headed to Walmart on the Monday before school started.  What was I thinking.  The parking lot was jammed and so was the store. I did find what I needed.

I cut the fabric 21 x 30 inches to maximize the fabric I had.  

I had a few problems of my own doing with my sewing machine but with perseverance I solved the issue.  It always purrs like a kitten and I was disturbed when it wasn't but I wanted the job done too. 

I checked my supply of twill tape and found nothing that was not synthetic in a warm color.  I decided to make my own from the fabric itself. I hope it is sturdy enough to stand the wear and tear.

I cut a strip of fabric 2 inches wide and about 18 inches long.  That should be enough. I ironed it in half then opened it and folded it in from both sides. I ironed that flat and sewed it along the open edge.

I cut the strip 4.5 inches long to make this hanging loop.  I decided to place it in the center of the tea towel this time rather than the corner.

This is such gorgeous fabric.  It drapes so beautifully.  The hanging loop in the center makes the tea towel hang shorter which may make a difference.

It is sown into the hem of the tea towel and I double stitched as that is where the most strain will take place.

I am getting better at making mitered corners.  These turned out really well and I added the bit across the corner that secures the folded piece under the miter.

I wanted to add a personal touch which would communicate how much I love her and think about her often.

My sister does a lot of embroidery so I thought I would give it a try.  Should be easy right? Let me say, not so much.  I used the chain stitch and some blue embroidery floss and placed it on the front where the hanging loop was on the back. Top center so she will see every time she uses it.

 Finished size: 19 in W x 28 in L
I am very happy with the end result!  I hope she likes them.

Saturday, August 19, 2023

Take Out / Take Away Bag

In my city, the Single-use Item Reduction bylaw came into effect on July 1, 2023. That means when I order take out food at a restaurant - some single use items would only be provided when requested and some would be offered at a cost. Plastic bags for take out were banned and paper bags would come at a cost of $.15.  I am okay with that but I still need a bag to bring my food home in so that it does not end up spilling in my car.

I set out to make such a bag.  I generally would need a small bag when I hit Tim Horton's or Wendy's but I got Vietnamese food the other day and that container was much larger.  I determined that I needed a bag around 9 inches square, the sides not too high and a way to close that would keep the food inside. Would be nice if it folded flat when I stored it in my car.

Here's is the result.


The floral fabric is a couple of strips of heavy cotton fabric I found for free at the ReUse Center last week.  The weight was a good start to having a sturdy bag. The strips were only 8 inches wide so I had to piece the bottom and I made it double layer so the inside would be nice with no seams showing.

I cut 2  pieces of 9.5 inch wide and 8 inches tall. Then I cut 2 strips of 9.5 inch wide and 2 inches tall to supplement the other pieces to end up a bottom that was 9" square finished.

I sewed the narrow strips to the large pieces on the 9.5 inch side.  I then ironed them and top stitched the seam.

Once both were done and put right sides together and sewed all the way around leaving a space to turn it right side out. Then I ironed that flat.  

The side piece was cut 8" tall and 38 inches long. Once layer was floral and the back was teal microfiber fabric which will be on the inside. Stitch all the way around and turned it right side out.

I pinned it to the bottom with lining on top of the bottom.  Once I identified the corners every 9 inches and sewed a seam from top to bottom of the eight inch length on all four corners. This will help stiffen the sides.  Then I went ahead and sewed the sides to the bottom matching the corner seams with the corners on the bottom piece.  The ends were overlapped on the front of the bag, again to help stiffen the front of the bag. 

The inside of the bag is floral on the bottom and teal on the sides.  The take out container fits perfectly on the bottom of the bag.

The handles are asymmetrical in the front loop is short and the bag loop is long.  They are made of teal microfiber.  The strip was 6 inches tall and about 38 inches long.  I folded the strip in half and iron it flat.  I then opened it and iron each half to the center.  I top stitched along both the open side and the folded side which helps to provide some stiffness to the handles.

To close the bag the long back loop is pulled through the short front loop and the bag is closed.  The join is above the center of the bag so it stays level.


I had to make it pretty as well.  I cut a large scallop circle from the floral fabric and sewed it over the ends of the front handles with a zigzag stitch

I hand sewed a teal button in the center of the flower for a final touch.

I am very happy at how this bag turned out.  
  • It is large enough to handle any take out order I will make, 
  • It will hold the contents securely inside the bag, and
  • I have a loop handle to carry it along with anything else that is in my hands
  • It folds flat and I can tuck it into a pocket in the car so it will always ready at hand when I need it.