Showing posts with label taupe. Show all posts

Saturday, April 27, 2024

Sewing Project - Wine Bottle Bag - Warm Florals

Here is the latest wine bag.

I loved the warm flowers on this part of the fabric so I cut it to make them the focus of the front.

I found a warm brown grosgrain ribbon in my stash that worked well which I placed at the top edge.  I layered a cotton twill tape on top of that to tone down the shine.

I decided to create an accent element with the same ribbon.  I cut it, sealed the ends with heat then I just folded it back and forth this it was wide enough.

I bought a couple of bags of buttons recently and this shell button was in there.  I stitched this whole element to the top left hand corner of the bag.  Done another one!

For information on "My Bag" Line: 


Thursday, March 14, 2024

Sewing Project - Book Sleeve - Red Batik


I started with the red piece of batik fabric.  I did not have enough to make the whole sleeve so I pulled a few fabric from my stash to complete the colors in the fabric.  I added some black, red and taupe.

I wanted most of the front to feature the batik fabric.  I added black on either side then a piece of taupe on the right hand side.  The back features 2 pieces of batik and black and taupe.  The taupe was on the opposite side so they would not be together when I sewed the bag. I added a strip of red along the top front to finish off the piece of fabric.  Piecing together the fabric took much longer than using a single piece of fabric. There were more choices to make coordinating the colors and the fabrics.

I then laid it onto my flannel padding piece and top stitched the red pieces with red thread and the black the matching thread. Now those pieces were one.

I used some red cotton poly as the liner.  Again, cut the the same size at the main fabric which is 12 inches wide by 19 inches tall.

I wanted the handles both to be black as it was sturdy fabric and a dark color. I just had one piece so I made the back handle out of all red fabric.  The handles were cut to 12 inches long with top stitching.

I used a hair elastic for the loop but I would not do it again.  The center is very hard and the elastic is very dimensional which made it harder to sew into the seam.

I chose a vintage cream button for the front of the sleeve.


For information on the "My Bag" Line


Saturday, March 9, 2024

Sewing Project - ReUsable Bag - Navy and Taupe Squares

This is the last of the 7 inch cotton poly squares in the Navy and Taupe which I received for free.  I paired it with some navy microfiber cloth to have enough fabric to complete the project. I created two 6 square panels then serged all the seam edges. I then sewed the 2 panels together with a French Seam hiding all the raw edges which created the bottom of the bag.

Realizing that it was not tall enough and I needed handles as well I dipped into my good microfiber fabric and chose this navy.  Works well with the pattern in the squares. I cut the navy panel 12 inches wide and ironed it half to 6 inches tall.  I then measured the width of my bag and sewed the strip to be exactly the same width then serged that seam.  Now I sewed the  navy panel to the top of the squares bag with the serger then top stitched fabric to the serged edge from the top on the squares piece.

I then changed my thread to navy for the rest of the project.

I ripped my handles to 3 inches wide and 41" inches long.  I sewed them and turned them inside out.  I fold the raw edges of each end to the inside leaving me a 40" handle.  I pinned the bottom of the handle to the bottom on the first rows of squares 5" inches in from the right and left side.  I created my reinforced squares on the bottom and the spot where the handle meets the top of the bag.  The handle is top stitched on both edges for both handles.

I added a decorative stitch along the top of the bag to keep that fold in place and to add my elastic to the inside of the bag which I can use to roll up if I want it to take less space.


This bag will replace my shopping bag.  This one I made a year ago. It is polyester and is very thin but I just loved the color so I just enjoyed for as long as it was going to last.  

For information on the "My Bag" Line

Friday, March 1, 2024

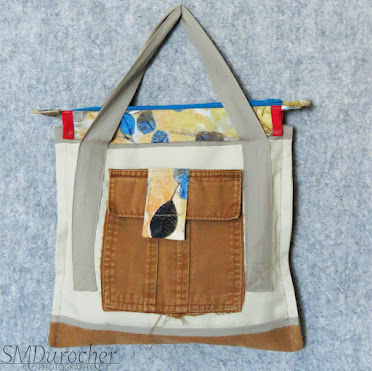
Sewing Project - Recycled Fabric - Everyday Carry Bag

I made a bag from all recycled materials.  The fabrics came from the box from Michelle at ReImagined Fabrics.

The bag is beige cotton duck fabric. 

A beautiful leaf pattern cotton fabric was used for the zipper insert, the tab on the front pocket and the tab on ginger pocket.  

I added a piece of ginger cotton denim to the bottom of the back to improve wear ability and keep it cleaner. 

I chose a small piece of red for the trim on the zipper insert, the loop on the front pocket and the key hook on the inside.

The bag features 3 pockets - the front leaf patterned one, the back ginger denim one, and the space between the ginger pocket and the bag.

It has a teal zipper at the top in the normal for me completed finished zipper insert

I used taupe cotton poly blend for the handles and made them as long as I could. They are placed on either side of the pockets.  They are well reinforced in the stress areas.

The the seams are finished which looks smart and there are no raw edges in sight.

I added a tab on the ginger pocket so that it provide better leverage to open the velcro closure. It is center which the velcro was not.
This button is from my stash of recycled materials as well as the teal zipper.

It was the perfect color to match the teal color in the patterned fabric.


I included a keys hook on the inside so they will always be at hand and easy to find in the bag.

The bag measures 12x12 square so it is not a big bag.  I guess, you would call it purse sized.  


For information on the "My Bag" Line

Tuesday, February 27, 2024

Card - Slow Stitching - A Rose

It's a rose!

I found this heavy cotton fabric at the ReUse Center. I cut it to size finding a nice composition.

I highlighted the stamens and a few of the petals.

Mounted with double sided tape onto a Stampin Up Tip Top Taupe A2 card base.

Adding a quarter sheet insert and an envelope it is headed to the card box for now.


Wednesday, September 13, 2023

Fabric Coasters - Set 1

I've decided to make fabric coasters for sale.

I've chosen to use linen/cotton fabric.  Generally, the outer layers are linen and I have put cotton flannel in the center.

The outer layer is cut to 5 inches square and the flannel layer is cut at 4 inches square.

I sew the flannel to the front piece with a wide seam then sew the 2 outer layers together with a narrower seam leaving a space to turn them out.  

I trim the corners to remove fabric bulk in the corners. I turn them right side out.  Press them flat making sure that the opening slot is well pressed.

I sew a seam really close to the edge all the way around closing the slot at the same time.

This is 11 sets of 2.  I am halfway to where I wanted to be. I have several other colors to make up yet.

Really happy with this day's work.

I am also working on packaging and how I will display them for sale.

Wednesday, February 22, 2023

Sewing Project - ReUsable Bags - 2 more shorter ones

These are a very similar size to the California King ones I made earlier. Overall height 20" T x 19.5W - bag  is 13" D.

I brought home some taupe microfiber fabric home from my sister's on Saturday that had been in my Mom's stash.  There was enough to make to 2 bags I thought.

It was very nice weight and I just had to assess the size of the piece and figure out what I needed.

There are some left overs which I have no idea what I will do with it.  The cut outs from all these bags are starting to pile up.
These bags do fold up to a reasonable size.  They would not fit in my purse but they would work for a lot of places.

I hope to find a few nice patterned microfiber fabric.  Doing these plain ones is getting boring.   I likely have enough bias tape to about 5-7 more.


I have started tacking the elastic to the front of the bag with a bit of stitching before I add the bias tape.  It helps to keep in place.

Means that I don't have to manage 2 things at once.

The button hides the overlap of the bias tape which works well.  Hand sewing the button can  be challenging because there are 2 layers of bias tape and the elastic in that spot.

It is working out alright.


This bag is another short and wide one.  

I used dark brown bias tape, black elastic and a brown button on this bag.

The bias tape makes this go really fast. I don't need to pin or anything.  Just open the tape, slip the edge of the bag inside and top stitch the edge. Works really fast but just quite costly.


This is the package of double fold bias tape in dark brown which I used on the bag above.\

Check out the price! It is $1.00 when the current price is now $3.30.  I wonder how old that package is?  70's?   Who knows!


I am starting to have a little basket full of these bags.

Right now the plan is to donate them.

I will bring them to show the girls at quilting on Monday.


Sunday, February 12, 2023

Sewing Project - Pillowcase Re-Usable Bag

The bias tape on the center is a nice lavenderish color and the twill tape I used was a good color match but narrower than the bias tape. The button was a great match as well.  I used grey thread on this bag.

I made another reusable bag.  This time with a different starting point.When I was at the thrift store the other day they had pillowcases in a bin for $1 each. Some I got for $.50 each. I chose a few microfiber ones and brought them home.  I liked this one because of the pattern in the fabric. 

The advantage is that the side seams and the folded bottom are already done for you. The side seams were nicely serged so totally ready to go. I just checked to make sure they were still intact. I cut the band at the top of pillowcase off. I placed the cutting pattern near the top edge where I had cut opposite the folded bottom edge.  I did add an inch because now I will have to stitch the seam at the top of my handles.  Again, I created finished seams. I chose a camouflage twill tape for the center of the bag and chocolate brown twill tape around the sides of the handles.  


This makes a bigger bag because the width of the pillowcase is wider than the ones I made earlier. The overall height of the bag from top of handles to bottom is 23.5".  The width is 20.5 inches and the measurement from the bottom of the handles to the bottom of bag is 16 inches.

I added a beige button with some narrow black elastic to keep it rolled up. 

As you can see it folded up it is still quite big but it will hold more stuff.

It takes all kinds to make the world go round so I am happy with the result because it is less work and time. 


The microfiber fabric in this pillowcase is pure luxurious feeling. Because I am using opened packages of bias tape sometimes I miscalculate if I have enough.  On this one I thought I did not have enough wide stuff so I put narrow twill tape on the outside of the handles and later realized I would have had enough.  Not undoing the seams.


I used a white elastic from a face mask but I am not sure how long it will last.  The elastic is quite soft and may need to be shorten over time. Glad I did not buy any of this elastic.


I offset the button and elastic because the bag was wider than the previous ones.  It needs more folds to get it narrow enough to be held in place by the elastic. It means though that it will hold more stuff.

The seams again on this one are at the top of the handles and are completely finished with no raw edges showing.

The fold on the bottom means you will not have seams wearing out on the bottom.Really like this one. 

Measurements: Total height is 24" T x bag is 16" T x 21" W

This microfiber fabric is thinner than the previous one.  A bit of a darker grey. This was by Utopia Bedding.  It was nice to keep the thread the same for this bag.

I chose this jade green color of bias tape but it was very narrow.  I had to iron it in half before I sewed it in.   I had to be very careful that I caught both sides the margin for error was very small. 

I will be glad to use up the stash of bias tape but the irregularity of the stuff I have creates challenges.  

Having tape in the neutral color would be helpful but it likely would make for a more boring bag. Would that be a bad thing?  It is really a utilitarian object.  Pretty is nice.


I think this button was a decent match to the bias tape and the black narrow elastic was better than white.

Again this one is quite big and needs extra folds to get it into a decent size for the elastic.

Measurement from top of handles to bottom is 24 inches, the bag itself is 15.5" tall and the bag is 20 inches wide.

With the less sewing because of the sides and bottoms already done these went pretty fast to make.  To donate, less time is better.

Wednesday, April 21, 2021

Birthday Tag

I made a tag for a joint gift for my niece who has a birthday in April.

I started with the QuicKutz Sewing Machine 4x4 thinlit.  The die cuts all the pieces which needed to be assembled.  It meant cutting once for each of the 4 colors - the body of the machine from olive green, feed dog plate, pressure foot and buttons in black, the other adjustment buttons in taupe, the spool of thread in black and red.  

I placed a piece of packing tape on a hard surface and slowly placed the pieces in place sticking them to the tape.  Once all the pieces were in place I used an exacto knife to trim the excess tape from around the outside edges of the die cut.

I then cut the tag with the Tim Holtz Cabinet die one kraft embossed with the SwissDots folder and one ivory.  I used the Crop a dile to make a hole in the top.  I adhered the sewing machine die cut to the tag with 3D foam tape.

I ran a length of red twine through the hole and it's ready to be attached.

The HB diecut was received in a swap so I have no credits.

It is very cute but a lot of work which explains this is the first time I have used it.

Sunday, March 21, 2021

Card - Coffee Time

I made this card for the 2021 Spring and Summer Coffee Loving Card Makers Blog Hop.

I started with a digi of a hand drawn pastel image of a beautiful coffee pot and cup.

I just love the soft muted tones of this image.

 I printed the image on a quarter sheet of white card stock and trimmed it to 3.75 x 5 inches.

I added a warm caramel piece of card stock layered behind it and adhered these layers to the front of a pea green card base.

I added a greeting above the image with a ripped layer of the same caramel card stock and the greeting printed on a taupe card stock.

I added 3 mini brads to the left of the greeting.

This greeting layer was adhered with 3D foam tape. 


Card - Angled Rectangle

This was the second set of card supplies which lay in a box for a year after COVID cancelled my classes at Compassion House.

A warm Soft Suede A2 card base with a piece of designer paper adhered on an angle and then trimmed to the card edge with scissors.

I created the accent with 3 leaf die cuts made with Tim Holtz Tattered Leaves die.  I adhered them to each as an accent then mounted them to the card front with 3D foam tape.


A taupe card base with hexagonal pattern on the angled rectangle designer paper. 

I added a Tim Holtz Mover Shaper Vintage Alarm Clock die cut from gold glitter card stock.

I decided to send the rest of the unmade card kits to Compassion House with a couple of samples so the ladies can make them up during their free time.

I don't anticipate being able to teach classes for a long while yet but I will put together more kits and drop them off.

Thursday, September 26, 2019

Sewing Project - Quilt 5 - True Blue & Floral

I completed another quilt today.  When I go to quilting on Mondays and cut squares then I want to get the rest finished.  I can't really keep up this pace.  We will have a 3 week break coming up.

Final Size: 40" Wide x 49" Tall.

Fabric:
Cotton fabric which I bought at the Grandma Africa sale last year.  The True Blue solid worked really well with the cool floral.   I had 1/2 yard of each.  I had to piece 4 squares to get the 10 of each I needed. The back and sashing areTaupe 100% cotton.

Squares:
I cut 10" squares for this one to make it a bit bigger.

Quilting: I sewed the front of each column adding the taupe sashing in the right places.   More about that a little later.  I then placed it on the batting and backer and quilted each square on the diagonal corner to corner.  Once quilted, I cut the other layers to the size of the front.

I almost got all the sashing right but forgot one on column three and only discovered it then I was starting to put the columns together so I had to do some ripping out.  I added the sash between the squares where it belong but now my batting and back were short.  I had to add a strip to both.
I also put one column on backwards and had to rip it out and put it right. There were some distractions going on so my concentration was broken. 

Binding:  I cut binding 2.5 inches wide and 190 inches long from the taupe solid. This time I sewed it to the back and pull it forward and top stiched on the front.  Not sure I would do that again.  Check out the tutorial here.

Column Assembly: I used the Quilt As You Go method to assemble the 4 columns together.  You can check the tutorial here.

My take away from this quilt: 
  • Love the colors!
  • Quilting in columns takes less time and make the quilt softer
  • I used a straight stitch for the tacking down of the sashing instead of the zigzag which was OK
  • The quilting pattern did leave long areas with no quilting so maybe not the best.
  • Quilting and sashing when things have to be in a particular order is challenging.  I did mix up the columns.  It looks good but not as I had planned.
  • Binding should be sewed to the front and brought to the back.


Tuesday, August 20, 2019

Compassion House - Thank You Cards

I made some more thank you cards for Compassion House this week.  I am delivering them tonight.

This card is a design I have used before.  You can see a few here.

I cut a 6 inch circle then cut it in half.  The straight edge was placed along the fold and adhered to the grey card front.

I added a black grosgrain ribbon which was run the length of the fold and tied in a knot.  I added floral accent made of 2 white silk flowers and a flower punchie all held in place with a tiny black brad.

The greeting was color printed and punched with the Stampin Up Word Window punch.  It was adhere near the top of the card with 3D foam tape.

This layout is based on ripping a piece of designer paper into 2 and adhering them to the card front leaving a space for the card base color to show.

On the card on the left I used a black card base and a dark grey designer paper.  You need to rip away from you to avoid having a white deckled edge. You have to rip the edge again on the second piece to get rid of the white edge.

The Tim Holtz Old Jalopy Mover Shaper die in silver metallic paper was adhered to the card front in the bottom right hand corner with 3D foam tape.

For the greeting, I added a silver Stampin Up Modern Label punchie topped with a Word Window greeting.  This was adhered with 3D foam tape.

The Vintage Alarm Clock and Camera diecuts are by Tim Holtz. I added a clock graphic behind the clocks which helps a lot but adds fiddly work.


I am delivering a stack of thank you cards when I do my card making class tonight.


Tuesday, April 9, 2019

Custom HB Card - Hexagons

I made this card for a friend you requested a special birthday card for a son who is celebrating the big "50" this year.

I chose a taupe, grey and black elegant striped designer paper.  I added it to a large taupe card base in the half sheet size (8.5x5.5"). 

I wrapped a length of silk ribbon along the right hand edge and taped the ends to the back. I added a short length and tied it onto the other. The layer was then adhered to the card front.

I cut 4 hexagons in black and 1 in red which I arranged onto the card front. They were adhered with 3D foam tape.

I printed the greetings on taupe card stock and cut them with the smaller die. The dies are Spellbinder Nestabilities - Hexagons. These were adhere to the larger hexagons with double sided tape.

Wednesday, November 1, 2017

Holy Family Photo Christmas Cards


I take photos of nativity sets whenever I can. This was taken during the 2016 Christmas season.

This time I was working on supplies for a stack card kit for my class on Monday.  I printed a few extra to make some cards for the craft sale.

Here I have adjusted the orientation of the photo to accommodate my needs for the card kit.  I added a color fill background and added a greeting.

For this card with a 4x6 photo I had to reduce the space between the photo and the greeting so I trimmed the photo down to a narrow color border.  I then trimmed the greeting to the same width as the photo.  These were adhered to the card front of a heavy white card. 


Left: This little nativity I have used before.


Right: I designed this card with a Mother and Child photo from Pixabay.  I`ve used this image several times.

The stack kit should be ready soon.

Saturday, October 14, 2017

Monochromatic Nativity

I spent a few hours this afternoon photographing this small nativity to achieve a nice bokeh background.

The photo was printed on white card stock and fussy cut to the edge of the printing.  I rubbed the edges with a black ink pad to get rid of the white cut edge and soften the corners. 

I cut the Tim Holtz Cameo Frame from taupe grey card stock.  I adhered it to the front of a black card. I adhered the nativity element to the center of the die cut with 3D foam tape. Skipped the brads on this one.

Monochromatic Madonna

I have been working on more Christmas Card Stack kits. These cards are samples that I decided not to pursue as kits.

This card features Mary and Jesus in lovely soft tones.  The original photo I downloaded from Pixabay.  It did not have the right ratio for the space I wanted it to cover so I widened the image.  I am happy with the way it turned out.  I printed it onto white card stock then fussy cut it to the printed edge.  The image is 3 3/4"T x 3 5/8"W.

I cut the Tim Holtz Cameo Frame in a taupe grey card stock.  It was mounted to a black card.  I rubbed the edges of the central image with a black ink pad to get rid of the white edges and soften the edges of the image. The Madonna image was adhered to the center of the frame with 3D foam tape.

I added 2 tiny black brads in the center of the top and bottom curves.