 Another gift card holder. I tried making the pop up smaller 4" W x 4.75" T. It helps because there is less to match up but I'm not sure if it's the final one. I chose double sided paper from Creative Imaginations. Design by Helen Dardik. There are light blue stars on a dark blue background on one side and the other has white and red stripes with a 6x6 of white hearts on same dark blue. I cut the base with the Card Base Pop 'n Cuts die from Stampin Up. Then I placed the Sizzix Pop 'n Cuts Magnetic Insert Die - suitcase and placed my heart paper on it and ran it through the Big Shot. I folded it in the right places then trimmed the handle off with scissors. I adhered it onto the fold. I wrapped a piece of red cotton ribbon onto the join and tied it in a knot on the front. I took the scrap from the 12" length and trimmed and placed at the top of the card front. I added a light blue greeting below the striped piece. I had flagged the right hand end with the SU Banner Triple punch. Again, I tucked the tabs into the slots to keep it closed. The gift card is held in place with a Zot.
Showing posts with label Card Base PnC. Show all posts
Showing posts with label Card Base PnC. Show all posts
Saturday, December 19, 2015
Gift Card Holder - Smaller Pop Up
Another gift card holder. I tried making the pop up smaller 4" W x 4.75" T. It helps because there is less to match up but I'm not sure if it's the final one. I chose double sided paper from Creative Imaginations. Design by Helen Dardik. There are light blue stars on a dark blue background on one side and the other has white and red stripes with a 6x6 of white hearts on same dark blue. I cut the base with the Card Base Pop 'n Cuts die from Stampin Up. Then I placed the Sizzix Pop 'n Cuts Magnetic Insert Die - suitcase and placed my heart paper on it and ran it through the Big Shot. I folded it in the right places then trimmed the handle off with scissors. I adhered it onto the fold. I wrapped a piece of red cotton ribbon onto the join and tied it in a knot on the front. I took the scrap from the 12" length and trimmed and placed at the top of the card front. I added a light blue greeting below the striped piece. I had flagged the right hand end with the SU Banner Triple punch. Again, I tucked the tabs into the slots to keep it closed. The gift card is held in place with a Zot.Friday, December 18, 2015
Gift Card Holder - Version 2
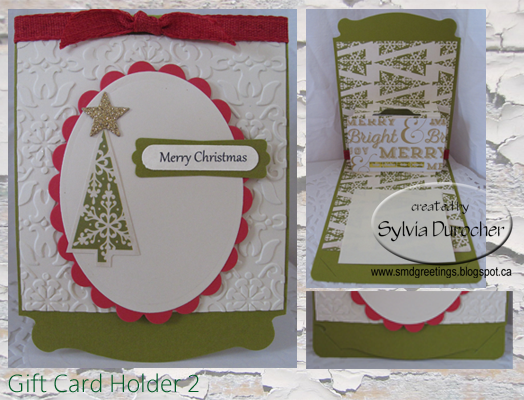
The front has a piece of ivory card stock embossed with the Stampin Up Vintage Wallpaper folder. I adhered that to the card front then added a red cotton ribbon along the fold. I cut a red scallop oval with Spellbinder Nestabilities then a smooth oval with the corresponding die. I cut a triangle tree from the scrap of the designer paper. Added a gold glitter star cut with the Sizzix Star die. A SU Modern Label punchie with the Word Window greeting punchie. Not sure the straight edge of the embossed layer is the best but I will continue to tweek the design.
Again, the fact that the card keeps itself closed with the tab/slot is great.
Pop Up Gift Card Holder

For this one, I used the Stampin Up Card Base Pop'n Cuts Die. The card stock is River Rock with Holiday Thyme designer paper cut with the Top Note die. I added an Ornament punchie stamped with the Delightful Decorations ornament in Cherry Cobbler on Very Vanilla. I added a bit of Cherry Cobbler twine. I created the dip in the pop up with the Word Window punch. I added a piece of DSP which matched the front then a sentiment from the Festival of Trees stamp set. I followed up with the rest of the sentiment on a piece of Very Vanilla which I cut again with the Top Note.
I love the way this card closes with the tabs in the slots.
Wednesday, July 22, 2015
Cards - Tab Closures

For these cards I cut the double sided card stock with the card base then folded it in half. For the blue one I used Make a Wish Dandelion paper from Pebblesinc. I cut a SU Lattice Die in white and adhered it to the card front in the tall orientation. I punched a couple of SU Five Petal Punchies in deep brown then 2 small white Five Petal punchies and adhered them onto the brown ones. I added a bit of a centre with a marker. These were mounted with 3D foam tape. I added a greeting in the bottom right hand corner with a SU Modern Label punchie in white stamped with a stamp from the Small Script Stamp Set. I punched a brown punchie same card stock as the flowers, cut it in two crosswise and offset them to the back of the greeting layer. This layer was then adhered to the card front with 3D foam tape.

Subscribe to:
Posts (Atom)