Showing posts with label buttons. Show all posts

Monday, October 28, 2024

Tree Scent Ornaments - Spools

A few additions to the collection of 1 of a Kind Tree Scent ornaments.

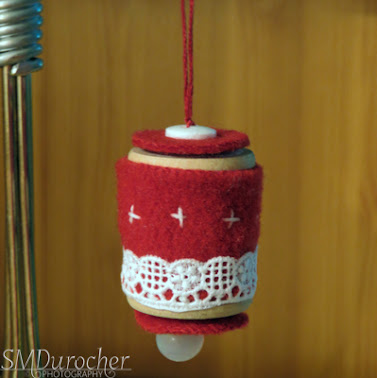
Vintage wooden spool wrapped with red felt. I stitched a length of white lace to the bottom and added a bit of white stitch above it.

Cut two 1 inch circles of red felt to put on each end. 

The bottom features a white pearl drop bead and the top a small white button. All hung with red wool yarn.


A wooden spool wrapped with lime green fleece.  

Once that was stitched on I wrapped the spool with dark green embroidery floss onto which I placed matte gold EBeads along the way.

I cut 1" circles for the bottom and top of the spool.

I added a gold button with a shank on the bottom and a gold bead at the top above the green felt circle.
 
All hung on variegated green yarn.


I stitched a length of plum wool ftlt with a few stitches in green, white and yellow.

This was wrapped around a vintage wooden spool . 

I cut two 1" circles in mustard felt for the top and bottom.

I added a plum colored button with a shank on the bottom and a tiny green button on the top over the felt circle.

All hung with plum embroidery thread.


I used a traditional red and green color theme on this Tree Scent ornament. 

A red felt piece was stitched with white and green thread then stitched onto the wooden spool.

I selected 2 red buttons to go on the bottom and top of the ornament.

I cut two 1" circles of dark green felt for the top and bottom of the spool.

I ran red wool yarn to hold all the peices together and knotted at the top with several knots along the way.

These can be used as personal passive oil diffusers as you relax.

Saturday, September 28, 2024

Sewing Project - Adjustable Bookmark

I have been thinking of making some bookmarks for the Christmas sale since we share the space with the library.

With a bit of research, I found a few features I would like to incorporate. Adjustable and a pocket for a writing instrument.

After some measuring, I decided to make the it wrap around the book with an elastic and a couple of buttons for adjustment.  A pocket could be placed on the front and maybe some stitching could be included.

I cut 2 pieces of fabric measuring 3"W x 21" T - one patterned one solid.  I decided to use elastic from old face masks. I cut a piece of mustard fabric for the pocket. The buttons and embroidery need to be added before sewing.  The pocket needs to be sewn on the front of the bookmark. 

The elastic was pinned in place at the opposite end from the pocket. Then, I sewed all the way around the long strip leaving a slit to turn it inside out. I trimmed the corners, turned it inside out, pushed out the corners with a chopstick and pressed it flat.  I then top stitched all the way around. It was very difficult to do the buttons and embroidery after the pocket was sewn on.

Notes: 

  • The pencil pocket is too tall and could be narrower. 
  • Stitching and button(s) need to be done before assembly.
  • This is a hard cover book so the overall length of the bookmark could be shorter to accommodate smaller books.
  • I will use this one and implement improvements to future versions
  • The mask elastic may too soft.

Tuesday, April 9, 2024

Slow Stitching Fabric Collage

I finished my second Fabric Collage square with slow stitching last night.

I used a foundation layer of 100% cotton then created a collage and basted the pieces on. 

I then started the slow stitching of the individual pieces. I added a couple pieces of lace, a couple felt buttons, and created a simple star shape as a focal element in white thread.

This piece will likely end up on the front of a bag like my first one.

It is fun! 


Saturday, February 24, 2024

Sylvia's Simple Shots

Its been a week for improvements in the sewing room department.

I have started buying distilled water for my steam iron which lessens the amount of times I have to clean it.  The cost is minimal about $2 and it is better all the way around.

I also found a water cup for the iron at the thrift store this week.  I have wanted one for a while and since I bought my iron second hand it did not come with one.

I have been reusing a disposable water bottle but it does not have the point to direct the water.

This cup works very well and it again was a bargain at the thrift store.


Another improvement in the sewing room was this clamp I found at the ReUse Center.

This the spool holder that my brother in law made me for Christmas a few years ago. It works well but the corner of my sewing desk is a bit short on space.  Whenever I pull the board to raise the machine it would topple over.  

This clamp is minimal but very effective.  It has been quite a while since I have worried about not toppling the spool holder.


I found this small bag of buttons at the thrift store when I met my sister in Wetaskiwin a while back.

They are vintage for sure with metal inserts in the holes for reinforcement.  There are about 50 of them so I am sure there is a project where they will fit in perfectly.


I had a visit with my youngest sister for Family Day.

She had a couple of friends over and we talked crafts, sewing, and all manner of other stuff.

We managed to make this puzzle while we chatted.

It was nice to be with family.


Saturday, January 27, 2024

Sylvia's Simple Shots

It took about 5 hours to find the box, make the dividers, roll all the less than a full skeins onto bobbins. A full evening of busy hands. You can see my pin cushion, scissors and sharpener fit in there as well. 

Now that I have decided that I will continue with stitch work it was apparent I needed to organize my stash of embroidery thread.

I used my Stampin Up Tab punch to create my little bobbins out of 110lb white card stock. Added 2 slits on the bottom as the store bought ones. I punched 75 of them - 3 full sheets.


These are my DIY Embroidery Thread Bobbins.

They measure 2 inches tall and 2 3/8 inches wide.

I placed all the full skeins in a ziplock bag. The spools of embroidery thread went into a smaller bag.  The skiens of "different" thread into another ziplock bag.

There is room in the large bag for the small embroidery hoop as well.

I am very happy with my progress.

There are very many ways to store embroidery thread and I did view a few videos. The small plastic box is from the dollar store.  It is organized by color because that is how I will use my thread.  I am not concerned with the number. Much of what I have is acquired second hand when sometimes the labels are missing.  That is okay with me.

The Bookseller - First Hugo Marston novel by Mark Pryor was a great book.

Hugo is former FBI agent is working as head of security at the US embassy in Paris.  His friend Max the bookseller is kidnapped at gunpoint. 

The police don't seem to interested in getting to the bottom of his disappearance.  Hugo enlists a beautiful and mysterious journalist, a semiretired CIA agent and reluctant police detective to help him negotiate politcal intrugue, police corruption, an escalation drug war, and the ghosts of Nazi collaboration that haunt some of Paris's most prominent citizens.

I love Paris as a setting.  The plot took a lot of twists and turns before the truth came to light.

I will have to keep an eye out for the other 8 in the series.


I found a sparkly at the ReUse center this week. There were a few crystal ornaments which I brought home as well. It was a good week for clear glass and plastic ornaments.

I woke up the next day after I hung it in the window and there were the rainbows on the wall and the floor as well.

I will have to find a better place and way to hang it but it is a winner.


I brought these home as well from the ReUse Center but they were stuck to scrapbooking tags with some sort of glue.  It took quite alot to get them separated.  

These are very small buttons and I think will work with future embroidery projects.

They are pastel colors but 12 is super.


I got some supplies to keep my organized in the coming years.

The page protectors are for half sheets which I use in binders to manage my sewing projects.  My niece was kind enough to order them for me.  I met the delivery guy at the door and he had 7 packages for this building alone.  I wondered how the Amazon boxes arrived at people's doors and now I know.

The small sheets are for my memo binder that lives in my every day bag which I take with me everywhere. I found these at Staples.

I visited a small home based business this week which works at ensuring that unused fabric and sewing notions are given an opportunity to see life with a new owner.

I found this fat quarter of purple fabric, 3 spools of cotton thread, a bit of lace for future embroidery projects and I could not resist the Bernina tape measure.

Nice to support a local entrepeneur and get some goodies at the same time.


Tuesday, October 17, 2023

1 of a Kind - Tree Scent Oranments - Set 3

Another set of these very cute Tree Scent Ornaments.  These can be used to give your artificial tree a scent.  Choose your favorite Christmas essential oil and apply 1 or 2 drops and enjoy.  

Here I have grey felted wool to which I have added royal blue blanket stitch on the top and bottom edge.

I had stitched white snowflakes around the middle.

The top features white felt circle and a grey button.

The hanger is the royal blue thread in 6 ply.


This felted wool makes me think of woodsy so I put small triangular trees on the middle panel of this ornament.

I chose black embroidery thread for the blanket stitch around the top and bottom edges.

The top features a black felt circle and a medium sized button.

The hanger is 6 ply embroidery thread in the same color as the tree on the wool panel.


A Bumble Bee colored ornament.

It features the ivory and black felted wool panel around the middle of the ornament. 

I use golden yellow embroidery thread for the embellishments.  The blanket stitch on the bottom and top edges.

I followed the fabric pattern with cross and dash stitches.

The top features a black felt circle with a golden yellow button.

Embroidery thread in 6 ply for the hanger.


I put white snowflakes on this woodsy felted wool panel.

I used chocolate brown thread for the blanket stitching along the top and bottom edges.

The top has an ivory felt circle cut the the SB Nestabilties smooth circle die - the smallest in the large set.

Topped with a brown button and brown embroidery thread hanger.


Another daisy on this grey houndstooth wool fabric panel.  

I did triple fold this fabric and stitched the ends to ensure no unraveling of the ends.

I chose pink thread for the daisy and the dashes in the middle.  Same for the blanket stitching along the top and bottom edges.

Charcoal grey felt circle at the top cut the the nestabilities die.

Topped with a pink medium sized button.

Pink 6 ply embroidery hanger.

This is the last set for this year.  I learned a lot in the process.  I got some feedback that they could be a popular item.  Let's hope so.

Friday, October 13, 2023

1 of a Kind - Tree Scent Ornaments - Set 2 and Stand

I made a few more 1 of a King Tree Scent Ornaments.  These ornaments can hold your favorite tree scent essential oil to give your artificial tree the right scent.

It could also be a favorite Christmas scent of your choice. The scent will dissipate and you can choose a different oil another day.

Love this bold black and white check felted wool.

I decided to pair it with red.

I put blanket stitch along both edges with black embroidery thead. 

I changed color to red and using the squares in the fabric I put X and dashes along to bottom half and just dashes long the top.

Red felt on top with a large black button on top of that.  Black embroidery hanger.

I had most of my buttons spread around my work area in separate bowls.  I found this cute small oval button which matched well with the thread I had selected so I decided to use it.

For this bright felted wool I chose bright green and blue.

I put blanket stitch in green along the top and bottom edges. 

I then stitched the button in the center front and then added dash stitches in blue above and below the button.

The top felt is green with a button button. 

True Blue embroidery floss hanger.

I decided to do one ornament in Oiler colors - blue and orange.

I used the wool denim colored felt.

I added a blanket stitch along the top and bottom edges in orange. 

The center pattern is a set of crossed dash stitches.

I cut the top felt circle from the same fabric with my smallest die from the Large Nestabilities smooth circle dies.  Fits perfectly.

Topped with orange buttons and the same orange embroidery thread for the hanger in all 6 plys.


Another Tree Scent ornament with bright colors.

The wool cuff is bright green and I chose purple embroidery thread.

I put a blanket stitch along the top and bottom edges.

I put stars patterns along the center of the wool layer.

The top has a purple felt circle and then a bright green medium sized button.

Purple 6ply embroidery thread hanger.


The fabric for this ornament was wool suiting so I folded it top to the back and bottom to the back so I had 3 layers to work with. 

I did have to stitch the ends which were stitched over with my connecting stitches.

White blanket stitches along the top and bottom edges.

I followed the plaid pattern with my white thread in dash stitches.

The top felt circle is red topped with a medium white button.

The hanger is white in 6 ply thread.


I needed another stand for Tree Scent Ornaments.  I went shopping this week and found this black folding stand. 

The Christmas stuff was out as well so I picked up a package of silver wire hangers.  I just squeezed them onto the wire frame.

I will put my sign on the back wire with the clothes pin.

I had the piece of wood in my stash which was perfect. It stabilizes the stand when there are ornaments on it. I will have to secure the legs into the slots.

Enough space on this stand for my 1 of a Kind Tree Scent Ornaments.

Monday, October 9, 2023

1 of a Kind - Tree Scent Ornaments - Wood Spools

Tree Scent Ornaments are ornaments on your artificial Christmas tree that are oil diffusers.  You place oil on the felt and it makes your tree smell like you want.  If you want it to smell like a real tree you can place essential oil that would give you that scent. I discovered last year that I no idea what kind of tree we had when we were kids.  I believe they were spruce trees.  You could also choose any scent that makes it Christmas for you.  I have made a variety of these ornaments last year and will continue this year with new styles this year.

I saw samples of these spools with embroidered wool on line over a year ago.  I really liked them.  
This was a project by Susan Lenz.  You can check out her blog post here.

Many of her wooden spools are older than mine and have the words embedded in the top and bottom ends of the spools.

She filled a small wooden bassinet of these.  It must have taken her a long time.
I had collected small pieces of wool at the ReUse center over the last 6 months.

These small spools come from Mom's stash.  She saved her spools and of course she sewed for many years when thread was sold on wooden spools instead of the plastic we have today. The wooden spool was eliminated in the 1970's.

I started with a 5 small wooden thread spools which I sealed with Modge Podge several days ago.  They measure about 1.25 inches tall and 1" around.

I gathered my bits of wool, my embroidery thread, a bucket of felt and a bucket of buttons and tackled this project.  Something good to listen to on the TV and a cup of tea.  I was there way longer than I expected. 

Raw wood works as a diffuser as well so any drops running down from the top will go down the center of the spool and be absorbed.

I am not sure that taking the time to seal the outside did much.  I was hoping to make the edges more warmed tone.  You don't see much of the spool at the end.

This wool was a left over from a sweater which may have shrunk.  I cut it 1" wide and 3" long.

There was a bit of pink on the edge which inspired me to  use pink thread on this one.

I split my embroidery thread into 3 strand lengths.  It is great to work with this material as there are not unravelling edges and it is quite thick.

I just made it up as I went which a rudimentary knowledge of some embroidery stitches.

Here I put different border stitches and daisies around the center.

The felt pieces on the top and bottom are cut about 1" across.

I chose medium sized pink buttons for this one.

On this ornament I used the pattern in the wool to guide my embroidery in the middle of the spool. 

The turquoise 100% cotton thread I used was not standard embroidery floss.  I split it as usual but I had a really hard time keeping it integral.  It would just come apart sometimes.  I will keep it in it's 2 strand version next time.

Turquoise felts on the top and bottom with tan buttons which matched well with the fabric I used.

I did not have any regular embroidery floss in the right color.  I am not sure where I collected this thread as it is packaged like the other stuff.  It was for sure at a Thrift store.

On this ornament, I embroidered white snowflakes on the navy blue portions of the fabric.

I managed to do the blanket stitch along the top and bottom edges.

White felt on top and bottoms with smallish navy button over the that layer.

I did not have any trouble when I used the regular embroidery thread, in this case white.

This fabric as other colors and patterns to it will make more spools and they will look different.


The wool on this ornament was very thick and the colors were quite mottled.  You can see that the fabric sticks out quite a bit from the wood edge.

I chose a denim blue embroidery thread and put blanket stitch along both edges.  I put diamond shapes around the middle.

The wool circles on the top were denim blue and here the buttons are a bit larger and I think it works better.

Again, I think this fabric was a shrunken wool garment and that is why it is to thick.

I think esthetically the fabric is a bit too thick as I just wanted to fill in the well on the spool.


On this last one, I chose the fabric for the color and it was cotton flannel instead of wool.  This comes with challenges. The edges are not integral.  On this one I folded the top and bottom edges to the inside and that worked well.

The biggest challenge was finishing the edges where the ends meet.  That had to be finished with a folded edge and I sewed that with regular thread.  Then when it came to connecting them at the back I used the red embroidery thread as I had been on the others.  The bigger buttons for sure look better.

I would not use flannel again, it was just too much work.  Three layers of layers fills in the space on the spool the nicest.

I do have some pieces of wool suiting which might be a better weight but may have the same edge problems as this flannel.

These are ones for now.  I have other styles I want to make.   I found the dimensional ones sold the best last year.  Stuffed hearts are easy and I can make snowmen and gingerbread men as well. 

Saturday, April 29, 2023

Sylvia's Simple Shots

The critters are starting to stir if they were here all winter.  Others are arriving backs from the southern climes.

The White Squill is a perennial flower that is one of the first spring flowers.


Got some news on Sunday that the leader of our quilting group is moving away.  I have volunteered with her on women's ministries for many years. 

They were able to sell their house and will be moving to be near their daughter.

She has liquidated most of her fabric stash.  She brought odds and ends that needed a new home so I was grateful to receive zippers, serger thread, a bit of bias tape and a small box of buttons.

I found the smallest red heart buttons in this box.  They certainly will come in handy for Macro Monday challenges.

Thanks so much for sharing.

We will have lunch with before she goes.

I am so glad to have my tax return done for another year.

Now that I am retired it is so much easier but I seem to forget that and procrastinate.

It took only a few hours and it was done.


I had time to have a walk around Lois Hole Centennial Provincial Park with my friend which I had not seen in a couple of months.

The red wing black birds had not returned yet.  I missed their distinctive calls.

The Canada Geese were jockeying for the best nesting places.

The water is very low so I hope all the birds find places to raise their young.


I attended the show where my aunt was displaying here old car watercolors.  They turned out really well. There was over 50 artists on display.

I met my other aunt and her husband at the venue.  We went for a walk along the Sturgeon River while we waited for the reception to start.


I is for Innocent by Sue Grafton is book I finished this week.

It`s always nice to reaquaint myself with Kinsey Malone the private investigator.  She has new work digs and is taking on work on her own.

Lonnie Kingman has hired her to continue work which Morley Shine was doing for him but he died suddenly.  Kinsey thinks it will be just a bit of final work and all the information will be ready for the civil suit.

David Barney was acquitted of the murder of his rich wife - Isabelle.  He is now spending her money - thank you very much.  Finding Morley`s files a but unorganized she needs to retrace some of those steps and redo interviews.

David`s story seems to be corroborated by evidence that he is innocent. 

Friday, December 2, 2022

Small Gifts - Oil Diffusers/Fresheners - Felt Balls Version 2 Batch Two

I received an email from the gallery that it was time to restock these little oil diffusers/fresheners so I put together another batch today.  I dug out beads, felt balls, buttons, wood clothespins and some cotton thread and got started.

I will deliver these tomorrow and see what other members have brought. Maybe do a bit of shopping.  When I was there last Friday I was the first one so there was no browsing then. 

Sunday, August 1, 2021

Card Exchange Cards - Tangerine Tango & Baja Breeze

I started with an orange card base which I think is Tangerine Tango.

I added a layer of Baja Breeze polka dot designer paper from the Palette o' Prints collection.  I ripped the right hand edge and aligned it along the fold. 

I added a length of Tangerine Tango Scallop Polka Dot ribbon to the designer paper layer and taped the ends to the back.  I adhered it to the card front.

I cut one of the labels from the Apothecary Framelits set from Baja Breeze card stock. I added a greeting from the Teeny Tiny Wishes set color printed on white card stock punched with the Large Oval.  I added tiny orange brads on either side of the greeting then adhered it to the card front with 3D foam tape.

I added 2 small buttons in coordinating color on the bottom right hand corner with small Zots.

The same basic supplies for this card but I switched up the orientation to landscape.

I turned the Baja Breeze designer paper over to the other side to show the floral design.

I put quarter sheet inserts on the inside and added a white envelope.

These are headed out to my card buddies. 


Saturday, July 31, 2021

Birthday Cards - Big Cards for Big Birthdays

This is a half sheet card meaning it measures 5.5 x 8.5 inches.

I started with a Very Vanilla card base.

I chose a sheet of designer paper from Springtime Vintage Series.  A lovely blue and ivory small floral print.  I cut it to leave a small border.

I added a piece of Baja Breeze Stitched Grosgrain ribbon to the top third of the card and taped the ends to the back.  It was then adhered to the card front.

I color printed a greeting on Very Vanilla card stock and cut it with one of the the Deco Label Framelits.  I then cut a textured Baja Breeze one as well.  I cut that in half and adhered them to the back of the greeting offset for the color to show.  It was adhered with 3D foam tape.

I added 3 pearl buttons in the bottom right hand corner adhered with small Zots.  A nod to the seamstress that my Mom is.


I started with felt finish printed card stock from Authentique - Remberance Collection - Remberance One.

It is printed in burgundy on warm white so I decided to just watercolor the flowers on the piece I had cut leaving a small border.  I chose More Mustard for the flowers and Always Artichoke for the leaves. This was great fun!

I added a twill ribbon of Bravo Burgundy topped with a grosgrain ribbon in More Mustard.  These were adhered to the back of the layer then adhered to the Bravo Burgundy card front.   I printed the greeting on Very Vanilla card stock and ripped the top and bottom.  I adhered it with 2 More Mustard mini brads.  This one is for my Aunt who celebrates a special birthday later this summer.