Showing posts with label carry bag. Show all posts

Monday, April 29, 2024

Sewing Project - Wine Bottle Bag - Celery and Red

I cleaned up this morning after this frenzy of sewing.

I found this celery textured fabric that I had set aside a while back and forgot about.  It had all its elements so I just decided to make it up. 

I will be keeping a few of these for the Christmas Market and the others will go to Grandma Africa merchandise sale in June.

I found this scrap of red patterned fabric which worked well.  There was just enough for 2 stripes so I just crossed them.

This fabric is not cotton and a bit tricksy.  It is heavier than the cotton I have been using so I skipped the flannel but added a thin layer of poly cotton to stabilize it and keep it square. 

The lining is a pale yellow polycotton fabric. The thread was a pretty good match to the celery color.

I did add a small square of flannel in the very bottom which I sewed between the layers and sewed to the lining bottom.  Just some cushion for a glass bottle as it is placed on a hard surface.

The button was a great match.  I am very grateful for things to be falling into place for all of these sewing projects.


For information on the "My Bag" Line


Sunday, April 28, 2024

Sewing Project - Wine Bottle Bag - Bright and White

A bright and cheery bag today.

I had a limited amount of this punchy colored 100% fabric so I decide to split it down the center and put the leaf green ribbon in between.

The outer fabric is navy cotton poly so it is a bit on the light side.

The lining is some of the yellow cotton/tencel fabric. The thread is navy.

I add this bold white buckle which worked out well I think.  With the navy button to keep the twill ribbon in place it works.

I wished that I had offset the ribbon a bit so you would see more of the fabric on the front.  It is what it is! 


For information about "My Bag" line.


Saturday, April 27, 2024

Sewing Project - Wine Bottle Bag - Warm Florals

Here is the latest wine bag.

I loved the warm flowers on this part of the fabric so I cut it to make them the focus of the front.

I found a warm brown grosgrain ribbon in my stash that worked well which I placed at the top edge.  I layered a cotton twill tape on top of that to tone down the shine.

I decided to create an accent element with the same ribbon.  I cut it, sealed the ends with heat then I just folded it back and forth this it was wide enough.

I bought a couple of bags of buttons recently and this shell button was in there.  I stitched this whole element to the top left hand corner of the bag.  Done another one!

For information on "My Bag" Line: 


Friday, April 26, 2024

Sewing Project - Wine Bottle Bag - Blue Floral with Lace

I pulled the fabric out last night so I could sew first thing this morning.

I just love this blue watercolor floral fabric.  The flower is very large so I just centered it on the front.

I chose a length of cotton lace which I placed below the top edge. I found a scrap of blue bias tape which echoed some of the colors in the print beautifully.

I used the wavy decorating stitch again on the bias tape and evenly spaced from the back seam to quilt the outer fabric to the flannel. This means I don't have a seam directly in front across the flower.

The lining is a white microfiber fabric which works well. Navy thread and a solid flannel so it would work with the white areas in the outer fabric.   I have attached my "My Bag" tag.

For information on the line. 

Thursday, April 25, 2024

Sewing Project - Wine Bottle Bag - Batik Phoenix

Another wine bag today. 

This is batik fabric from a shirt. I used one of the sleeves which featured a phoenix bird motif so I cut the fabric to ensure the birds were on the front.

I was short on the length so I added a strip of black on the bottom. I also added a twill tape accent at the top edge.

It was quilted to the flannel with the same wavy stitch as before.

The lining is beautifully soft yellow cotton fabric.

The handle is double sided with black on top and yellow lining fabric on the underside.

I had decided to place the "My Bag" tag along the top of these wine bags just left of the handle.

This is my current model of tag and stitching them with white thread is working well.

Looking forward to making a few more of these bags. I am finally able to sew them with out mistakes but designing accents is taking time out of the sewing process.


For information on "My Bag" line:


Monday, April 15, 2024

Sewing Project - Wine Bottle Bag - Polka Dots

I made my third Wine Bottle Carry Bag yesterday.

I used some pale blue fabric with red dots which I believe was part of Stampin Up's fabric line when that was a thing.

It is lined with a solid red cotton poly fabric.

I used circles in white thread as my quilting pattern to attach the flannel to the outer fabric.

I chose to assemble the bag differently this time with starting with the top seam instead of that being the last seam.

It was easy to align the handles and the decorative ribbon along the edge and sew the top seam. Then the long side seam of the outer and lining is made leaving a hole to turn it right side out.

Then the box corners are achieved by tucking in the fabric into the center.  Check out this video for the full details.  I made sure that I alternated the corners so they would sit opposite each other on the bottom. Then you turn it right side out and sew up the hole in the lining.  Two top stitch seams and it was done.

I added the 2 different sized white buttons on the deep red ribbon by hand.

It seems to be as stable as the other method.

Here's how they look side by side.  The left is neater.  I really appreciated not having to fight to get handles straight in that small top seam at the end in the first design.


For information on the "My Bag" Line

Monday, April 8, 2024

Sewing Project - Wine Bottle Bag - Updated

When I visited my sister a while back we worked on a wine bottle bag design.

I brought the pieces to make one as we ran out of time to finish one for me.

We had decided to add some height to the bag so we could have 1.5 inches in the top band where we were top stitching. This would add strength and a bit of stifness.

The one on the left was the one I brought home so I cut the outer fabric and added the 1.5 inch blue strip.  That meant I had to add some to the lining as well.  We decided to leave the flannel so it would only reach the top of the bag with out being folded over in the seam.

Learning is challenging. I did add the pieces I needed but failed to remember to put the flannel in and to make the top seam 1.25 inches so there would be extra fabric in the top edge. You can see that it is higher than the other one. Made on Sunday.

The one on the left is the one I made on today which incorporated all the things we planned.  A cotton outer fabric, a flannel layer shorter than the cotton, and a poly-cotton lining the same size as the outer fabric.  The fabric measures 15.5" tall by 12.5" wide. Flannel is 14" T x 12.5" wide.

I quilted the flannel to the diagonal patterned fabric along those lines in black thread. Then I made the box corners on the outer and lining fabrics.  Then made the strap.  Pinned the strap first to ensure it was right with the same side facing the outer, that they were on the sides with the seam at the back, and that they were aligned with the edge of the fabric. I then added the lining ensuring that the box corners were sitting opposite the ones on the outer fabric.  I sewed the seam 1.25 inches wide along the top leaving a opening to turn everything inside out. 

Once the lining is pushed into the bag and aligned, then pressing the top edge flat I sewed the 2 top stitching seams. One really close to the edge to close the opening.  The other to capture the handles a second time to ensure strength.

Note: Maybe a bit of trimming of the flannel in the box corners would help balance out the bottom. They stand on their own without a bottle inside.

Updated:  I redid the one on the right to include flannel, the 1.5 inch top stitched edge and an accent on the blue strip.

I have added the accent for number 2 so this set is finally completed.


Friday, March 1, 2024

Sewing Project - Recycled Fabric - Everyday Carry Bag

I made a bag from all recycled materials.  The fabrics came from the box from Michelle at ReImagined Fabrics.

The bag is beige cotton duck fabric. 

A beautiful leaf pattern cotton fabric was used for the zipper insert, the tab on the front pocket and the tab on ginger pocket.  

I added a piece of ginger cotton denim to the bottom of the back to improve wear ability and keep it cleaner. 

I chose a small piece of red for the trim on the zipper insert, the loop on the front pocket and the key hook on the inside.

The bag features 3 pockets - the front leaf patterned one, the back ginger denim one, and the space between the ginger pocket and the bag.

It has a teal zipper at the top in the normal for me completed finished zipper insert

I used taupe cotton poly blend for the handles and made them as long as I could. They are placed on either side of the pockets.  They are well reinforced in the stress areas.

The the seams are finished which looks smart and there are no raw edges in sight.

I added a tab on the ginger pocket so that it provide better leverage to open the velcro closure. It is center which the velcro was not.
This button is from my stash of recycled materials as well as the teal zipper.

It was the perfect color to match the teal color in the patterned fabric.


I included a keys hook on the inside so they will always be at hand and easy to find in the bag.

The bag measures 12x12 square so it is not a big bag.  I guess, you would call it purse sized.  


For information on the "My Bag" Line

Saturday, August 19, 2023

Take Out / Take Away Bag

In my city, the Single-use Item Reduction bylaw came into effect on July 1, 2023. That means when I order take out food at a restaurant - some single use items would only be provided when requested and some would be offered at a cost. Plastic bags for take out were banned and paper bags would come at a cost of $.15.  I am okay with that but I still need a bag to bring my food home in so that it does not end up spilling in my car.

I set out to make such a bag.  I generally would need a small bag when I hit Tim Horton's or Wendy's but I got Vietnamese food the other day and that container was much larger.  I determined that I needed a bag around 9 inches square, the sides not too high and a way to close that would keep the food inside. Would be nice if it folded flat when I stored it in my car.

Here's is the result.


The floral fabric is a couple of strips of heavy cotton fabric I found for free at the ReUse Center last week.  The weight was a good start to having a sturdy bag. The strips were only 8 inches wide so I had to piece the bottom and I made it double layer so the inside would be nice with no seams showing.

I cut 2  pieces of 9.5 inch wide and 8 inches tall. Then I cut 2 strips of 9.5 inch wide and 2 inches tall to supplement the other pieces to end up a bottom that was 9" square finished.

I sewed the narrow strips to the large pieces on the 9.5 inch side.  I then ironed them and top stitched the seam.

Once both were done and put right sides together and sewed all the way around leaving a space to turn it right side out. Then I ironed that flat.  

The side piece was cut 8" tall and 38 inches long. Once layer was floral and the back was teal microfiber fabric which will be on the inside. Stitch all the way around and turned it right side out.

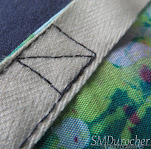
I pinned it to the bottom with lining on top of the bottom.  Once I identified the corners every 9 inches and sewed a seam from top to bottom of the eight inch length on all four corners. This will help stiffen the sides.  Then I went ahead and sewed the sides to the bottom matching the corner seams with the corners on the bottom piece.  The ends were overlapped on the front of the bag, again to help stiffen the front of the bag. 

The inside of the bag is floral on the bottom and teal on the sides.  The take out container fits perfectly on the bottom of the bag.

The handles are asymmetrical in the front loop is short and the bag loop is long.  They are made of teal microfiber.  The strip was 6 inches tall and about 38 inches long.  I folded the strip in half and iron it flat.  I then opened it and iron each half to the center.  I top stitched along both the open side and the folded side which helps to provide some stiffness to the handles.

To close the bag the long back loop is pulled through the short front loop and the bag is closed.  The join is above the center of the bag so it stays level.


I had to make it pretty as well.  I cut a large scallop circle from the floral fabric and sewed it over the ends of the front handles with a zigzag stitch

I hand sewed a teal button in the center of the flower for a final touch.

I am very happy at how this bag turned out.  
  • It is large enough to handle any take out order I will make, 
  • It will hold the contents securely inside the bag, and
  • I have a loop handle to carry it along with anything else that is in my hands
  • It folds flat and I can tuck it into a pocket in the car so it will always ready at hand when I need it.

Monday, January 17, 2022

Art Portfolio Carry Bag

As I de-clutter I am finding pieces of art so I decided that I needed a place for those to be stored all in one place. I decided a bag to hold a mat board sandwich would work. I have a piece of mat board 32"W x 25"T.  After checking the pieces of leftover fabric stash, I had a navy piece that would work with the mat board.  When we emptied Mom and Dad's apartment a piece of batik fabric that was made by my brother in art school was returned to me so I decided that would be appropriate for this project.  I chose a couple of other colors to complement the bag.

I needed sturdy material for the handles so I chose polyester twill tape in an warm white color.  They will run the full height of the bag to distribute the weight.

I wanted a flap over the top because I did not have a zipper long enough to close the top.  By adding a piece of teal which matched the batik that worked well.

I added the piece then worked out the flap and where the bottom would be.  The bottom was just a folded edge and I thought it needed to be reinforced so I sewed a narrow strip of the navy along the bottom. I also sewed box corners to allow for the depth of my mat board sandwich.

The mat board sandwich will be 2 pieces of similar sized mat board stuck together at the bottom with duct tape. 

I will leave about an inch of tape between the 2 to allow the sandwich to grow.

It is quite big but I thought I would maximize the use of the fabric and board I had.  Maybe I am destined to do a large art piece.  The sunrise piece is quite large.


The batik piece on the front serves as a pocket.  You can see a pad of drawing paper peeking out of it in this picture.

It is quite large and should fit any type of paper pad I need should I eventually take to a class.

A button on the pocket keeps its contents in place. A twill tape loop slips over the large purple button.
All the stress point have been reinforced.

Now I needed to keep the top closed and I decided that I would use a couple of pieces of velcro 3 inches wide near the handles.  The pieces were sewn on to the front and the closing top flap.

Now, I had stitching  showing on my flap so I placed a strip of batik fabric across the flap to look pretty and cover the stitching.


Next,  I needed a visual reminder as to where the velcro was and a grabbing point to pull on the flap.  

I added 2 short loops of the same twill tape I used for the handles.

I think this bag will work well to store my art pieces and allow me to find them when I am needing one of them.

I need another piece of mat board before I can assemble my sandwich.

Happy with this project.