Showing posts with label FW. Show all posts

Tuesday, December 1, 2020

Christmas Card Samples

I have had a client place a large Christmas Cards.  I prepared some samples for them to choose from.  I am posting the two cards which were not chosen.  I will post their selection later once the recipients have seen the card.

This card is a photo of my own Nativity.  It is the Avon porcelain one which is simple and elegant.  I photographed it with a black velvet backdrop.  In post production I added the bokeh in the top left hand corner then added the greeting as well.

It was printed on photo paper at 3.5 x 5 inches.  It was trimmed to 3.5 x 4.75 inches to leave an even border all the way around on an A2 card.  It was mounted on a heavy white card with a customized sentiment on a quarter sheet adhered on the inside.

I am really happy with the way it turned out.

I am working on the order and it will several days to get it done.

This the second card presented. 

It is a photo I took early this year of a friends stained glass Nativity set. I applied a filter to give me the silhouette in black you see on the front.  The silhouette was placed in front of a piece of alcohol ink background which coordinated with the Tempting Turquoise card stock. It was printed on photo paper and trimmed to 3.5 x 4.75 inches. The frame was printed with I did the credits on the back of the card.

Again, a customized insert on a quarter sheet insert. 

Really happy with this one as well.   They may become my Christmas card for this year.

Friday, October 21, 2016

Sympathy Cards

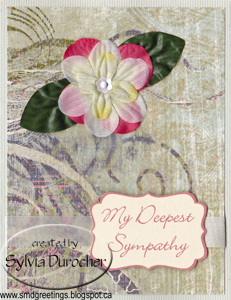
A dear friend passed away this week.  She lived a good life and celebrated her 93rd birthday this summer. Her three daughters were with her before she passed.

I made sympathy cards for my friend who lost her mother and my other friend who lost her grandmother.

The designer paper comes from K&Company and the adhesive borders are by the same company.  I did not find name for the collection.  I chose one of the papers and cut it to 5.25x4.00 inches.  I ripped a piece from the top third and adhered the pieces to the top and bottom of the card base.  The adhesive borders matched quite well except that they had white backgrounds. I applied some Tim Holtz Antique Linen distress stain which did just what I needed.  The borders were 12 inches to I cut them to 4" each.  I adhered the border to the left then added a silk flower and handmade paper flower held in place with a deep rose brad. I added a deep rose ribbon behind the flower accent then trimmed the ends.  I color printed greetings on ivory card stock and rubbed the edges with the TH Antique Linen distress stain.  They are adhered to the card front with 3D foam tape.
The second card has a lighter handmade flower and a green brad.

Monday, August 22, 2016

HB Metallic

I made this card for a friend who is turning 93 today.

I cut the Memory Box Jumbled Happy Birthday from gold and silver foil card stock with 2 passes.  This allowed me to change the spacing of the words.  I adhered them to the navy blue card with quick dry adhesive.
I placed an embossed border at the bottom of the card in light blue done with the Anna Griffin Acanthus set.

Quick and bright card.

Saturday, March 7, 2015

Card - St. Patrick's Day Birthday

I made these two cards for a friend who requested special cards for a relative that celebrates her birthday on March 17th.  I started with the Spellbinder A2 Ribbon Threader die which cut some DSP by Echo Park - For the Record2 - Damask - this is the flip side.  It gave me some illusion of movement with it's diagonal lines.  I trimmed the holes at the bottom of the die which here is the right hand side.  I then found this wonderful soft green image of a shamrock wreath to which I added the greeting then color printed it.  I added notches on the corners with a punch.  I had some mint colored seam binding which was too clear a color for the rest of the card so I colored it with Tim Holtz Bundled Sage Distress Stain to give it some warmth in color.  I ran one length through the slots and taped the ends to the back.  Then, I pulled a second piece through behind the first one and tied a nice soft bow.  I found a card in the coordinating green but it still needed something.  I decided to add a layer of DSP by Basic Grey - Porcelain - Chintz which supported the warm greens in the rest of the card.  This layer was adhered to the card, then the ribbon threader then the wreath was added with 3D foam tape.

Sunday, October 19, 2014

Cards - Sympathy - Silk Flowers

I made a couple sympathy cards this morning for folks who have lost loved ones recently.  The top one is for a lady who lost her husband.
I started with a mint green card and added some K&Company Designer paper in muted tones of green, grey and teal.  I added a ribbon across the bottom and mounted the sentiment on top of it with 3D foam tape.  I added an accent of layered silk flowers and leaves in similar colors. All held in place with a tiny white brad with a gold flower sequin as the outer most layer.

The next one is for a friend who lost her sister at 95. What a long life!  On this card I played on the bits of bright pink in the bottom left hand corner hence the bit of pink in the silk flowers.  The sentiment was color printed and punched with the Stampin Up Decorative Label punch.  Again mounted over a ribbon with 3D foam tape.

Friday, August 22, 2014

DSP Strip Background - HB

Here's another try at the DSP Strip background. This time I cut the DSP to 4.00 x 5.25 inches then cut the strips at .75" wide.  This worked much better but it's not a scrap buster idea because you need a large piece to start.  You can see that having a centre strip the opposite color of the end ones works well.
Once the strips were cut I laid them side by side and taped them together on the back.  I rubbed the edges with an dark green ink pad to add definition. I wrapped a piece of moss green satin ribbon across the bottom half and taped the ends to the back. I then adhered this layer to an ivory card. I used a SU Decorative Label punchie with a greeting which I rubbed it's edges with a pink ink pad. I added a velvet hydrangea and smaller silk flower to the top left hand corner held in place with a green mini brad.

2BGreen - Recycled Cards - 4

 Another set of 2BGreen cards made from recycling/reusing elements from cards received from others.  This is a gift for a friend with a birthday.  The card on the left I trimmed then added a Stampin Up Decorative Label punchie from the same card so it matches perfectly. Added a Word Window greeting.


The one to the right is a great image of a tea cup.  I just brushed it's edges with an ink pad and left it blank to be used for any occasion.


Roses are always a favorite.  The dark accents are gold so I punched a SU Decorative Label punchie in gold and added a word window greeting. Mounted to a pink card.


The card front was trimmed to leave a small border and adhered to a golden yellow card.  I added a white and then golden yellow silk flower in the top right hand corner held in place with a tiny black brad.
This great watercolored violets image was trimmed and layered onto a purple card.  I created a band with the same card stock then added an oval greeting mounted with 3D foam tape.

Sunday, July 27, 2014

2BGreen - Recycled Cards


Here's another set of 2BGreen Cards which are a line of cards I created to use the cards I've been given from friends who just could not throw away the cards they had received.  They just need a bit of something to make them useful again.


I was fortunate to find the color of card stock I needed to match the images. The one above I added purple buttons.  The oval flowers was die cut with TM Holtz oval mover and shaper then mounted on white layer embossed with the Cuttlebug Oval frame embossing folder. Oval was mounted with 3D foam tape.


These are great images I'm glad they will be enjoyed by another person.

Wednesday, January 23, 2013

Cards - Birthday in Greens

I created these cards for a friend who has a family member who celebrates a birthday on March 17 - St. Patrick's Day.   I made some for her a while back. Check it out.
Left: The card is Certainly Celery with double sided designer paper by Stampin Up!  It was cut 1/3 to 2/3 and the top piece was flipped over.  I color printed the greeting in CC on Very Vanilla and cut it with a Spellbinder Ribbon Slider thin die.  I placed it onto a piece of CC ribbon which was placed over the join of the 2 piece of DSP.  The ribbon is pulled through a slit in the card fold and taped to the inside.  I added a large silk flower and dyed a smaller one with Tim Holtz Peeled Paint Distress Ink. They are held in place with a vanilla brad.
Right: I selected a dark green textured card stock.  I selected some green DP by Basic Grey - porcelain arabella.  I color printed the greeting and punched it out with the SU! Decorative Label punch.  I punched another from the green cardstock. I cut it in half and mounted the halves top and bottom of the punchie. I added a coordinating gross grain ribbon.

Sunday, March 13, 2011

Card - Silk Flower Trio

I started with a Kiwi Kiss card. I embossed a white card stock rectangle with the Victorian embossing folder. I then applied some ink to the edges with the stamp pad. I died the silk flowers with the re-inker which ensures they match. I added a second small white silk flower and attached the flowers to the card with white brads. I color printed the custom greeting and trimmed to fit the top half of the card.

Card - Kiwi Flower Trio

Another green card. I started with a Kiwi Kiss card. I had dyed several white silk flowers with the matching re-inker and let them dry over night. I added white smaller silk flowers and attached them to the card with terracotta colored brads to coordinate with my decorative paper. I cut my striped decorative paper with a scallop thin die. I glued 2 of the scallop borders to the top half of the card. I color printed my greeting, ripped the top and bottom edges and added 3 small buttons with Zots to the right hand side. This greeting was layered over the scallop die cuts.

I have a new scallop Die-namics border die - thin dies from My Favorite Things MFTStamps.com. I am very happy with it's proportions for card making. It's six inches long. Perfect.