Showing posts with label needle. Show all posts

Friday, November 8, 2024

Needle Case for Floss Organizer

I made a needle case for one of my sisters.

We had supper on Thursday night as we both headed to meetings in the evening.

We had talked about organizers for embroidery floss a while back and she found one in her de-stashing. 

I exchanged 10 applique pins. I bought a box of 150 so I could easily let a few go.

I needed to transport them safely so why not make a quick needle case. I included a needle as well.

The alcohol ink is packed so it had to go as it was.


This organizer has fixed dividers which has it's advantages and it does hold the commercial floss bobbins as well as my DIY ones.

I dropped the needle case off this afternoon.

Nice not to have go shopping for what we need and we each get what we want.


Friday, September 20, 2024

Slow Stitching - Zokin

I needed to do some slow stitching so I dug some cloth from the stash and started.

This is 100% cotton dishtowel well used with holes.  I ripped it down and folded in half.  I added a few felt patches over the holes. This little heart is one.

I stitched with some thread from ORTS tin which give me a bunch of different colors.  I stitched in both directions.


A long sashiko needle came in handy with project.

It measures 2.5 inches and I could put a lot of stitches at one time and just pull that thread through.

Added this cleaning cloth in the bin in the laundry closet.  Ready to clean up messes and then washed and used again.

Another piece of cloth to be useful again.


Wednesday, September 11, 2024

Stitching - Needle Cases

Over the last 4 months I have been working away at making a few more needle cases. I have used a variety of tins and several color combinations.  Some of the tins have been altered.

This case is a simple elegant box of silver toned metal in an oval shape.  I don't know what it's original contents were but now it has been repurposed.

It now holds a stitching needle with 3 applique pins on a felt holder.

I chose to make a black felt holder with an accent of red near the bottom.


This mint tin had advertising on the lid which I was not keen to leave there.  I sanded the lid to remove most of the writing.  I then decorated it with alcohol inks in yellow and blues.  Once it was dry I sealed it with a coat of Modge Podge.

The felt holder has a base of turquoise with a yellow accent on the left hand side.  It holds 1 embroidery needle and 3 applique pins.

A safe way to carry your stitching needles.


This tin had the same issue so I handled it the same way as the one above. 

I chose yellow and pink alcohol inks for this lid and again it was sealed once dry.

The felt holder has a flower stitched onto it and holds 1 embroidery needle and 3 applique pins.


This tin has the Vienna Opera House on the lid which needed to alteration.

I stitched a house felt holder in black and turquoise which holds 1 embroidery needle and 3 applique pins.


This is again a mint tin and I knew that alcohol inks would not completely cover the writing on the it but I think it altered it enough to work.

Again, it was sealed once the ink was dry.

This tin opens differently that the others so I had to alter the felt holder.  I added a ribbon at the top of the tin so it can be pull out of the tin to access the pins.

The felt holder is green with blue on the back.  Whip stitching around the edge with triangles and French knots as decoration.

It holds the same pins as the others.


This is a tall and slim metal tin similar in shape to the previous one. The bonus on this one is the lid is clear.  It closes very securely.

I made the felt holder from burgundy felt with a bit of a flower stitch along one side.

It hold 1 embroidery needle and 3 applique pins.


I spent quite a while thinking about how to package these. I did not want the pins to be touched, I wanted the felt holder to stay with the tin and I wanted the beauty of the tins to very visible.

Here's what I did.  I sealed the felt holder with the pins in a cellophane envelope.  The used a Zot to adhere the envelope to the inside of the tin.  This ensures the needles can not be removed nor can the envelope be removed from the tin.

The envelope can be removed and discarded to use the needles then the felt can be placed back in the tin.

I think this will work well.

Tuesday, September 3, 2024

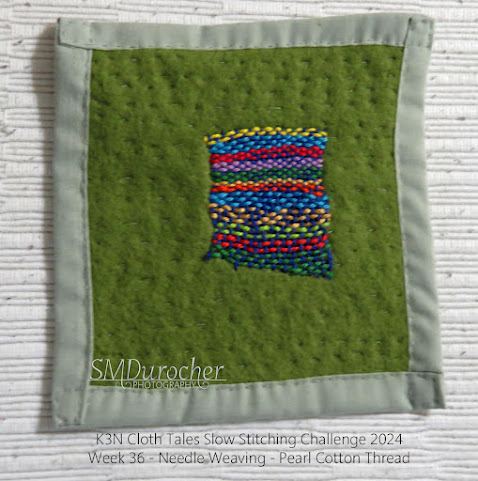
Slow Stitching - No. 036 - Needle Weaving - Pearl Cotton

This is a stitched piece for K3N Cloth Tales slow stitching challenge 2024.

Week 36 - Needle Weaving - I used Pearl Cotton.

I prepared by foundation piece by placing a piece of olive green felty fabric onto a piece of poly cotton in light green.  Folded over the edge to the front and stitched it with sewing thread.  I then basted the middle with the same thread.

I laid down my warp thread in navy blue pearl cotton.  Drawn lines or a couple lengths of tape may have ensured more even top and bottom edges. 

I then wove my short lengths of pearl cotton and wonderful colors all along the length of this little weaving.  I used the head of the needle to go over under all along the warp threads. Tacked the ends and started again with a new color.  It was nice to use pearl cotton - worked really well.   The shape is organic and that is all well.


Saturday, August 31, 2024

Sylvia's Simple Shots

It's been busy!  

I had my aunt and her husband over for tea on Sunday.

It's been a long while since she was over so we had a good visit.  I was able to ask a couple of guy questions - about the DeWalt drill I inherited from my Dad. One of the batteries won't charge so he recommended calling DeWalt.  On the ToDo List

I sent peaches from the case home with them.


The car went in for servicing at 7:30 am so I had to spend half a day in the area.  I read my book in a bit of a coffee shop till businesses opened at 9:00 am.  I stopped at Starbuck and did some craft ideas journaling while I drank my $4 chocolate milk! 

I then headed to VV.  I sure can spent a few hours there. Forgot my coupons at home.

I bought myself a light backpack because I did not take my big one from college days because it weighs too much. It has a slot inside to keep the water bottle upright and a waist strap. Yes we will take that.

I had several stops on my list.
I stopped in at Dollarama that day as well.  I was looking for tape but came out with these metallic watercolors for $2.

They are great.  Very impressed.

Easily moistened, sit in full sized pans and provide good coverage.  I will have to find a container/box to keep them in.

I have been using them a lot.


The Call of the Wrens by Jenni L. Walsh was the book a read this week.  A wonderful book with strong female main characters.  We meet Marion Horton in WWI and Evelyn Fairchild in the WWII which served in the WRENs. WREN stands for Women's Royal Naval Service in the United Kingdom.  

Marion Horton is an orphan and at eighteen she ages out of the support system and has to find her way in the world.  The war is on so she joins the WRENs and finds family.  Her boyfriend Eddie Smith,  a fellow orphan lies about his age to join the war effort as well.  They do their basic training and motorcycle dispatch training and are posted close enough to see each other.

Evelyn Fairchild is a teenager and loves to drive fast. She is found at Brooklands regularly.  She has a clubfoot for which she has had many surgeries to correct. It has not kept her down and she has pursued her goals. Her mother is very protective of Evelyn. Evelyn thinks it is too much and she does not want to just get married.

There is a wonderful twist at the end of the book was made a great conclusion to the story.

With needing to embellish my linen coasters I decided that maybe some Sashiko work might be useful.

I looked up where I might find such things where I live.

I discovered a new to me quilt shop - Trapunto ( which means quilt in Italian). 

The ladies were very helpful and I came home with the cheaper needles and some thread as well.  I have heard of this type of stitching through Kathryn and my slow stitching challenge.

We shall see.


I have decided to trade in my great Contigo plastic water bottle for metal ones.  keeping water in plastic contributes to micro plastic in my body so I made the switch.  Of course, metal Contigo bottles on the second hand market are non existant.  Will other brands be water spill proof?

I did buy a few before I found a couple I was happy with. I have the blue one for the car and the white one fits in the new backpack.  MTF had a 50% sale on the whole store. Good to go!
It feels like back to school. 

I have bought myself a couple of jean type pants in the last couple of weeks.  This pair of stretchy jeans are a bit short waisted so they needed a belt.

I bought the belt a couple of days later after I had worn the jeans a couple of times.  I still have to shorten them.  The price was $10 but with the 50% sale I was happy with the final cost.

The belt was $2 at VV later in the week.

Keeping with the feel of back to school I bought a pair of new to me runners as well.  

They fit well,the color was good at teal and black and they were in good condition.  They needed a good cleaning.

The cost was more than I am used to but that is with everything these days.  At $16 but after I looked them up on line I was happy.  The regular price runs between $130 to $150.

I gave them a good wash and let them dry in the sun on the balcony for a couple of days.

Good as new!

I dropped off art at the Spruce Grove Gallery for the Open Art Competition

Then did some shopping at VV.  The Goodwill store has closed. Bummer! 

I connected with my aunt and dropped by for a visit and a game of scrabble.


It has been a very busy week!

Thursday, March 21, 2024

Lipstick Needle Case

 I found some of these empty lipstick cases and I saw a needle case.  During a visit with my sister earlier this week we brainstormed ideas and had determined that polyfill would be the best filler.

I came home and worked out what I saw in my head.

I created a red felt tube, stitched it by hand, filled with polyfill and sealed at the top with another felt circle. I used a medium Zot at the bottom to keep it in place in the lipstick case.  Now one can safely carry a few needles with our slow stitching projects and it looks really cool.

Sunday, January 7, 2024

Slow Stitching - Set Up


Here's my set up for the upcoming slow stitch projects.  I have a large project and a few challenges.

1. Embroidery Thread - regular and pearl cotton

2. I have a small hoop - Not sure I will need it

3. Small scissors and sharpener - These are small enough to fit in the bag to be put away and the sharpener improved the scissors quite a bit.


4. Needles - I did my first piece with tapestry needles which was not ideal.  When I was out to see my sister she dipped into her stash and gave me 3 or 4 finer needles. Some with bigger eyes and smaller, some longer which has helped. The green zigzag tabs was a gift from my neice quite a few years ago and it holds all my needles so they are easy to find.

5. Pin Cushion - I used a vintage small shot glass wit a green bottom.  Wadded up a small bunch of fiberfill and topped it with a striped green fabric and stuffed it into the glass. Works great.  I only have 12 needles so that I can account for them at the end of the day. I don't need them in my flesh anywhere thank you.

6. Basting Thread - this is just sewing machine thread.  I generally use cones on the sewing machine these days so I am pulling the small spools to use up that thread.

7. Heat and Bond Hemming - a roll of this adhesive to hold things together without head pins.  I see some of the you tubers on line are using applique pins which are much smaller.  I will see how I get on.

8. Base Fabric - I ripped 4 inch squares for the challenges I will be undertaking this year.  I think I will jump around to find challenges that interest me.

Wednesday, July 22, 2020

Bernina 830 Sewing Machine & 1st Project

The new to me 1972 Bernina 830 Sewing Machine arrived yesterday thanks to my sister and brother-in-law.   I purchased it in late February through my sister then I started making the space to house it!  Then COVID hit and life changed.  I have continued to clear, de-clutter, and get rid of stuff and last week there was space for it. 

I have placed it in front of the window so that the light will be the best most of the time.   There is enough room on the right for me to access the window to open, clean or get out if I needed to.

You can see the ironing station on the right hand side.   The cutting and pinning station of the craft table is behind the desk and on the left hand side.  That makes a very good working triangle where everything is at hand but there is enough room to work.

The desk has a lifting mechanism which allows it to be stored in the desk, then the machine level to the desk top and then higher still to access the free arm feature of the machine.  It works really well and I will get some lubricant to help it work a little better.
I created Thread Bobbin storage in a Ferraro Chocolate box. I love the clear lid so I can see the contents.  I created the channel organizer with 80lb text paper.  I cut a piece 16 T x 8.25 W inches then scored it every inch.  Then it was a matter of creating the channels to hold the bobbins. I taped the edge on the right to the bottom of the box. As you can see I have expansion room.

I decided to store the sewing machine needles in the space left. 


I used the same boxes for Thread Storage.  They are deep enough to accommodate most spools. I organized the thread by first separating the polyester from the cotton. 

The ones displayed are the polyester which I have the most of.  The spools were organized by color into separate boxes. Reds and pinks, neutrals (black, white and beige), 2 boxes of blues then a box of yellow and greens.


My niece made this Needle storage tag book for my birthday.  It is tag shapes with ribbon sewn to them then protected with a clear one on top. 

The label at the top allows me to remember what I have stored there.  Sometimes you have to switch out needles but you don't want to return it to the new ones.  This system allows me to store it here until I need it again.


These small wooden boxes were made by my brother-in-law when we needed boxes for selling cards at craft sales.  I have not used them for a couple of years because I bought a large card display.  They fix perfectly in this drawer and makes use of all the space.

Small cutting tools, my rotary cutter and blades, measuring tapes, pins straight and safety.


This is the extra hook on the pole where my African Violet lives.

The light on the right hangs over the craft table.


I refurbished it's lace cover today.  I cut the lace in half so that I will have the same fabric for the other light.
I hemmed the top edge then added a white grosgrain ribbon along top of the wide hem on the bottom.  It is a single layer which allows more light to get through.

I will be getting another hanging light for the extra hook which will give me lighting on the left hand side of the sewing desk which likely will be needed when sewing at night. 

It is very exciting to have a dedicated sewing space where everything will be close at hand.  Keep an eye out for quilts in the near future.

Wednesday, June 3, 2015

Pine Cone B&W

I went through the photos I took a few days ago to see if one had enough contrast to go to black and white.  I chose this pine cone photo where the green pine needles have turned dark and the top bits of the pine cone are lighter. The background has a good mix of light and dark. The focal point is just off center and I have some of the ends of the needles and some not.
I think nature is wonderful, inspiring and relaxing.


I've included the color version. 

Submitting to the Black and White Wednesday hosted at My Memory Art.


Saturday, June 7, 2014

Cool Tool: Skate Lace Threader

Here's the cool tool! It's a floss threader but I used it to thread my red laces onto my skate. Here's how.
Pull your red thread through the loop so now it will act as a needle would.  Pull the thread through the bottom hole back to front first and pull thread to the half way point. now pull the lace through the holes from the back as you go up.  Release that thread and put the other into the threader. Now pull that thread through all the holes from the front which should create that little cross until you get to the top.  Tie a knot and trim the ends.
I included a threader in each of the kits.