Showing posts with label thread. Show all posts

Monday, October 14, 2024

Slow Stitching - No. 042 - From the Same Cloth

K3N Cloth Tales 2024 Slow Stitch challenge.

Week 42 - From the Same Cloth - Pulling Threads and Running Stitch.

This is a piece pale yellow linen.

I pulled thread from the bottom area and stitched them into the cloth above.

Lovely finished piece and a very simple process.


Wednesday, August 28, 2024

Slow Stitching - No. 035 - Thread Sampler - ORTS - Satin Stitch

Week 35 of the K3N Cloth Tales Slow Stitching Challenge 2024 - Hanging by a Thread - Thread Sampler and Satin Stitch. 

Somewhere in the video Kathryn said "think of your thread as paint" or words to that effect.  

For me a paint palette came to mind. So I found a line drawing of a palette online and traced it onto my orange fabric and cut it out. It was appliqued with the blanket stitch. 

Then I pulled out the ORTS tin and started satin stitching bits of paint onto the palette.  My paint brush was next.  This was all done on the fly so all in all I am happy with the final result.

Sunday, March 10, 2024

Card - Slow Stitching - Flower

I love the colors in this fabric.  

I chose an ivory thread to outline the flower and a light green to outline the stem.

I added several French Knots in the center of the flower.

The stitch I used is the back stitch.

This was a long one which took 2 evenings to complete.

I chose an Early Espresso card base in the A2 size.  

A quarter sheet insert and an envelope added it is now sitting under a pile of books to ensure the double sided tape sticks the fabric on very well.

Saturday, February 10, 2024

Sylvia's Simple Shots

The progress on the slow stitching scroll continues.

I found this button in a .50 cent bag of buttons when I visited the thrift store in Wetaskiwin while on a visit with my sister.

It matches really well the colors in the backing fabric of the scroll.

It is a shell button and measures about 1.25 inches across.

You can see a hint of the tie I created as well.


We had a good dump of snow overnight.

I was glad I did not have any place I had to be and could just hunker down till the roads were cleared.


I have simplified my method of keeping the bobbin with the matching spool of thread.

It is a simple elastic band about 3-4 inches long. I push one end through the bobbin then pull both ends over the top end of the spool.

The expensive gadgets I bought were a total waste of money.  Several broke the first time I put a bobbin on them.

This bands are cheap as dirt and can be replaced instantly should one decide to fail.

Happy with this new system.  Easy to add to the system as well as I have box of 100s at my disposal.


The Joy Luck Club by Amy Tan.  I have read several of her books and enjoyed them a lot.

The story of 4 Chinese mother and daughters in their early years and their later years.  It was a lot of characters to keep track of.

This one was a disappointment.  The conflict between mothers and daughters was not fun to read about.  I did enjoy the beginning and the end had some wonderful bits in it.


I found a tin at the ReUse Center for my ORTs.

Orts are the leftover snips of thread that remain when you are done stitching. They may be be tiny bits clipped when you run out of thread, or longer lengths you no longer need.

I love the green shamrocks on the lid and it looks like it originally held a wonderful confectionery.

As you can see the box is full of fluffy threads.

Perfect!


Sunday, January 7, 2024

Slow Stitching - Set Up


Here's my set up for the upcoming slow stitch projects.  I have a large project and a few challenges.

1. Embroidery Thread - regular and pearl cotton

2. I have a small hoop - Not sure I will need it

3. Small scissors and sharpener - These are small enough to fit in the bag to be put away and the sharpener improved the scissors quite a bit.


4. Needles - I did my first piece with tapestry needles which was not ideal.  When I was out to see my sister she dipped into her stash and gave me 3 or 4 finer needles. Some with bigger eyes and smaller, some longer which has helped. The green zigzag tabs was a gift from my neice quite a few years ago and it holds all my needles so they are easy to find.

5. Pin Cushion - I used a vintage small shot glass wit a green bottom.  Wadded up a small bunch of fiberfill and topped it with a striped green fabric and stuffed it into the glass. Works great.  I only have 12 needles so that I can account for them at the end of the day. I don't need them in my flesh anywhere thank you.

6. Basting Thread - this is just sewing machine thread.  I generally use cones on the sewing machine these days so I am pulling the small spools to use up that thread.

7. Heat and Bond Hemming - a roll of this adhesive to hold things together without head pins.  I see some of the you tubers on line are using applique pins which are much smaller.  I will see how I get on.

8. Base Fabric - I ripped 4 inch squares for the challenges I will be undertaking this year.  I think I will jump around to find challenges that interest me.

Saturday, March 4, 2023

Sylvia's Simple Shots

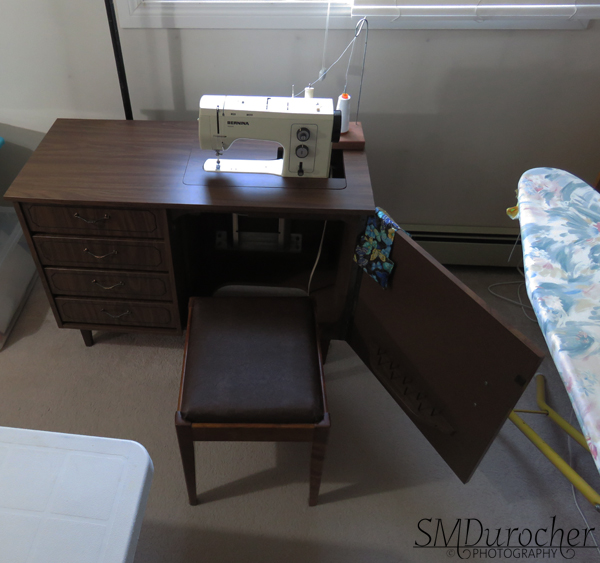
With my machine in a desk and not really portable I choose to take other tasks for my time with the ladies at quilting. 

I  took cutting to quilting on Monday since I just need my cutting mat, my rotary cutter, measuring tape, my long quilting ruler and some scissors.   I cut 16 UnPaperTowels - 6 sets of 2 in the grey flannel and 2 sets of 2 in the red flannel.

You can see that I have trimmed the corners on the top 2 sets making them ready for the serger.

I have quite a bit of flannel to cut and serge.  I think I will just put all of them in a pile then assemble sets of 10 somewhere along the line so I can put together nice looking colors.

When I picked up the serger I realized that I would need 2 cones of serger thread for the needle threads as they had been cut off.

I checked Michaels - they carry Coats and Clark but only in black and white on the 3000m spools.  Price is pretty good with a coupon.

I checked Fabricland which carries the Tailor brand and the price was pretty good.  I checked on the fuzziness of the thread and it was not as smooth as a sample I had from home so I moved on. They carry high end brand at a very high price.

I headed to Walmart where the price was about the same as Fabricland with the same manufacturer as Michaels and there was some grey.  Upon checking, the thread was smooth and very comparable to the the one I had with  me.

At quilting, Linda had brought fabric from one of our prolific quilter's stash.  This lady has experience health issues and has given up her hobby.

We were told all the pieces had to go.  There was a nice collection of fat quarters in beautiful colors and 100% cotton.

I took a stack of these fat quarters for my sister who is making different kind of sewing projects for the Grandma Africa chapter in Red Deer.

She has made casserole carriers, pot holders, aprons, and bunch more.  

She is working on getting rid of her stash but this will help a bit in offering different colors for her projects.

You know what they say - be careful what you wish for.  I had been wondering how to find flannel for my UnPaperTowels at a reasonable price since they will be donated or given as gifts.

Well, there were some pieces in the stash that Linda brought on Monday.

Here's the pieces I found.  There are a few darker pieces for the Make Up Remover pads projects.

I washed all the fabric and ironed them all so that they lie nice and flat and I can see what I have.

I will cut UnPaperTowels first then use the leftovers for the pads as they need pieces about 4 inches square.

Thanks so much for the donation of fabric.

I had a friend over for tea on Thursday.  I had not seen her since early December.  Of course, my life has been turned upside down since then.

We had a great visit. 

I used my Signature Turquoise and Yellow tea set which was a nice springy color.


I was invited to my aunt's new place for lunch on Saturday.  They sold their house and bought a condo much closer to me.  I am very happy to have her and her husband closer.

I decided to make Saskatoon and Rhubarb crisp in small pie size.  I used honey for a bit of sweetener in the fruit and brown sugar in the crumble topping.

I made 4 - 2 for my aunt, another for my other aunt who was invited to lunch as we were dropping off our art in the Juried Member show that morning.  One for me.

I ate mine for supper on Saturday.


Another book this week - J is for Judgement by Sue Grafton.

The story is about Wendell Jaffe who was recently declared dead after being missing for the last 5 years.  His widow Dana has collected the insurance money and has spent a lot of it clearing debts incurred while raising her 2 sons alone.

Kinsey Millhone has been hired to investigate a reported sighting of Wendell in Mexico.  Off she goes to spend a few days south of the border.  Based on her sighting it does seem that Wendell is alive. 

He has a new partner Renata and they just packed up in the middle of night.  Where are they headed. Kinsey heads back to California and starts tracking leads. One of his sons has been arrested so the speculation Wendell is headed north.

Life is always exciting with Kinsey.  We find a bit more about her personal life this week.  Some of her extended family reach out and she as always thought she had no family because the aunt who raised her never mentioned others.  There was a reason and it was hard to accept by Kinsey.
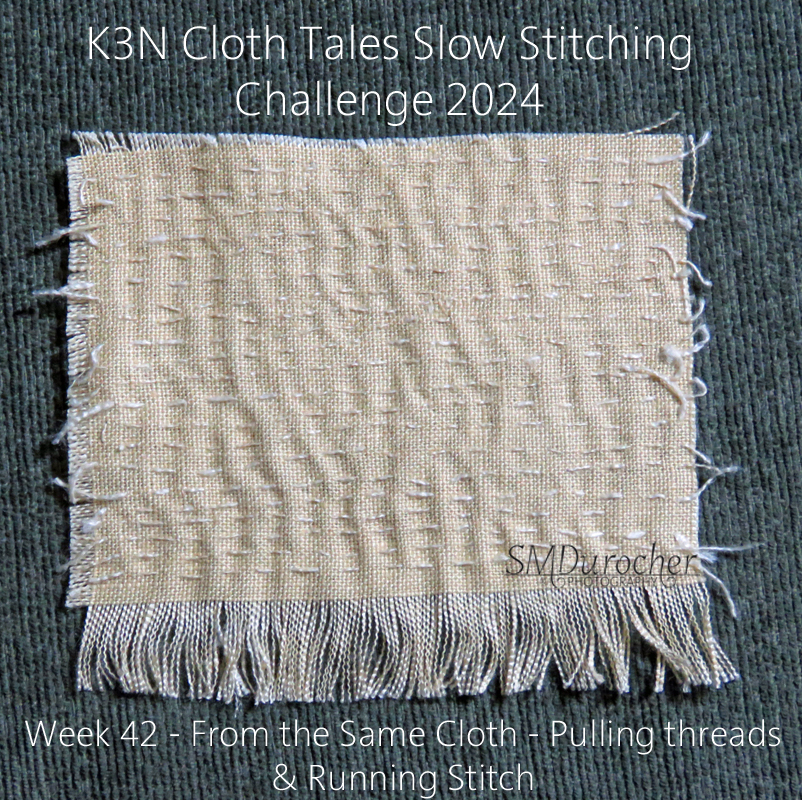
Wednesday, October 12, 2022

Small Gifts - Car Cup Holder Coasters

A car coaster collects the drips, drops, spills, crumbs and other stuff that ends up in our car cup holders.

I made up some with supplies I had on hand. These were made with felt circles.

I started with an 3.25" circle which was hand cut.  I stacked onto it 3 more circles of various colors and sizes.  I took them to the sewing machine and stitched in a spiral manner from the outside to the center of the coasters. Since the circles were felt buttons I added a coordinating thread through the whole coaster and knotted it on the front.  This can be used to remove the coaster from the holder.  These can be washed and reused. 

I made 10 sets so we will see how things go.  I mixed and matched a bunch of colors.  Red and White Canadian in the top left corner, the Elks one in position three in the top row with a few summer colors and Christmas red white and green.  The tags are 2.5 inches with rounded corners and it was placed between the 2 coasters which are back to back. They are stitched on with white cotton thread. 

Thursday, September 1, 2022

Christmas Card Challenge - Watercolor - Silver Foil Joy

I had some small Christmas note cards featuring a wreath and Joy in silver foil on white card.

I decided to trim the card front off and water color the background with the Stampin Up Watercolor Wonder crayons.  I left the center of the wreath white.

On this card I used Tempting Turquoise with salt.  Once it was dry I trimmed it a wee bit. I added the TT Thread with a large round silver brad to hold it in place aligned the left hand side.

I adhered it to the Tempting Turquoise card base with double side tape.

This card features the same silver foil wreath with the Old Olive watercolor. 

This one was just a basic wash on the background again leaving the inside of the wreath white.

I found some coordinating round sequins in my stash and mounted them with tiny silver brads.  I chose some green and some silver.

The watercolor layer was adhered to the Old Olive card base with 3D foam tape.

A seasonal insert with a white envelope completes the card.

For this card I used the Brave Burgundy watercolor and created a gradient wash with it being light at the top and darker at the bottom.  I actually painted this upside because it works better to start dark and add water as you get lighter.

I chose 4 large silver star brads for this card.  I put them in the four corners.

I adhered the greeting layer to the card front with 3D foam tape.

I made 2 of each color so I have 6 more cards in the Christmas card box.

Monday, March 8, 2021

Sylvia's Simple Shots

I captured this Nuthatch near the bird feeder which is along the stairs that lead to the river valley.

As you can see in the photo there was a bit of snow coming down.

I have been busy with family commitments that last few weeks and it was so cold I was hibernating.

It has warmed up amazingly in the last week and I have been able to have a couple of outside visits with folks I have not seen in months.


I finished this book a couple weeks ago. Revenge of the Middle Aged Woman by Elizabeth Buchan.

It is a story of reinvention of one's self after what as thought to be permanent is not.  She handled the challenges with grace and poise and won out in the end.

I found it encouraging that we can all turn a corner and see what is up ahead if we don't get too bogged down in the stuff of today.


I'm changing up my exercise routine a little bit to ensure I don't get too bored.  I have an MP3 player that I have used for pace when I walked on the thread mill.  I chose music with good rhythm and that I loved. 

I have started using that music instead of the music on the DVD.  I just mute the TV and do the movements which I have pretty much memorized the last few months.  I have been able to push myself into more than 1 mile with this music! 

The CD that I used are under the MP3 player.


I visited my sister this week.  We cooked hotdogs outside on the fire.  Love those!

She shared a cool find with me in these cones of polyester thread.  She found them second hand for a wonderful price.  I have been using cones with the holder I got for Christmas and it makes it less tedious to always be changing thread from spools. It ensures you have enough to finish a project.

This is the book I finished most recently.  Another reinventing your life book - Rise and Shine - Anna Quindlen. 

An early morning TV show host says something after an interview but is not aware that her mike is still live.   This ruins her career and she escaped to a hot tropical clime to recharge and make plans to move forward. 

Her sister is worried about her, her son is wondering where she is but he is away at college so a bit out of touch, and her husband told her that he is leaving her. 

With a break from the rat race pace of life in New York she finds a way to recover.  She is called back to New York when her son suffers an injury and she needs to step in to heal the relationship and the wrong that has been done.


A few goodies for the car.
 

 The USB stick holds all my favorite music which I can play in the car.

I added a wrap to the car blanket so it stays small and contained. 

I got some floor liners to protect the carpet in my car.  The are nice plastic and easily cleaned.

It was late last night when I was photographing my entry for Flickr Macro Monday.  The challenge is "Motion Blur" which means capturing movement during a long exposure.  You can see in the image on the right that I was able to capture the movement of the second hand. You can find my submission on my Flickr Photostream (SMDPics)

I am sharing with Angie who hosts Mosaic Monday #121 and

Mersad who hosts Through Me Lens #280.

Have a good week!

Wednesday, July 22, 2020

Bernina 830 Sewing Machine & 1st Project

The new to me 1972 Bernina 830 Sewing Machine arrived yesterday thanks to my sister and brother-in-law.   I purchased it in late February through my sister then I started making the space to house it!  Then COVID hit and life changed.  I have continued to clear, de-clutter, and get rid of stuff and last week there was space for it. 

I have placed it in front of the window so that the light will be the best most of the time.   There is enough room on the right for me to access the window to open, clean or get out if I needed to.

You can see the ironing station on the right hand side.   The cutting and pinning station of the craft table is behind the desk and on the left hand side.  That makes a very good working triangle where everything is at hand but there is enough room to work.

The desk has a lifting mechanism which allows it to be stored in the desk, then the machine level to the desk top and then higher still to access the free arm feature of the machine.  It works really well and I will get some lubricant to help it work a little better.
I created Thread Bobbin storage in a Ferraro Chocolate box. I love the clear lid so I can see the contents.  I created the channel organizer with 80lb text paper.  I cut a piece 16 T x 8.25 W inches then scored it every inch.  Then it was a matter of creating the channels to hold the bobbins. I taped the edge on the right to the bottom of the box. As you can see I have expansion room.

I decided to store the sewing machine needles in the space left. 


I used the same boxes for Thread Storage.  They are deep enough to accommodate most spools. I organized the thread by first separating the polyester from the cotton. 

The ones displayed are the polyester which I have the most of.  The spools were organized by color into separate boxes. Reds and pinks, neutrals (black, white and beige), 2 boxes of blues then a box of yellow and greens.


My niece made this Needle storage tag book for my birthday.  It is tag shapes with ribbon sewn to them then protected with a clear one on top. 

The label at the top allows me to remember what I have stored there.  Sometimes you have to switch out needles but you don't want to return it to the new ones.  This system allows me to store it here until I need it again.


These small wooden boxes were made by my brother-in-law when we needed boxes for selling cards at craft sales.  I have not used them for a couple of years because I bought a large card display.  They fix perfectly in this drawer and makes use of all the space.

Small cutting tools, my rotary cutter and blades, measuring tapes, pins straight and safety.


This is the extra hook on the pole where my African Violet lives.

The light on the right hangs over the craft table.


I refurbished it's lace cover today.  I cut the lace in half so that I will have the same fabric for the other light.
I hemmed the top edge then added a white grosgrain ribbon along top of the wide hem on the bottom.  It is a single layer which allows more light to get through.

I will be getting another hanging light for the extra hook which will give me lighting on the left hand side of the sewing desk which likely will be needed when sewing at night. 

It is very exciting to have a dedicated sewing space where everything will be close at hand.  Keep an eye out for quilts in the near future.

Friday, January 11, 2019

Bound - Project 1 - Art Album

I received this book Bound - 15 Beautiful Bookbinding Project by Rachel Hazell for review just before my crazy craft sale season started in October so I am just getting around to making my first project from the book.

I have been looking to develop some photo related products. After some research, I found several handmade Instagram Albums which I thought were a good idea.  We need to get those pics off our phones.

It paired well with the Five Hole Pamphlet project in this book so I moved forward.


I needed square pages to accommodate the 4x4 Instagram photos.  Of course, I am very familiar with that format as I used it all the time in my photo calendars.

I started with a piece of paper 4.25 x 11 inches which is half of a letter sized sheet of card stock.

After printing a bit on it I scored it at .5 in, 5 in, 9.5 in.

I created holes on the spine at the center 2 1/8 inches and at .5 from the top and bottom edges of the 4.25 inch. The book was too small to have 5 holes as the project in the book.


I chose color thread to provide some interest.  The half inch flap on the left helps to keep the pages in and the large flap on the right provides place to document the 12 pieces inside the album.

The stitching is start from the outside through the center hole, go up to the top hole through to the outside again, down the spine to the bottom hole and then through the center hole to the outside again.  Before making your knot make sure the 2 threads are on either side of the length of the spine.  Pull taut and double knot.  I left the thread long enough to tie the album closed.

Version 2.0
I decided that I could improve on the design so I took another stab at it.  By cutting the card stock in half the other way 8.5 x 4.25 I could get a cover that was 4.25 inches square when folded.   I decided to put the index on the inside front cover.  The pages are cut just a smidge under the 4.25 inches to allow for the stacking of the pages. Still plenty of room for the 4 inch art.

I embellished the thread lengths off the knot with E-Beads.

I produced a tag which provides the buyer with how the album can be used.  It  can be filled with Instagram photos, Mini Paintings (watercolor or acrylic), Poetry, Comic Strips, Drawings, or Everyday Pics

It can be used for: A Photo Album, Flip Book, Portofolio

Makes a great gift for: Bridal Party, Grandparents, Clients, & Friends.

Wednesday, November 28, 2018

Cardmaking - CH - Class 5

Style 2 - Designer Paper Split.  I bought these 12x12 glitter papers together but don`t have a designer or manufacturer.

This is very versatile paper in that it has lots of colors.  The bottom piece is cut 4 inches wide by 3.5 inches tall.  The top piece is cut 4 inches wide and 1.75 tall.  These are taped together on the back.

I added a kraft ribbon over the join which was taped to the back.  This layer was then adhered to the front of a nice pink card.

The greeting was printed with colors from the designer paper.  It was punched with the 2 inch oval and adhered to the card front with 3D foam tape.

I created kits with kraft card and pink ribbon and green card with red ribbon.


Style 3 - Square - The ornament element is 3.25 inches square.  It was adhered to a 3.5 inch red layer which coordinated well with the ornament color. Creating a hole with a push pin, I added a clear crystal brad in the center and pressed the prongs apart on the back.

I chose a deep burgundy card which matched well with the background color on the accent.  I glued a piece of gold moire paper to the card front leaving a small border.

I wrapped a piece of gold ribbon around the card front and taped the ends to meet under the accent layer.

The accent layer was then adhered over the ribbon with 3D foam tape aligned with even borders top, left and bottom.

Style 8 - This card was designed with Stampin Up elements.  I chose a Garden Green card base.

The diagonal stripe designer paper is from the Be of Good Cheer DSP set.  It was cut to leave a small border of card color.

I cut a 6 inch length of Cherry Cobbler Tulle and wrapped it around the DSP in the bottom third of the layer and taped the ends to the back.

The greeting was created with ivory metallic card stock cut with one of the SU Apothecary Framelits.  It is attached to the card front over the tulle with 2 tiny green brads on the bumps on the right and left sides. The greeting was color printed and punched with the SU Word Window and mounted to the label with 3D foam tape.

The designer paper layer was then adhered to the card front.

The felt wreath is from the Stampin Up Stitched Felt Winter Wishes Embellishment Set.  I added a Cherry Cobbler bow made from thread which is held in place with a Bling Zot.  The wreath was attached above the tulle with Scotch Quick Dry Adhesive.

Monday, April 24, 2017

Mosaic Monday - Fabric and Art

I attended my first Fabric Frenzy on the weekend.  It lived up to it's name.  I stood in line for an hour just to get in, it was raining/snowing, and I met a couple of ladies who quilt. I would estimate the number of people in line to be at least 300-500. They were letting in 25 at a time.  I understand this was unusual to have so many attend.  This is a fundraiser for Grandmas in Alberta for a New Generations who support grandmothers in Africa raising children orphaned. 

There was a room with quilting fabric and notions then one with all the rest of the fabric.   I knew my sister was ahead of me in line but did not see her outside. I managed only the quilting room and I found her there. I was shopping for my aunt who was supporting her sister in an art show which I was attending later in the day.  My sister managed to get her some denim and we each made color selections for the start of a quilt project. I did see several friends as they were leaving with full bags in arm. 

I managed some lace, thread and one piece of fabric for my self.  I'm really happy with the multicolored piece of 1 meter at $5 was a great price.


I was headed off to the art show for my aunt Maria the artist.  The goodies were excellent.

The weather was better 2 hours away from home.  I had a visit with 3 aunts and viewed some art. 


One of the artist at the show had fabric for sale.  Left over from when she own a fabric store.  Well it did not take much for some of us to head on over after the art show reception. These are the pieces I bought.


Sharing with Maggie at Normandy Life who hosts Mosaic Monday#37.