Showing posts with label santa. Show all posts

Wednesday, April 6, 2016

Santa - Card Challenges

I made this Christmas Card to satisfy a few card challenges.
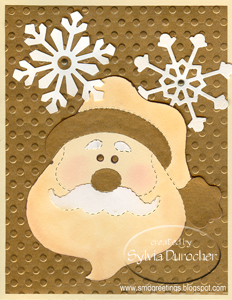
I started by cutting the Sizzix Santa Head die once in white card stock, once in white felt and 1 in red card stock.  I cut the red hat and nose and glued them to the white card stock one.  Then I took the head band & pompom from the hat and the eyebrows & mustache from the face of the felt one and adhered them to the same white card stock head.  I placed a piece of navy card stock behind the eyes which coordinates with the navy greeting.  I adhered a piece of damask designer paper onto the citron card leaving a small border. I adhered the Santa Head paper pieced head on the right hand side of the wide card. I adhered the color printed greeting cut with the Stampin Up Bitty Banner Framelits with 3D foam tape on the bottom left hand side. I attached the white felt snowflake to the top left hand corner with a red star brad which coordinates with the red on the Santa hat.

Submitting this card to the following challenges:

Holly Jolly - Santa
Weekly Christmas Card Challenges - Anything Goes
Crafty Hazelnut`s Christmas April Challenge - Anything Goes

Sunday, July 7, 2013

Challenge - Santa

I made this card for the challenge at Christmas Cards All Year Long which is Santa. I chose to upcycle this old Christmas card because it presents a different view of Santa.  This is a painting by Tom Newman called Santa's Hobby.
I cut the card with the Tim Holtz Ornamental die.  I found a dark green card.  I chose an ivory layer to coordinate with the duck.  I added the ivory layer embossed with the Cuttlebug 5x7 Snowflake folder trimmed to leave a small border. I added a sentiment with the Stampin up! Modern Label and Word Window stamped in Handsome Hunter.  To repeat the ivory  I added a grosgrain ribbon in the top left hand corner held in place with a red star brad to match Santa's sweater.

Saturday, December 1, 2012

Christmas Card Challenge - Focus - Reason for the Season

The Card Challenge this month is a focus challenge which is the Reason for the Season.  I selected a Santa and baby Jesus image and a sentiment by MelonHeadz Illustrations.  I made the sentiment the same color as Santa's suit. Then I arranged the digital images and then color printed them on white card stock.  I then cut the card stock with the SU! Top Note die.  I found card stock to coordinate with the halo on Jesus' head. I cut it slightly smaller than the card front and embossed it with the Cuttlebug Swiss Dots folder.  This was adhered to the cherry red card front. I then added a piece of black gross grain ribbon just below the middle of the card and taped the ends to the inside of the card.  I mounted the top note to the card front with 3D foam tape. I nice quick card.  I have about 140 cards made with this final challenge of the year.  I need about about 160 so I will have to visit a few more ideas. I hope you have your cards made. I will host another challenge in 2013.  Keep an eye out for it. 

Wednesday, June 8, 2011

Challenge - Gold Cream White

I made this card for the Sparkles Christmas Card Challenge. It's a color combo challenge Gold Cream White. I started with a cream card. I embossed a piece of gold decorative paper with the Cuttlebug Polka Dots folder and glued it to the card front. I cut the Sizzix Santa Head with the same cardstock, then I cut it out of the gold paper and white cardstock. I cut the different layers along the dashed lines from each and glued them onto the cream base. I applied some chalking to add some dimension to the beard and hat. I glued the Santa head onto the card leaving space for snowflakes. The snowflakes were cut from white with Sizzix Sizzlets and are held in place with gold tiny brads.

Cards = 1
Total = 49

Wednesday, December 1, 2010

Cmas Card Challenge - Dec - Santa/St.Nick

I have added St. Nick to the category which will allow vintage images and coloring to the category. You can stamp, die-cut, color print, watercolor, chalk, marker or emboss these jolly men onto a card. Here's the cards I made.


I started with a vintage St. Nick image which I color printed. I layered it onto off white cardstock coordinating with his robe and then burgundy cardstock matching his overcoat. I selected a Blue Bayou cardstock which matched the background.
Left: I embossed the top 2/3 of the card with a Cuttlebug folder. I placed a ribbon just below it and taped the ends to the inside of the card through a slit in the fold. Glued the St. Nick layer to the top left corner. Added a greeting stamped in white below and a MS punched snowflake on the right. Added a silver sparkly in the centre.
Right:I created a gatefold card. I stippled the outside edges of the card with Ruby Red ink. I stamped a small flourish in white ink to the left of the image. I glued the St. Nick layer to the left card flap.
I made 8 of these cards:
Total to date: 131