Showing posts with label stars. Show all posts

Wednesday, August 27, 2025

Slow Stitching - August 2025 - Week 4

My August piece is complete.  The theme for my piece this month was Friends. I am following Kathryn at K3NClothTales - Comfort Coverlet 2025. 

I finished the background in running stitch and white thread.

A reminder of my friends and how much they mean to me.

I have no plan for September yet as I have been unpacking for ages.

I am sure inspiration will provide something.

Wednesday, August 20, 2025

Slow Stitching - August 2025 - Week 3

Comfort Coverlet 2025 - August - Week 3.

My theme for this month is Friends.  

I have diecut fabric with my Bigshot machine from fabric which I associate with each of these friends.

I have started a running stitch background around the stars with a matching colored floss.


Wednesday, August 13, 2025

Slow Stitching - August 2025 - Week 2

Comfort Coverlet 2025 - August - Week 2.  Project hosted by Kathryn at K3N Cloth Tales.

My theme for August is Friends. I die cut seven stars to represent some of my friends. I chose colors which I associate with them.

I continue to stitch down the stars to my foundation layer.  I have used running stitch, French Knots, blanket stitch and representations of stars designed by me.

I am thinking of what the stitching will be on the background.


Wednesday, August 6, 2025

Slow Stitching - August 2025 - Week 1

My theme for August is Friends.  I am following K3N Cloth Tales Comfort Covertlet project.  

I die cut a star for each friend in colors that I associate with each of them.

I used 2 strands of embroidery floss and the blanket stitch to attach the stars to my background fabric or foundation layer. I chose the threa according to the colors in the fabric.

Some fabrics have metallic accents

Wednesday, April 3, 2024

Slow Stitching - No. 014 - Layers and the Moon

Week 14 of the Slow Stitching challenge with K3N Cloth Tales.

The prompt was layers and the moon with the lunar eclipse coming soon. It was geared to experiencing stitching through several layers of fabric and how the stitching starts giving it structure and weight.

I chose an owl for my animal.  I started with a 4.25" square of deep purple linen, then a striped layer for horizon line, then my yellow full moon and topped with  my Owl. This is a smaller version of this one I created for Inktober.

I stitched the horizon layer to the linen in several lines of stitching. Then I stitched the moon with running stitch in circles, then I stitched my Owl on with black thread. I added yellow accents with felt eyes, beak and feet. I used the stem stitch for the branch is sitting on in brown thread. I added stars to the night sky and voila another square done.

Wednesday, January 10, 2024

Slow Stitching - No. 002

I finished my 2nd piece of slow stitching.

I am following Katherine at K3NClothTales on You Tube and Instagram. 

The prompt for this week is Balance - Light & Dark.

I chose 2 heavier fabrics in my favorite color combo - yellow and navy blue. I aligned the join on the center line of my 4 inch foundation fabric, pinned it and did whip stitches in both colors - yellow first then black next.

I traced the circle for the sun with a spool of thread then with a darker and brighter yellow embroidery thread 3 strands I stitched the half circle with back stitch and the rays with running stitch.

I added white stars to the navy bottom half.  The fabric was unraveling so I added a blanket stitch all the way around the outside edge with thread that matched the fabric color.

Monday, October 30, 2023

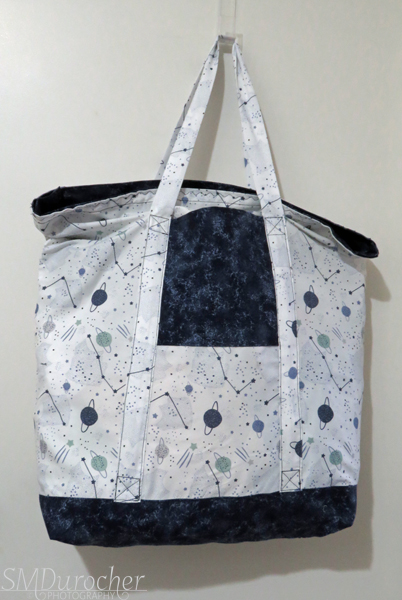
Sewing Project - Large Tote Bag - Stars and Planets

My sister and I had a conversation the other day about projects which we could make to give back. 

I still have quite a few microfiber fabric which can be used for another project.  Originally, they were collected to make Re-Useable shopping bags.

Those were donated and have not sold really well.  I think presentation is the problem. I am moving on.

Morning Star is an organization which supports women in crisis.

There is no dignity in carrying all you own in a plastic garbage bag so large bags can be used to give these women some self worth.

I chose the Stars and Planets pillowcase which is made of deluxe microfiber fabric. 

I paired it with some cotton fabric in deep navy small pattern which was donated to me when a quilter in our group retired and de-stashed her supplies.

I decided to put a piece of navy on the bottom since the fabric is white the bottom of the bag will likely get dirty fast and being a dark color will help.

I layered the cotton over the microfiber which will add strength.

I wanted the bottom to be boxed. I created the corners at 5 inches across then folded the  triangles onto the bottom of the bag and sewed them down.  That will add layers on the bottom and help to add structure to the bottom corners.

I chose a navy thread so it does not show on the cotton fabric.  It is more evident on the microfiber pieces.


I created the zipper insert the same what I made it for my own tote bag.  I used the method explained in this video Tutorial by Crafty Gemini.

This produces a completely finished edges with no open fabric ends.  Tabs are added to the 2 ends of the zipper so it is easy to pull open and shut.

I hemmed the top edge of the bag after I cut off about 10 inches off the top of the pillow case once I had undone the seam that created the top hem.  I used that fabric to make the handles. Microfiber more durable than cotton being handled all the time.  Handles are 1.25 inches wide finished with the seam place in the back center. They are 53 inches long. I tied the bottom of the handles in the cotton bottom for sturdiness. They were sewn 7 inches from the sides. 
 

It is important to have reinforce the stress points to ensure there is some strength is distributed to take the wear and tear.

The zipper insert is the same width as the opening of the bag. It is about 6 inches deep which is slightly more than the bottom but we have to account for the seam to put it in.


Now it is just a matter of pinning it very carefully and sewing the insert into the top of the bag.

I chose this decorative stitch on my sewing machine which produces this wavy seam which adds a bit of pretty to the bag.

Once the zipper insert is sewn in the zipper end tabs can easily be accessed when opening or tucked in when on your shoulder. 

It does allow an addition amount of space for hold stuff when the bag is full.

With the zipper insert the same width it makes the bag well sealed to ensure there are no holes where one could lose items from inside the bag.

The color of the zipper provides some contrast in the dark fabric so it is easy to see.  The tabs also help the find the zipper slider.

I will be making a few more of these to be donated in early December.


Thursday, June 2, 2022

Christmas Card Challenge - Watercolor

Worked on Christmas cards again.   

Using 140lb rough watercolor paper trimmed to approximately 4.00 x 5.25 inches.

I wet the triangle and just dropped color inside and let it blend together.  Added a trunk and let dry.

The red dots were added after the tree was dry.

I used a Micron Fine Permanent black marker to add the lines, the star and outlines around the dots.  Spattered the background by covering the tree with scrap paper.   This was mounted onto dark green card base with a seasonal insert.

The colors are different on this one and I chose another pattern for my lines.  This are quite not traditional colors and I am okay with that.

Stars replaced the cots.

This one was mounted on a medium olive green card base with a seasonal insert and white envelopes.

A few more cards for the box! 


Friday, April 1, 2022

Christmas Card Challenge - Watercolor - Dot Wreath

I chose to use my Stampin Up Watercolor Wonder Crayons for this month's Christmas Cards as that is the card stock that has not been packed.

I used Arches Watercolor Cold Press Paper.

I started with a light pencil circle mark.  I sprayed my crayons. I mixed Always Artichoke and Garden Green for the green dots, Cherry Cobbler and Real Red for the red ones and Not Quite Navy and Night of Navy for the blue ones.  I applied the dots with the end of a cotton swab which I wet then dabbed into the colors. 

I drew a bow towards the bottom of the wreath with a Micron black permanent marker then filled it in with a bit of the red paint.

The greeting was traced with the black marker using the window as a light box.  I just printed several greetings on a quarter sheet of white paper.


I added a few stars with the black marker to balance out the shape.

The piece was then spattered with colors used in the card front but somewhat diluted.

I chose a Not Quite Navy card base.  I adhered the wreath watercolor to the card with double sided tape, added a quarter sheet insert and pressed them to ensure all the pieces stick together.

I am taking advantage of some down time now to get ahead  with this project so when the move comes I don't have to worry as these will be scheduled to arrive on time.

Tuesday, June 18, 2019

Compassion House - Thank You Cards

I put together card kits to make thank you cards for Compassion House.

Quite a few are Stampin Up kits.


Saturday, September 22, 2018

Potholders - Flat

This is my standard 8.5 inch flat potholder with a 1 1/8 inch borders which have been stitched to the center 7.5 inch square. 

It has a center loop with top stitching very close to the edge to seal the gap where I turned it over.  I then added another close to the other edge.

To create my center stitching I used my 1 inch border chip board pattern piece and placed it along the edge had my sewing machine foot follow the other edge.

I chose some manly fish fabric for this set of flat 8.5 inch potholders. 

I paired it with an aqua 100% cotton for the back.  They had the 1 1/8 inch border.

Center hanging loop.

I changed up the center stitching and created a quarter circle from paper which I followed with my machine. I love that they intersect at the edges.  I'm glad it did not overlap the main fish too much.


I loved this bright church fabric with silver metallic lines and wanted to maximize it's use so I cut the center square smaller so I could get 3 sets of potholders.  With the wonderful colors in this fabric I will be able to pair it with several different colors.
This time I chose the royal blue but I had to widen the border to accommodate the smaller center. The borders 2 inches wide and I was able to get away with top stitching on the close edge and the far edge also did the center stitching. Excellent.

This fabric as really fabulous so I wanted to see a lot of it so I decided to make the whole in stars.  I paired it with the same royal blue from the previous pair. 

It needed a bit of a focal point on the front so I created a silver rick rack onto a royal blue strip which I stitched on before I assembled the potholder. 

The center stitching was just triangles below the accent strip. 

Less fuss on this set of potholders.

Monday, January 22, 2018

Card Club Kit - Set 4 - Card 2

I chose a warm designer paper in blues, oranges and ivories made by K&Company - On the road stars.  I cut it to 5.25 x 4.00 inches.

I added a ripped strip of blue vellum which folded to the back of the designer paper and taped the ends down. This layer was then adhered to the front of a ginger card.

I added the greeting which was color printed and cut to .5 tall. I adhered it over top of the vellum.

I placed one bronze star and used a push pin to create a hole through star and card front. I spread the prongs on the inside of the card. Repeat for the rest of the stars.  Make sure at least one of the brads captures the greeting.

Monday, July 11, 2016

Star Trio Birthday

I started with a Stampin Up Marina Mist card.
I created my own background with a sponge, a MM ink pad and a piece of photo paper.  I intentionally left the top part white so the happy would contrast with the card color.
Once dry, I cut it with the Memory Box Grand Happy Birthday thin die.  I trimmed to sides down to 5.25 inches and adhered it to the card front.
I cut the stars with the Sizzix Stars #2 Originals Die using Basic Gray and Real Red card stock.  They are held in place with a tiny white star brad.


Sharing with Stampin Up Color Q challenge #349.

Monday, November 24, 2014

Card Club - November - Chalkboard Christmas

I started with a black card.  I added a gold metallic layer leaving a small border.  I then glued the Merry Christmas chalkboard layer to a white layer leaving a border.  With a bit of extra space at the top I wrapped a length of thread around 3 times and knotted it.  This layer was then adhered to the metallic layer with 3D foam tape.  I added gold star sequins to the card front held in place with tiny Zots.

The kit included a gold metallic and red metallic where the stars matched that layer.

Monday, March 25, 2013

Card Club - March - Star Trio

Here's a masculine card for this month.  I selected a dark brown card based on the decorative paper I choose.  I glued it to the card front.  I printed the greeting onto a gold card stock then punched the ribbon slider with a Fiskars border punch.  I fed the dark brown gross grain ribbon through the slits then glued it to the card front. I made a slit in the fold, pulled the ribbon end though and taped both ends to the the inside of the card.  I punched 3 stars from the same card stock and placed them below the greeting on the right hand side.  I have some kits with different decorative paper with a red greeting and stars.  The right card was one of the other colors combos I had put into my kits.  These worked out well.