Showing posts with label angel. Show all posts

Sunday, March 16, 2025

Tree Scent Ornaments - A few more

Colonial Candle Co. Angel Candle Hugger Vintage Made in Taiwan in the 1950s. Made of porcelain and measures 2.5" tall.

It holds an ivory felt candle which I fashion myself with a yellow flame at the top. It hangs from a warm toned ribbon gathered around her wings.

She is an oil diffuser where pure essential oil is placed on the felt and the scent is dispersed into the space.

Can be used with tree scented oils to provide a Christmas Tree scent to your artificial tree. She also stands so can be used in other spaces.

Use in any personal space to disperse a calming scent as you drink your favorite beverage and relax.

A wonderful clear glass heart ornament that features a frosted cupid playing its flute.

The felt diffuser is a small pink heart whose edge has been blanket stitched all the way around.  

A small E bead has been added to the front where it has been stitched to the pink satin ribbon hanger.

I can be given to a loved one as a token of affection and is practical.  It allows one to diffuse scent in a personal space and on the Christmas tree during the holiday season.

It measures 3.5 inches tall

The diffuser features a wooden kitty cat.  It has eyes and black whiskers.

Its tummy holds a black felt ball which is the diffuser.

Place a few drops of  pure essential oil of your choice onto the felt ball and the scent will fill your personal space.

It makes your morning tea or your afternoon snack break a time to relax.

It can be hung but it also stands on it own making it move with you as needed.


Another small frame turned into a tree scent ornament.

I chose a seasonal theme for this diffuser by stitching a bright green Christmas tree on green felt. I added a yellow star at the top and brown trunk at the bottom.

I used French Knots for the red ornaments along the branches.

I crocheted a hanger from cotton floss in the same red as the ornaments.  It was stitched directly to the felt oval to ensure it is secure.

The gold frame features enameled green decoration around the edge.

Wednesday, September 18, 2024

Cards - SC Christmas - Colored Pencil

I worked on more Christmas cards this morning.

I chose to use images I have drawn digitally.  This is my Bethlehem which I had to resize to accommodate this card size but that was easy. It was printed on ivory 65lb card stock.

I used colored pencils and colored the sky, the sand dunes and the windows. 

I cut the large star with the Sizzix Star & Starbursts die in silver card stock. I then punched the others with a CM Star Border punch. Large star adhered with 3D foam and the littles with QuickDry Adhesive.

The image was then adhered to the card with double sided tape, the white insert adhered with glue stick and a strip of d/s tape with carrier on the flap.  This is a self closing card made with 1/2 sheet of 12x12 navy card stock.

I really love how this one came out.

This is an angel a drew digitally based on a wicker angel I saw in a garden center at Christmas many years ago.

Subtle blue background, metallic halo, green metallic on the wings, a red dress with a green and gold border at the bottom.

A bit of flesh color on the face.

A self closing card from a 6x12 inch piece of card stock.  I adhered the drawing onto the card with a white insert opposite.  A length of double sided tape with carrier on the the flap.


A nativity I drew a few years ago. 

A subtle night sky, a yellow star with a wooden stable. 

The figures were colored with traditional blue for Mary and brown for Joseph. Just a wee head for Jesus.

Subtle blue sky, green and tan for the ground background.

Drawing adhered to the card, a blank white insert (not sure if I will regret this later when I have to handwrite the sentiment), carrier tape on the flap. 

Card is 6x12 navy blue linen card stock.


Saturday, January 21, 2023

Sylvia's Simple Shots

My niece came up this week so we can take a trip to visit Mom in hospital.

My main nativity set is a White Matte Bisque Porcelain one by Avon.  I have a large stable to house them but of course all that is packed. She is always on the look out for additional pieces so she brought this 2nd Wiseman to me and the Angel Gabriel.  

Unfortunately, the did not come with their boxes so I will have to design a storage solution.  

I am still missing another wiseman, animals of every kind, and shepherds.

My sister called over the holidays as she had found some pieces but she thought they were Mary and Joseph so we let those go.

Another gift from my niece.  She bought a couple of these a long while ago when I was anticipating moving into a new place.  That did not happen and since I have gotten rid of the sofa (which I miss a lot!) she brought one of the chairs up.

Beautiful mid century lounge chair in a great yellow color.  It is vinyl upholstery in superb condition.  Dark wood frame in excellent shape. Comfortable.

It offers me a change from my glider chair so I am grateful she had room to bring it with her.


I finished this book - Katheryn's Secret by Linda Hall.  The story is set in Maine about a family cottage willed by Katheryn to her niece Sharon. 

Sharon is a writer facing a book deadline and taking time to visit Maine and the cottage is more important. Right?  She takes a couple of weeks with her teenage daughter tagging along. Her husband will join them a bit later.

Her aunt Katheryn Sullivan had not married and lived in this cottage with her sisters for many years.  She was eccentric, a dreamer, romantic and a storyteller.   Sharon finds a mysterious disappearance of a child and through the search for her resting place uncovers deep secrets. 

She finds folks who knew and did not tell but fortunately she was able to uncover the family history and bring closure to the events. 

I made a visit to the local ReUse Center as well.  I am working another version of essential oil diffusers/tree scent ornaments which features sewing thread spools. 

I was hoping to use wooden ones but only found a few.  Of course, the plastic ones are everywhere.  I will have to see whether I can achieve a look I am happy with using the plastic ones.

There were bits of velvet which should work wonderfully. Some colorful yarn and some wool skeins.

I will post when I have made a version I am happy with.


Another book completed - Iris and Ruby by Rosie Thomas.  This is my second book by this author and it was wonderful story based in Cairo Egypt this time.  The other was the Kashmir Shawl.

Her granddaughter Ruby from England appears on Iris's doorstep unannounced. She has run away and needs a place to stay. Can she?

Her quiet household with the houseman Mamdooh and Auntie the house keeper is disrupted by this young person and the friends she is making in the area. 

The novel moves between the years Iris was a young woman living in Cairo during the Second World War and her now at 82 years of age still living in Cairo but starting to lose her memories.  Ruby wants to help her grandmother preserve her beloved history so they start to set time aside to reminisce and capture the past.

It is a wonderful story which reunites 3 generations of women and helps Iris, Lesley her estranged daughter and Ruby the willful granddaughter see each other's point of view and life history.

Thursday, January 13, 2022

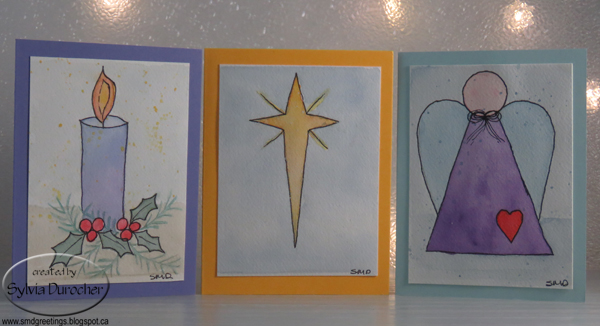
Christmas Card Challenge - Watercolor - January


I made these three watercolor cards for my Christmas Card Challenge - Watercolor for January.  I chose 140lb cold press watercolor paper.  I cut a piece of paper and taped to a piece of glass.  I drew my images by hand then painted them.  I traced the images with a black permanent marker after they were dry.  I them spattered them with watercolor.  I trimmed the images and I had cut it too short so on some of them you can see the line from the tape.  Live and learn.

The first is a candle and I used a gradient wash from blue to purple on the body of the candle. I added holly leaves and berries then added some different foliage. I added yellow, orange and red to the flame.  I left the foliage not touched by the black marker. I added a background to the bottom and the top.

The  middle is just a Bethlehem Star.  I tried to add spatter with bleach thinking it would remove the color but it did not.  Maybe I should have added yellow. 

The angel is a design I create years ago for a custom ornament.  A background was added to this one also with a spatter of blue.  I think I made the bow too small.  Still happy with it.

Tuesday, May 16, 2017

R2Go Christmas Kit - Angel

The body of the angel is a triangle which measures 4" tall and 3" wide at the base.  The designer paper I used is by Anna Griffin.  A 12x12 sheet creates 21 bodies which is very efficient.

The wings is a heart die cut.  I used one of the Sizzix Heart #2 Framelit set and cut it from cherry red card stock.  It was embossed with the Sizzix Softly Falling folder which provides a subtle texture to the wings.

The head is a 1 inch circle punch from ivory card stock.  It is adhered to the card front with 3D foam tape. 

I added a greeting frame to the card front printed in Always Artichoke.  It allows easy alignment of the angel onto the card front. 

Monday, March 20, 2017

Mosaic Monday - Visit to Garden Center

I visited the large garden center yesterday.  I generally only visit at Christmas time when it is totally decked out for the season.  It was very windy yesterday wo it was nice to photograph flowers that were sitting pretty.

There were a large variety of pots for house plants and outside patios.

There were some 3 feet tall and very decorator in color and finish.  There was a variety of materials: pottery, plastic, glass, ceramic and wood.

I thought these were bright and colorful.  Together as a group they are quite overwhelming but spread across a space they would likely do the trick.  I thought the colors where quite retro.

They have a wide variety of decor items featuring a number of materials including resin, glass, papermache, and metal.

This was a small angel in a cream color.  It had a wash applied to highlight it's lovely features.  It was maybe 4 inches tall so could easily be tucked into a corner of almost any space.

Great in the house or the garden.


The model train was set up in the central area.  It is the same one I saw at the Conservatory a while back.  It must take a lot of work and time to set up the pieces in new venues.

I've just finished viewing a series of railroad promos done in the first half of the 20th century telling of their history in North America.  It was very interesting.


I was surprised to see the amount of art and paintings available at the center. It's not fine art mostly but very nice pieces which would look good in a living as well as in a 3 season room.

This piece of art was huge, probably 4 feet square and very lovely.  As you can see there is a reflection so some parts of it were a bit shiny.  I love the texture in the petals and the monochromatic color scheme.


Of course, there was lots of plants for sale. The orchids were gorgeous, ranunculus in many colors as well as rhododendrons in very pretty colors.

I enjoyed my visit and will be back as the seed rack was full and I will want some herbs again this year on the balcony.

Sharing with Maggie at Normandy Life who hosts Mosaic Monday #32.

Wednesday, November 18, 2015

Decorative Paper - Christmas Cards

I stamped the Stampin Up Gentle Peace stamp on vellum then clear embossed it.  I trimmed the vellum to 3.75x5.00 inches.  I backed it with a pieced of my own decorative paper then placed it on the front of the card. Then I added a star brad at the top of the arch and 2 round ones on each corner of the arch.

The blue one I stamped in Taken with Teal and mounted it on a teal card.  The other was stamped with Handsome Hunter and mounted on a dark green card.  I used Craft ink so that I could emboss it before it dried.


On this card I used some of my ink spot paper in traditional Christmas colors.  I printed the greeting in dark green on vellum and applied gold embossing powder to it.  You can see that some of the green shows through which is kind of cool.  The background ink spot layer was adhered to the card front then the vellum is held in place with glitter star brads.  Really happy with this one.


For this set of cards I used 3 inch watercolors I had designed for a card class a few years ago.  I chose the kelly green and the bright blue from the watercolor and used them in the card and the embossed layer.  The embossing folder I used was the Stampin Up Large Polka Dot.  I added a length of white seam binding across the card tied in a knot then the watercolor is mounted over it.  I added a small felt angel held in place with a tiny star brad.  I no longer have the label which identified the manufacturer but it may have been Hero Arts.


I chose a dark green card for this card with another of my small watercolor backgrounds.  I stamped the greeting in the bottom right hand corner and embossed it with gold powder.  I added a random layer of gold powder to the left of the greeting and embossed it as well.  The angel is held in place with a tiny white brad.


Another watercolor square with a gold glitter star cut with the Sizzix Stars die.  This element is placed over a blue layer which was embossed with the Cuttlebug Swiss Dots folder.  Again, on a kelly green card. 


Thursday, October 1, 2015

Christmas Card Challenge - Oct - Angel Vellum Stamping

I chose Angelica from Stampdendous as my stamp.  It happens to be an angel which I stamped with craft ink on vellum then clear embossed it.  I chose to match the ink color and the card color in this case a deep Hunter Green from Stampin Up.  The greeting is from the SU Teeny Tiny Wishes stamp set.  I cut the backer from aqua card stock with the Tim Holtz Arch Frame which highlights the angel nicely.  I attached the vellum to the backer with 3 tiny brads a star one for the top and 2 round ones for each corner.  This layer was then adhered to the card front with double sided tape.  I find this angel just a bit on the big side for an A2 card so it presents some challenges when designing a card.

Monday, March 9, 2015

Mosaic Monday - Angels

I've put together a set of angels I have.  I found it interesting how they are all similar in color.

Top left: This is an angel pin I made with a wooden body and shrink plastic wings.
Top right: Ceramic and I find her skirt seems to mimic a heart upside down.

Center left: I like the movement in her skirt as well.

Bottom left: Is a votive holder from Party Lite.  It is about 8 inches tall and has matte and shiny surfaces. I've switched from lit candles to battery powered and for scent I bought a wax warmer which is safer.

Bottom right: The angel is from the Willow Tree collection named "Friendship is the greatest gift of all".

Sunday, December 14, 2014

Community Sing - Trumpet Angel

I attended a community carol sing in my neighborhood this afternoon.  I brought a friend with me who enjoyed it as well.

We will go together next year!

Another concert later this week.  I hope I have whittled down my to do list a bit by then.

Thursday, August 28, 2014

Christmas Image Swap 2014

I created these black on white stamped images for a Christmas Image Swap on one of my on-line groups.  The top one is Joy to the World - InkyDinkyDo.  I like the calligraphy words.  The one on the right is Angelica - Stampendous.


While I was stamping I made a few for myself so keep an eye out for what cards I make with these.


Monday, August 25, 2014

Simple Christmas Angel

I made a few of these for my own Christmas card box as it is not as full as it should be at this time of year.
The card is Stampin Up True Thyme.  The wings were cut in brushed gold with the SU Elegant Bird die and embossed with the SU Vintage Wallpaper embossing folder.  The skirt was cut from SU Holiday Thyme DSP. The head is a 1" circle punchie in Very Vanilla.  The greeting was stamped in Always Artichoke with the MC from the Come to Bethlehem set on Very Vanilla. It was clear embossed.  It was then punched out with the SU Modern Label punch. Another punchie of the same shape was made from the same color card stock as the card.  This punchie was split in half lengthwise, the centre bump at both ends was snipped off and they were adhered behind the greeting offset top and bottom. The greeting and head were adhered to the card with 3D foam tape.
This is submitted to Hazel's Christmas Card Challenge - Anything Goes.

Sunday, August 24, 2014

R2G Card Kit - Simple Angel

Another Ready 2 Go Card Kit - SU Style.  I started with Holiday Thyme DSP which I cut into triangles. These are 3" W and 4" T.  This makes maximum use of the 12x12 sheet of DSP. They could be a little taller.  I cut the wings from brushed gold card stock 2 a time with the metallic facing itself using the Stampin Up Elegant Bird die. I embossed them with the Northern Flurry Textured Impression embossing folder. They were taped together ensuring that they were not too wide for the card. I punched the heads with a 1" circle punch from Very Vanilla card stock.  I stamped the greeting on Very Vanilla with the MC stamp from the Come to Bethlehem set in Bravo Burgundy for the red and Always Artichoke for the green since I did not have either ink color for the card stock used. I then clear embossed them.  I punched a Modern Label punchie from the same card stock as the card, split it in half lengthwise and snipped off the center bumps from both ends. I glued each half offset from the top and bottom of the greeting punchie. Once I had aligned the skirt onto the wings leaving enough room for the head I turned them over carefully and taped them together. They were then glued to the card front.  I mounted the head as planned with 3D foam tape and the greeting likewise at the bottom of the skirt.  The kit includes 2 Cranberry Crisp cards and 2 True Thyme cards.

Sunday, July 6, 2014

Vellum Accent Christmas Cards

 I made some of these cards from my June Stack class because I just loved them. I like the softness of the images against the boldness of the JOY background.
The images printed on the vellum are all my own designs.  They are color printed and cut down to 2.75" wide.  It is wrapped top and bottom over the kraft and white printed background.  I wrapped some silky cream thread around this layer and tied it off. Then I mounted it to a white card.  I made 8 of these for my own stash of Christmas cards.

Saturday, November 2, 2013

Christmas Stack Class - Angel

This is a Christmas angel.  I used a gold embossed handmade paper for the wings.  They were cut with the Stampin Up! Elegant Bird die. They were taped together ensuring that they are not wider than the card.  The skirt is a triangle cut at 4.75" T x 3.50" W from designer paper. This paper is by Echo Park Paper Co. called tree skirt. The greeting is a combo of the SU! Modern Label and the Word Window punchies with a color printed greeting on ivory card stock. It is adhered to the skirt with 3D foam tape. The head is a 1" circle from ivory card stock is adhered with 3D foam tape.

Thursday, December 20, 2012

Cards - Herald Angels

I made a bunch of these cards for a customer. I designed the card front with a heralding angel from Dover. I was fortunate that I could change the color of these images, so I coordinated the angel color with the strip of paper I added on the left hand side.  I selected foil paper in all cases.  I had the request not to have sticking out from the card front so brads, 3D foam, rhinestones were eliminated. It was a bit challenging but the design works.


Thursday, July 12, 2012

Card - Angel - Christmas Challenge

I made this card for Holly Jolly's Christmas Challenge this week which is Angels.
I cut the angel with the Cricut and the Best Images of 2008 cartridge. I cut the filigree layer in silver metallic paper and the layer 1 in black card stock. Once cut, I glued the silver one over the black one. I found a scan of the Christmas Carol - Hark the Herald Angels Sing - which I colored in red and re-sized it to fit on the card front.  Once I had decided on red, I added the red thread around the angel's waist. I printed the carol on white card stock and then trimmed it to leave a border.  I selected a red card to match.  I glued the song background to the red card and then glued the angel to the background. I added a bit of rhinestone on the horn.

Tuesday, July 3, 2012

R2G - Herald Angel Card Kit

Another Ready 2 Go card kit for summer sales.  I started with a dark chocolate textured card.  I added a brown/blue striped wavy frame cut with the Sizzix die.  I cut the angel from designer paper into a square to match the hole in the frame.  I color printed the greeting on warm blue card stock and trimmed it to 3/4" tall and 4.24" wide.  I then flagged the ends before I mounted it to the card with 3D foam tape.  I cut the star from the same warm blue card stock and mounted it to the card in the top left hand corner with 3D foam tape as well.  Check out my Christmas Card Kit Page.

Sunday, July 1, 2012

Cmas Card Challenge - July - Brown/Ivory/Gold

This month's challenge is a color one - Brown - Ivory - Gold.
I decided on this angel.  I cut the wings from gold card stock with the Stampin Up! Elegant bird die. They need to be cut with the gold side facing each other so when cut creates wings for each side. I embossed them with the Cuttlebug Victorian folder.  I found some vintage looking Designer Paper (webster's pages - ladies & gents - Sunday afternoon) for her body.  I cut the dress in a triangle shape from the DP.  I punched a Stampin Up! Modern Label from a dark espresso brown card stock and then added a ivory greeting color printed in dark brown then punched with the Stampin Up! Word Window punch.  I punched the head with a 1" circle punch is the same card stock as the greeting.  The angel was then mounted on a brown card.

Total cards so far: 65
I think I will have to step things up a bit.

Saturday, December 24, 2011

Merry Christmas to all of you!  I hope you have a great day with family and friends.  Enjoy good food, the great weather, and take a walk.
This nativity is part of a larger fabric Advent Calendar my sister made for me last year! It was good to count down by adding another figure each day.  The angels, the star, sheep, shepherds, the stable animals, the wisemen, the camels, and finally Mary, Joseph and baby Jesus.  The panel was designed by Nancy Halvorsen.