Showing posts with label Tangerine Tango. Show all posts

Tuesday, October 3, 2023

Card - Watercolor and Ink - Fall Colors

The original ink drawing was done on 90lb watercolor paper measuring 4.00 X 5.25 inches.  I used a fine tip permanent black marker.

I was inspired to start ink pieces by the Inktober Challenge

I drew it then applied watercolor to it in fall colors. Yellow, oranges and browns.

I rubbed a black marker around the edge to finish off the lines in the drawing.

I added a fabric accent "City Express Post" 2 cent stamp.  Unfortunately, I was not express enough and this card is a few days late. 

I added 2 deep yellow mini brads at the top and bottom of the stamp. The watercolor drawing was then adhered to the front of a Tangerine Tango card.  

I will hand deliver the card tomorrow.


I have been working on art pieces for the upcoming Value of Color show at the art gallery.  Turned out to take more time than I thought.  Keep an eye out for those coming at the end of October.

Thursday, July 20, 2023

Set of Cards

I made a set of cards with one single sheet of designer paper.  The design is by graphic45 - Couture Collection - Gorgeous - I agree it is a beautiful floral paper. Rich colors and a dramatic black background.  This paper measures 12x12 inches. Cutting 4 inch strips I ended up with 6 pieces for A2 cards. With the direction of the design all the cards were created in the portrait orientation.

Next I selected card bases for these cards.  With the colors in the paper there was lots to choose from.  Finally, I chose Old Olive, Lost Lagoon, and Dusty Durango.

For card 1 I cut the layer down from the top and flipped the piece to show off the blue striped backside. I then added a strip of orange card stock across the split.

I added a Decorative Label greeting mounted with 3D foam tape. A white quarter sheet insert finished the card.

For card 2 I did the same layout but put the stripes on the bottom this time.  I laid a length of So Saffron ribbon across the split.

The base this time is Lost Lagoon.

I layered silk flowers in warm tones and a small gold sequin onto a tiny black brad to create the floral accent which I mounted on the bottom left hand side.  The brad was pushed through the designer paper keeping all layers together.

This layer was then adhered to the card front with double sided tape.

A white quarter sheet insert was added.
This is card 3.

Here I split the layer top to bottom instead of side to side. Once split I flipped the small piece and taped back the designer paper so I could handle it as a full piece.

I added a length of Apricot Appeal grosgrain ribbon over the split and taped the ends to the back.

I added a Dusty Durango butterfly accent on the bottom right side.  The butterfly was cut with the Sizzix Winged Beauties thin dies.  I used my steel plate to ensure all the tiny spaces were well cut. I wrapped black thread around the body of the butterfly and left the ends to be the antennae.  Adhered with double sided tape.

Quarter sheet insert completed the card.


Card 4 has an Old Olive card base.  

The designer paper was left at 4.00 x 5.25 inches.  

I wrapped a length of Baja Breeze ribbon across the middle and taped the ends to the back.  

I added a Artisan Label greeting with black letters which was adhered with 3 D foam tape over top of the ribbon on the right hand side.

A quarter sheet white insert completed the card.


Card 5 is similar to card three.

This time the ribbon is So Saffron which is wrapped over the designer paper top to the bottom with the ends taped to the back of the layer.

I added some Candy Dots to the left of the ribbon in pink tones to coordinate with the large flower near the bottom of the card.

A white quarter sheet insert on the inside.


Card 6 repeats the lay out of the DSP split with the striped paper on the bottom.  

A length of wide Tango Tangerine ribbon across the split with ends taped to the back.

I found 2 tiny turquoise blue buttons in my stash.  They are adhered to the ribbon with Bling Zots.

A white insert on the inside.

This makes a nice set of card with enough variety to be interesting.  Versatile in that some have greetings and others are left blank to used for any occasion.

Happy with this set which will given as a gift.

Monday, May 29, 2023

Exchange Cards

I got my Exchange cards made for May.

I have decided to use my 4x4 photos from my past calendars.

This is a beautiful Red Poppy I think taken at the community garden.

I chose Tangerine Tango card base with a small piece of green card stock that I taped together on the back.

I stamped the green with Border Builder stamp set - script in Basic Black ink to just to knock down the plainness.

I wrapped a piece of Daffodil Delight ribbon around the element over the join and taped the ends to the back.

I then adhered the full layer to the card front with double sided tape.


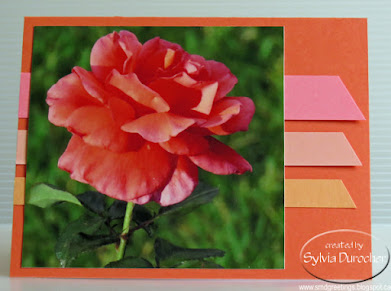
This card features a warm rich orange rose taken at the Botanic Park.

I chose the same Tangerine Tango card base.

I added some complimentary strips of card stock behind the photo. Cameo Coral, Groove Guava and Peach Parfait.

I adhered the strips and trim the right hand end with scissors cutting at an angle.

Adhered photo with double sided tape.

Tuesday, July 12, 2022

Watercolor - Birthday themed cards

I worked on some more cards for upcoming birthdays.

I am not choosing to put greetings on my cards these days but the subject matter helps to communicate the sentiment.

I created birthday candles on this one.  I put an odd number of them.  These were penciled in then traced with the black marker then colored in bright colors.

I drew various patterns on the candles.  Some were made with the black marker and others were added once the first wash was dry.

Once the candles were dry then I added some spatter with orange and blue.

The paper is 140lb rough water color paper trimmed to about 4.00 x 5.25 inches.

Mouunted to Tango Tangerine card base with a quarter sheet insert on the inside with a white envelope!


The cards above are based on a similar process.  The one on the left is presents on a Pink Passion card base. The one on the right is balloons on an Elegant Eggplant card base with a wrap of purple crochet thread wrapped around the accent layer and tied to the front.  These will go in the stash for the summer birthdays coming up.

It was a good idea to create watercolor cards this year.

Wednesday, August 18, 2021

Watercolor on Handmade Paper

More reusing supplies from old card kits.  I just loved these small white handmade paper sheets and could not just give them away.  I have painted daisies on these in the past but I wanted to create new art on these.

I am using my Stampin Up Watercolor Wonder crayons in rich regals and brights color families.

This one is an abstract flower in the blue green color family.

I had to trim the handmade paper because the other flowers were not great.  This required an additional layer so i chose some Old Olive on some Not Quite Navy card base.

I always adhere handmade paper to cards with hot glue.  It works the best but you have to be fast before it cools.

This card features a multitude of pinky orange abstract flowers again.  Regal Rose and Old Olive are the colors used.

I did try to put a background of subtle color which did not really work great.

Mounted on a Regal Rose card base.

Each card gets a white blank insert on the inside.

I signed each one as well.


I started with abstract shapes on this piece of handmade paper.  

The colors used are Tango Tangerine and Marina Mist.

I dug through my bling box and found these butterfly confetti sequins which were the right blue color.  I then added them to the handmade paper sheet with orange tiny brads.

I like the fact that there are 2 different designs of butterfly.

Makes me think Santa Fe coloring.

Mounted to the a Marina Mist card base.


This card features Bravo Burgundy as the color in several shades for the flowers.  I was thinking of roses when I painted but I am not sure I succeeded.

Always Artichoke for the stem and leaves with a bit of mixed brown thrown in for good measure.

A bit of spattering in the main colors to lessen the white background.

Mounted to a Bravo Burgundy card base and a white insert.


I tried following the design of the small deep teal handmade paper flowers I had selected as inspiration.  

I had to remind myself - Stick to the 5 petals and make them rounder than usual.  Always Artichoke for the stem and long open leaves.

I mounted the small pale yellow flower then the bit larger teal one onto the watercolored on with a tiny white brad.

Mounted to a deep teal card base of textured card stock.

A bit of spattering to tone down the white background.


I painted the flower with More Mustard and a bit of Daffodil Delight with a lot of long slender petals. I think I should have overlapped some of them.

I really needed Summer Sun to match the card base but I did not get the yellow mix quite as good as I hoped.

A mix of greens and blues for the closed long leaves.

I mounted a small yellow handmade paepr flower in the center of the watercolored one, held in place with a tiny white brad.

These no greeting cards could go into the cards for seniors box but I am not sure yet.

Love the painting.

Sunday, August 1, 2021

Card Exchange Cards - Tangerine Tango & Baja Breeze

I started with an orange card base which I think is Tangerine Tango.

I added a layer of Baja Breeze polka dot designer paper from the Palette o' Prints collection.  I ripped the right hand edge and aligned it along the fold. 

I added a length of Tangerine Tango Scallop Polka Dot ribbon to the designer paper layer and taped the ends to the back.  I adhered it to the card front.

I cut one of the labels from the Apothecary Framelits set from Baja Breeze card stock. I added a greeting from the Teeny Tiny Wishes set color printed on white card stock punched with the Large Oval.  I added tiny orange brads on either side of the greeting then adhered it to the card front with 3D foam tape.

I added 2 small buttons in coordinating color on the bottom right hand corner with small Zots.

The same basic supplies for this card but I switched up the orientation to landscape.

I turned the Baja Breeze designer paper over to the other side to show the floral design.

I put quarter sheet inserts on the inside and added a white envelope.

These are headed out to my card buddies. 


Tuesday, May 18, 2021

Seniors Week - June 7-13 2021 - Card Donations

I worked on more cards for the Seniors Week Project.

I started with the yellow and blue layer which I made last summer.  It involves making a marking tool with old toilet paper rolls to create dandelion flowers.  

That layer was trimmed to 4.00 x 5.25 inches. 

I placed a piece of blue rick rack across the bottom third and taped the ends to the back. This layer was then adhered to the front of a medium blue card base.

I added a color printed greeting punched with the Stampin Up Decorative Label adhered with 3D foam tape.

This card was created with a 4x4 photo reused from one of my photography calendars. 

I trimmed the 4x4 down a bit to leave a bit more of a border. 

I added the vellum sentiment which I adhered to the photograph with gold flower sequins held in place with orange tiny brads.  This full layer was then adhered to the front of a yellow card base.


These cards are reusing a small card I made for a Stampin up party I held years ago.  I had leftovers and they just sat. 

The accent layer has a Tango Tangerine base with Tempting Turquoise designer paper.  I added an accent strip in orange punched with the Stampin Up Dotted Scallop Ribbon border punch. 

The tag was stamped with the Too Terrific Tags set in Tempting Turquoise on Whisper White. Layer onto Tango Tangerine with a Tempting Turquoise grosgrian ribbon held in place with an orange tiny brad. 

The Whisper White layer was embossed with the Swiss Dots folder and trimmed to leave a small border. It was adhered to the turquoise card base.

The stack is growing!

Monday, July 11, 2016

Night of Navy Background - HB Card

Add caption
I used a background I created when working on this card
I smooshed Stampin Up Night of Navy ink onto a piece of photo paper with a wet sponge.  Once dry, I cut the paper down to 4 x 5.25 inches.  I adhered it to the Night of Navy card front.  I cut the greeting with the Memory Box Jumbled Happy Birthday thin die.  I chose Tangerine Tango for Happy and Certainly Celery for Birthday.  I adhered those to the card front with tape runner adhesive so I could easily rub off the excess.  I then above the greeting I added some handmade paper flowers in an aqua color topped with small flower sequins and held in place with tiny white brads.

Sharing at Come and Get It Challenges - Make your own background.

Monday, May 23, 2016

Trio of Circles and Banners

I started with an Stampin Up Always Artichoke card base.
I cut a piece of the coordinating blue green card stock and corner rounded the corners. I cut a couple of strips of the decorative card stock.
For the greeting I cut a piece of Tangerine Tango and adhered it to one strip of decorative card stock. Then I stamped the greeting in Always Artichoke on warm white with the Sweet Essentials Stamp set. Finished the ends with the Banner Triple Punch.
Using the Stampin Up circle punches, I punched a 1 1/4" circle from decorative card stock, the 1 3/8" from Tangerine Tango and layered them.  I created a banner with the second strip of decorative card stock. The circles and banner were added to the corner rounded panel then it was added to the card front.

Tuesday, May 17, 2016

Four Squares on Tangerine Tango

I started with a Stampin Up Always Artichoke card base. I placed some leaves from the Blossoms Abound digital set in Always Artichoke to create a subtle layer on the card above and below the accent square. I used this decorative card stock which is non SU but matches perfectly. 
I created a central accent with 4 squares. I punched the 1.25" squares from the decorative c/s aligning the tangerine element in the center.  I punched the 1.5" squares from the coordinating solid card stock which matches Pool Party.  I adhered these squares onto a piece of SU Tangerine Tango and trimmed it leaving an even border.
I stamped the greeting from the Sweet Essentials stamp set in Always Artichoke onto a strip of Tango Tangerine. I flagged both ends with the SU Banner Triple Punch. It was adhered to the card front with 3D foam tape.

Submitting to the challenge at SU TGIF - 55 - Sketch