Showing posts with label everyday. Show all posts

Tuesday, April 23, 2024

Art Show - AAC - Redux Show 2024 - Upcycled Every Day Carry Bag

This my second piece in the Spruce Grove Gallery - Form Redux Show which opens today.

It is an Every Day Carry Bag which was made with upcycled fabrics from a box of fabric given to me by Michelle at ReImagined Fabrics. You can find her on Instagram #reimaginedfabrics  Other bits were chosen from my thrifted/reclaimed stash as well as pieces collected from the ReUse Center.

I made myself one of these bags several years ago.
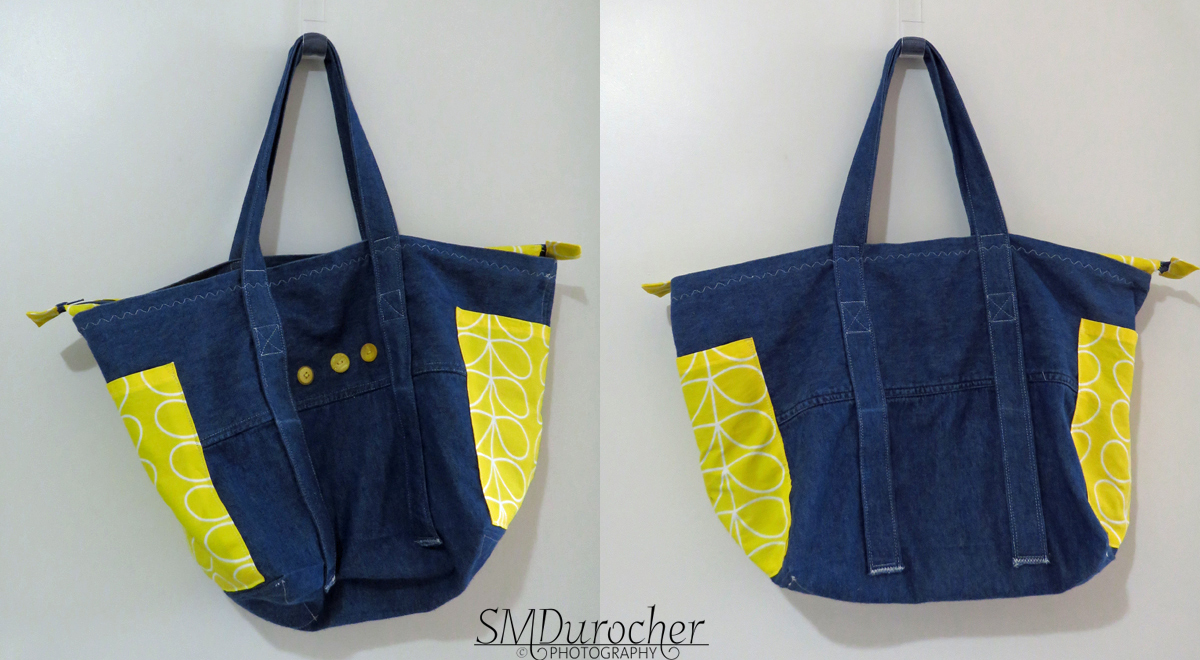
Title: Upcycled Every Day Carry Bag

Size: 15.00 T x 13.00 W inches

Medium: Fabric Bag with embellishments


I started with the beige cotton fabric for the main part of the bag.  All the seams are finished inside so no raw edges anywhere.  I added a zipper insert made from a beautiful leaf patterned fabric from this box of scraps and squares with a teal zipper chosen from my stash of reclaimed zippers.

I chose a taupe microfiber for the handles which means they will last a long time.

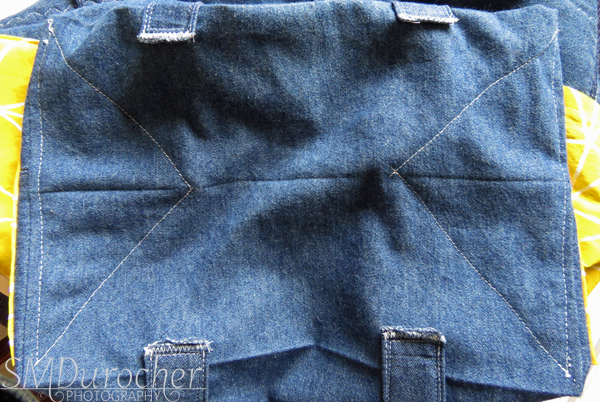
The bag features 3 pockets. The front pocket was made with the accent fabric and I added a coordinating blue button that I found in my stash. The back pocket is a reused Carhartt pant pocket with a velcro closure. I sewed the pocket to the back of the bag which creates a pocket and added an accent fabric tag to the help with the opening the Velcro on the ginger colored pocket. I added some teal slow stitching to the flap of the pocket.

The ginger heavy weight fabric was added to the bottom to show less dirt and will wear much better than the beige cotton fabric. 

A few pieces of tomato red bias tape was added as an accent color which was again pulled from my thrifted supply.

I added a little bling on the zipper pull which was brought from a ReUse Center donation.  

Inside I added a clip for your keys which again was found at the ReUse Center.

It is on display at the gallery and is for sale.  The reception is Saturday April 27th at 1-3pm.


Information on "My Bag" line:

Friday, March 1, 2024

Sewing Project - Recycled Fabric - Everyday Carry Bag

I made a bag from all recycled materials.  The fabrics came from the box from Michelle at ReImagined Fabrics.

The bag is beige cotton duck fabric. 

A beautiful leaf pattern cotton fabric was used for the zipper insert, the tab on the front pocket and the tab on ginger pocket.  

I added a piece of ginger cotton denim to the bottom of the back to improve wear ability and keep it cleaner. 

I chose a small piece of red for the trim on the zipper insert, the loop on the front pocket and the key hook on the inside.

The bag features 3 pockets - the front leaf patterned one, the back ginger denim one, and the space between the ginger pocket and the bag.

It has a teal zipper at the top in the normal for me completed finished zipper insert

I used taupe cotton poly blend for the handles and made them as long as I could. They are placed on either side of the pockets.  They are well reinforced in the stress areas.

The the seams are finished which looks smart and there are no raw edges in sight.

I added a tab on the ginger pocket so that it provide better leverage to open the velcro closure. It is center which the velcro was not.
This button is from my stash of recycled materials as well as the teal zipper.

It was the perfect color to match the teal color in the patterned fabric.


I included a keys hook on the inside so they will always be at hand and easy to find in the bag.

The bag measures 12x12 square so it is not a big bag.  I guess, you would call it purse sized.  


For information on the "My Bag" Line

Sunday, May 1, 2022

Sewing Project - A Bespoke Tote

I decided that I needed a bag to carry my purse, my small everyday bag and my camera which I pretty much carry every time I leave the house.  It needed to be much shallower than the one I currently use.  Just big enough to put these things in with a bit of extra.  The items would stay in place and be easy to access. In the bag I use now the purse and camera bag straps get all tangled, its deep so I can't see everything which does not work well. The inside is also black which does not help.

Despite wanting to keep the sewing area tidy I decided to tackle this project.   Originally, I thought I would create a lining which was sectioned to add more definition but I have decided not to go that route for now.  It took 2 days.

This is the bag at the front door filled and ready to go.

The fabric is light denim and a beautiful yellow and white pattern piece of 100% cotton fabric.  

The bag as a boxed bottom with large pockets on both ends.

The fabric cost me $5.00 at the thrift store.  The denim was a large pillow sham and the yellow has a baby dream tag but was flat and was about a yard of fabric.  
I did fill the bobbin a couple of times.  

It's quite floppy when not full but that is okay.

I wanted the straps to run the full length of the height of the bag to distribute the weight.  I see that I twisted the front strap but it will stay that way as it is very well attached.

The buttons indicate the front and is helpful for using the zipper.

I put 2 large patch pockets on the bag - both ends of the bag.

These are about 8" square and provide a quick place to put something I need to take with me.  They hold my travel mug of tea for sure.  

A nice hem at the top and the edges ironed over and then just sewn on to the denim.  They are quite flat.

They are large enough for a book, or cards that need to be mailed. 

I used white thread through out the project.  It is quite unnoticeable on the yellow and more so on the blue denim.


The bottom has the box ends sewn down on the inside of the bag.  This provides a bit of stiffness to the bottom but it may need a piece of corrugated cardboard or plastic to help it out. 

I brought the ends of the straps to the underside but not really enough to work well.  I just did not have enough denim to make them longer.  On hindsight I should have just brought them down to the bottom edge.

Live and learn they say.

This recessed zipper was a very good idea that my sister shared with me.  It allows you to add a zipper to any bag. You can check out the video tutorial by Crafty Gemini here.

I chose the yellow to be very visible.  Upon checking my stash of second hand zippers there was blue one that was long enough.   The zipper insert measures 23" tab to tab. 

The buttons are the same sunflower yellow which you find in the fabric.  

I chose 3 different ones and sewed them on with yellow thread.

They help to make sure I am coming from the right direction to open or close the zipper.
Yes, my decorative stitches are back now that the sewing machine has been serviced.

This is just a curvy stitch that is adjusted by the stitch length and the zigzag measurement.  This is quite tight and I like it a lot.

I used this to attached the recessed zipper insert to the bag.  It goes right around the bag so provides a decorative element at the same time.


Here's the inside of the bag filled with its purposed contents.

The purse, the every day bag and the camera bag.  You can check this post for the details on the small every day bag I made.  It is still perfect, a couple years on.

There is nothing like a bespoke item that fits the exact purpose you need.

I encourage you to get a perfect rather than settling for "it is just okay".

Sunday, April 26, 2020

Sewing Project - Zippered Tote

I made myself a zippered multi pocket tote today.  I have been thinking about this project for several months.  It will replace this one.

I wanted to make some improvements mainly a zipper at the top to ensure the contents stay inside. I wanted more outside pockets. Having a pen handy is always nice.  I have purchased a small binder to use which would not have a space for a pen so the bag needed one.

I did watch several videos as refresher on assembling a tote and in particular for the zipper. 

The fabric I used is from a fall jacket that the zipper has been a problem.  I have replaced the jacket.  Since I have been wearing the jacket for at least 7 years and the fabric seems indestructible,  why not use it for a bag that will get a lot of use.  I used one sleeve from the jacket, the dark green outer fabric and the navy lining.  I used the inside of the green as my good side of the bag.

The exterior piece of the tote measures 9.25 T and 20.5" W.  I used grey thread since I did not have any dark green thread.  Would have been better on the strap top stitching if it had been dark.

The pocket panels I created from batik cotton in wonderful colors on one side and a cherry colored cotton on the other side.  I only had 2 small pieces of the batik so I wanted to make best use of it. Those are 4.5" W and 9.25 T same as the main piece. I top stitched just below the cherry on the top before I sewed the panels to the dark green exterior along the other edge. I placed the panels 2.25" apart based on the center of the exterior panel at 10.25 inches.  I am planning a 2" box bottom.

The straps pieces were cut 1.5 inches wide and over 35 inches long.  I used the bias seam approach from my quilts to connect 2 pieces to create my straps. I sewed the side then turned them inside out.

Finished they were .5 " wide and 33" inches long.   I wanted the straps to run the full length of the tote.

I created 2 bags with the lining one just a smidge smaller than the exterior one.  I sewed the 2 side seams, boxed the corners on both at 2" then tacked them down to the bottom with a triangle of stitching.  This was done on the green and the navy one.  I added a narrow channel of green fabric on the one side.

I placed the exterior inside the lining and sewed the top edge leaving an open space to turn them inside out.  Once right side out and the lining in the tote and put a line of decorative stitching along the top to close the opening and add a bit of stiffness to the top edge.

The straps were added once the tote was assembled because I wanted them to hold the lining in place as well as create the pockets on the outside.  I placed them 2.25" from the side seam. I started on the bottom, pinned everything very well and tacked the strap 2 inches from the top edge.  Putting on the straps was quite challenging because there not much room to maneuver.

Just being patient and pinning very closely it worked out well.  I have 6 outside pockets in this tote.  The center pockets are larger and the side ones are smaller.  Just what I wanted.  I added some batik fabric at the very top of the handles where they will get the most wear.

Then it was the zipper.  I had prepared the zipper ahead of time and wanted to insert it inside for a recessed one.  But of course, the batik fabric panels on each side were too long now that I had box corners.  Plan B.  I just sewed the panels to the outside of the tote where I had reinforced the edge with decorative stitch earlier.   I added extra reinforcement X a little higher on the strap now that I had cotton behind it which will give it more strength and it is still not too close to the zipper.

I added pull tabs at each end of the zipper to help with opening and closing it.  I left extra zipper so that the bag can be opened the full width of the bag. Makes getting things in and out easy.


The channel on the one side is designed to hold a pen.  I am still a notebook and pen person.  I carry a note book every time I got out which contains listings of the day's list as well anything I am on the hunt for.  I track size, color, and other details so I am prepared when the right thing comes along.

That is why I always carry my measuring tape. In the past it lived in a pouch but this will do nicely.

Considering the old is 3 years old and barely shows wear this one should last a long time.   I love the batik fabric and it works so well with the dark green fabric of the tote.

It took most of the day but really happy with this project.

Monday, November 13, 2017

Small Calendar - Quick & Handy

I ran out of coasters for my Coaster Calendars so I had to invent one to keep a calendar in my product line with a smaller price point.  With so many photos from this year, that is where I went as a starting point.  I found a calendar at 2018 printable calendars.

I selected my best 5 sayings from my coaster calendars and included them in the Fridge Calendar.  I selected photos which worked with the sayings.  The combo was printed on 4x6 photo paper which was layered onto coordinating card stock.  A magnet is then added to the back.  This allows it to be used on any metal surface - fridge, file cabinet, and/or toolbox.  A push pin will hold it onto a cork or bulletin board.

I selected the following sayings.
Sisters are Forever
Life is too short to be anything but happy
Everyday is a second chance
Give Thanks Always
Count your Blessings

Put it where you can see it for a quick reference.  It is easily mailed so it is a great gift for those far away.  Include it in your Christmas card.


The Sisters calendar is a cosmos from the Legislature, the Happy one is a bright polished stone background, the Everyday is a sunset at Pigeon Lke to remind one that the light will return tomorrow, the Thanks is our river valley in fall, and Blessings is a flower bed at Legislature.  You can find them for sale on my Calendar page.

Monday, February 6, 2017

Mosaic Monday - My Every Day Fabric Bag


I carry a small fabric bag when I am out and about. I'm still old school, so I use a pen and paper rather an electronic device so the bag holds a coil bound book. I make notes in the book for my errands, details about items I'm on the hung for, and anything I need on that particular day.  I always carry a small measuring tape (inset in the large photo).
I have been using a black reusable bag turned inside out to hide the logo.  I had resewn the seams on this one several times over the last couple years.
With my latest surge of sewing I decided to make myself a prettier bag.  I spent about 2 weeks thinking about this project.  I started by recording the measurements of the old one and made some adjustments to the design to make it work better. Adding a pocket for my measuring tape was one of those adjustments and I wanted better attached handles.
I chose a heavy navy fabric saved from an old pair of pants. I lined it with a wonderful yellow fabric and you can see that I created X at the top of the bag where the handles are attached, this will not come apart. I chose a fabric with sunflowers on red background fabric for my pocket.  I placed it between the handles. I added a small velcro closure on the pocket to ensure I don't lose my tape measure.
Learnings: I needed to make the pocket taller than wide because I need to finish the top and bottom edges.  Some of my seams are not as straight as they should be.  The navy fabric is a bit heavy for the project. 
The bag completely covers the book and you can just see the pen nib sticking out.  I did cut a piece of heavy plastic to keep the bottom square.  It took me over 3 hours to make. Some of the seams are not as straight as they should be but overall I am happy with it. I look forward to using this bag for years to come.

Sharing at Mosaic Monday #26 hosted by Maggie at Normandy Life.