Showing posts with label SB Nestabilities Smooth Circles. Show all posts

Thursday, December 28, 2023

Celestial Stuffies


I made a set of stuffies for a little girl celebrating a birthday soon.  Sun, Moot and Star.

The Sun: I cut orange and yellow felt with rays layered on top of each other then turned the yellow one over. I cut a circle of warm yellow and stitched it to the center and stuffed before closing it up with over stitches. I add longer stitched to connect the rays to each other.  I added some orange stitches to the center.

The Moon.  I cut 2 large circles from white felt then cut out smaller circles from one of them. I layered some grey flannel fabric under it and used stab stitches to connect the two. Once the 3 craters were done I stitched the 2 white circles together with the blanket stitch around the outside. Once I was close I stuffed the moon with fiber fill and then closed the opening.

The Star: The 2 star shapes were cut with Stampin Up Star thinlit dies from yellow felt.  I embroidered the front shape with variegated thread.  The shapes are held together with blanket stitching.  It was stuffed with fiber fill. 

Tuesday, October 17, 2023

1 of a Kind - Tree Scent Oranments - Set 3

Another set of these very cute Tree Scent Ornaments.  These can be used to give your artificial tree a scent.  Choose your favorite Christmas essential oil and apply 1 or 2 drops and enjoy.  

Here I have grey felted wool to which I have added royal blue blanket stitch on the top and bottom edge.

I had stitched white snowflakes around the middle.

The top features white felt circle and a grey button.

The hanger is the royal blue thread in 6 ply.


This felted wool makes me think of woodsy so I put small triangular trees on the middle panel of this ornament.

I chose black embroidery thread for the blanket stitch around the top and bottom edges.

The top features a black felt circle and a medium sized button.

The hanger is 6 ply embroidery thread in the same color as the tree on the wool panel.


A Bumble Bee colored ornament.

It features the ivory and black felted wool panel around the middle of the ornament. 

I use golden yellow embroidery thread for the embellishments.  The blanket stitch on the bottom and top edges.

I followed the fabric pattern with cross and dash stitches.

The top features a black felt circle with a golden yellow button.

Embroidery thread in 6 ply for the hanger.


I put white snowflakes on this woodsy felted wool panel.

I used chocolate brown thread for the blanket stitching along the top and bottom edges.

The top has an ivory felt circle cut the the SB Nestabilties smooth circle die - the smallest in the large set.

Topped with a brown button and brown embroidery thread hanger.


Another daisy on this grey houndstooth wool fabric panel.  

I did triple fold this fabric and stitched the ends to ensure no unraveling of the ends.

I chose pink thread for the daisy and the dashes in the middle.  Same for the blanket stitching along the top and bottom edges.

Charcoal grey felt circle at the top cut the the nestabilities die.

Topped with a pink medium sized button.

Pink 6 ply embroidery hanger.

This is the last set for this year.  I learned a lot in the process.  I got some feedback that they could be a popular item.  Let's hope so.

Friday, October 13, 2023

1 of a Kind - Tree Scent Ornaments - Set 2 and Stand

I made a few more 1 of a King Tree Scent Ornaments.  These ornaments can hold your favorite tree scent essential oil to give your artificial tree the right scent.

It could also be a favorite Christmas scent of your choice. The scent will dissipate and you can choose a different oil another day.

Love this bold black and white check felted wool.

I decided to pair it with red.

I put blanket stitch along both edges with black embroidery thead. 

I changed color to red and using the squares in the fabric I put X and dashes along to bottom half and just dashes long the top.

Red felt on top with a large black button on top of that.  Black embroidery hanger.

I had most of my buttons spread around my work area in separate bowls.  I found this cute small oval button which matched well with the thread I had selected so I decided to use it.

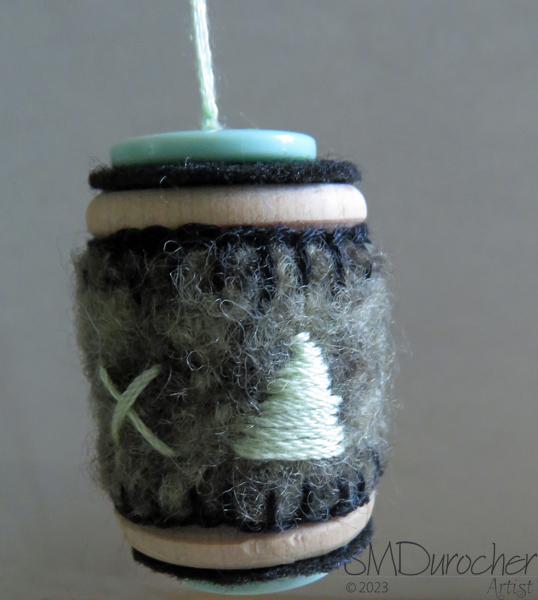
For this bright felted wool I chose bright green and blue.

I put blanket stitch in green along the top and bottom edges. 

I then stitched the button in the center front and then added dash stitches in blue above and below the button.

The top felt is green with a button button. 

True Blue embroidery floss hanger.

I decided to do one ornament in Oiler colors - blue and orange.

I used the wool denim colored felt.

I added a blanket stitch along the top and bottom edges in orange. 

The center pattern is a set of crossed dash stitches.

I cut the top felt circle from the same fabric with my smallest die from the Large Nestabilities smooth circle dies.  Fits perfectly.

Topped with orange buttons and the same orange embroidery thread for the hanger in all 6 plys.


Another Tree Scent ornament with bright colors.

The wool cuff is bright green and I chose purple embroidery thread.

I put a blanket stitch along the top and bottom edges.

I put stars patterns along the center of the wool layer.

The top has a purple felt circle and then a bright green medium sized button.

Purple 6ply embroidery thread hanger.


The fabric for this ornament was wool suiting so I folded it top to the back and bottom to the back so I had 3 layers to work with. 

I did have to stitch the ends which were stitched over with my connecting stitches.

White blanket stitches along the top and bottom edges.

I followed the plaid pattern with my white thread in dash stitches.

The top felt circle is red topped with a medium white button.

The hanger is white in 6 ply thread.


I needed another stand for Tree Scent Ornaments.  I went shopping this week and found this black folding stand. 

The Christmas stuff was out as well so I picked up a package of silver wire hangers.  I just squeezed them onto the wire frame.

I will put my sign on the back wire with the clothes pin.

I had the piece of wood in my stash which was perfect. It stabilizes the stand when there are ornaments on it. I will have to secure the legs into the slots.

Enough space on this stand for my 1 of a Kind Tree Scent Ornaments.


Sunday, December 5, 2021

Special Project - Thank You cards


I made some thank you cards for the friends and neighbours at Mom & Dad's apartment building.  They have been so good to them.  We planned some treats for them which I will deliver this week.

I started with the watercolor paper which I taped to glass then applied the color to the wet paper.   It was allowed to dry overnight which left it very flat.   I cut the circles with Spellbinder smooth circle thinlets - this one measures 3.25 inches.  I added a length of silver metallic embroidery thread.

I found a few simple images on line - birds, garden and butterflies.  I placed them on my light table and loosely traced them onto the watercolored circles with a black marker.  I added the border all the way around.

I cut pieces of white card stock which measured exactly what I needed then ran them in the BigShot with the Cuttlebug Thanks Words folder.  

I chose a card base that matched the colors in the ornament. I adhered the Thanks layer to the card base then used a black brad to attach the ornament to the card front.  This will allow the receiver to remove it and hanging it in a favorite place.


Monday, October 29, 2018

R2Go Christmas Stack - Turquoise Dove & Copper Ribbon

I started with the Turquoise Dove Die cuts created with the Stampin Up Deco Label thinlits.

I added a metallic copper circle behind the diecut.  Two pieces of 3D foam tape was added to the back.

The decorative black copper layer was created with Antique Copper Mist by Maya Mist applied with a toothbrush rubbed across a metal butter knife. It was left to dry over night.

Lay the copper ribbon across the decorative layer and determine the placement of the turquoise cord.  Tie the turquoise cord onto the copper ribbon then tape the ends to the back layer.  Adhere the layer to the front of the white card base.

Remove the release paper from the 3D foam tape and adhere the dove element over the ribbon on the right hand side of the card.

Pull the star & Bling Zot from the release paper and adhere to the card front as per the sample.