Showing posts with label rhinestones. Show all posts

Sunday, August 18, 2024

Card - HB watercolor - Purple

A large purple watercolor card for my aunt who is celebrating a birthday soon.

There is several layers and colors of watercolor brushed across then dried.

Later, I just let color drip down the paper while it was standing.  Catching the drips at the bottom on the desk.

It was then pressed flat.

A simple flower where I punched the flower and painted it with the bits left on the palette. Added a stem and a center.

Half sheet sized card on SU Lavendar Lace cardstock.

I added some clear  rhinestones held in place with Bling Zots. Full sheet insert to hide the brad in the center of the flower. White envelope and it's done.   

Found a new place to take my card pictures where I did not have to move stuff all the time.  See how it goes.

Saturday, June 25, 2016

Wedding Card - Purple Hearts

I made this card for the wedding today. 

I used a piece of spatter ink background paper I made when working on the gift for this couple.  This was cut leaving a border and adhered to a coordinating purple card. 
I wrapped a piece of 7/8 inch white grosgrain ribbon across the bottom third of the card.  I pulled it through a slit in the fold and brought the other end to the inside of the card and tape down the ends. 
I cut the sentiment from the same purple card stock as the card with one of the Tattered Lace Vertical Sentiment thin dies.  I layered it onto a piece of non shed silver glitter card stock leaving a tiny edge.  I added 3 silver tiny brads to hold the purple to the silver.  This was adhered to the card front with 3D foam tape aligned along the left hand side.
I punched textured card stock painted with the purple and iridescent inks with the Stampin Up Sweetheart punch.  These were adhered to the card front to the right side of the greeting.
I added silver bling rhinestones along the ribbon on the right hand side.

Monday, May 30, 2016

Thank Yous - Trip

These are the cards I included with my thank you gift to those ladies who helped me out last week. One took me to the airport and the other kept an eye on my place while I was away.  I am giving them tea as gift.
The left card features handmade marbled paper with a leaf cut with a Cuttlebug double die.  It cuts the outline and the solid background.  The pink one is the Stampin Up scallop circle punch in pink pearl paper.  Then layered 1 3/8" white and 1.25" pink circles.  I placed a pearl confetti daisy on top of those with a rhinestone in the centre. The envelopes were cut from 80lb text weight paper with the SU Petal Card die.  The envelope is held closed with a small white circle sticker.

Monday, February 1, 2016

Christmas Card Challenge - Feb - Blue / Snow

Here's the card for my blog Christmas Card Challenge.  For February the prompts are Navy Blue and Snow.

I ended up with a warm dark blue so it may be teal instead of navy.  I wanted to create a night sky with snow falling.  I chose the Sizzix Softly Falling embossing folder which I inked up with TH Distress Stain in denim blue but as you can see it's not anymore.  More about that here. I chose a card that coordinated and I adhered it to the card front.  I ripped a snow bank from white card stock. I cut a white triangle tree which I embossed with a Tim Holtz Alterations Star folder then I adhered it to the card front aligning the bottom of the tree to the bottom of the snowbank.  I added a silver star sequin at the top held with a Bling Zot.  I added a few silver rhinestones.  Then 3 small pearly snowflakes held in place with tiny white brads. 

Submitting to Anything Goes Challenge at Weekly Christmas Card Challenges.

Saturday, October 31, 2015

R2G Card Kits - SU - Believe

Here's my next Stampin Up Ready 2 Go Card kit.  Again, I selected Winter Frost Designer Paper. I cut the DSP to 2.12 x 5.5 inches. I chose Pool Party card stock onto which I put stamps from Snowflake Soiree set, The snowflake in Smoky Slate and Believe in Bermuda Bay. I adhered the DSP layer it to the bottom of the landscape card. I then adhered a .5 x 5.5 inch strip of Whisper White over the edge of the DSP.  I added 3 rhinestones in clear and warm blue with Bling Zots to the right hand side of the white strip.

Wednesday, September 30, 2015

Bling HB Card

A birthday card for a young lady celebrating her birthday today.  

I started with a purple card one of her favorite colors.  I added 3 banners of designer paper which coordinated.  I wove a piece of green between the banners and chose another piece to highlight the flag ends at the bottom of the card.  I added a flag end to the greeting.  I added a strip of bling rhinestones above the greeting then added a shorter strip on the right to balance the layout. 

Wednesday, August 19, 2015

Snowflake Sparkles

I wanted to try coloring an embossing folder then embossing card stock.  I've seen a few samples in my web surfing the last few weeks. 
I used the Stampin Up Northern Flurry embossing folder and a Night of Navy
Watercolor Crayon on the bumpy side of the folder. I spritzed it and ran it through the Big Shot with Whisper White card stock. The process put the color on the opposite side of what I was wanting because I did not think it through.  I used the really nice colored side but the debossed snowflake side. I was amazed at the variety of colors that appeared.  I mounted it on Soft Sky card with some wet glue and double sided tape in the corners to help the paper flatten out a bit.  I stamped the MC greeting from the Four the Holidays with NofN ink on white. I then cut a piece of NofN card stock and trimmed to the leave a small border. I added rhinestones in the center of 3 snowflakes and on the greeting banner.
Submitting to the following challenges:
Holly Jolly - 54 - Snowflakes and Sparkles
Christmas Cards All Year Long - Snowflakes

Friday, March 27, 2015

50th Wedding Anniversary Invites

I completed the order for these wedding anniversary invitations today.  The request was yellow with a bit of turquoise and 50 should be included.
I started with a yellow card.  I embossed a white layer cut to 4 x 5.25 inches with the Cuttlebug Juli's Garden folder.  I pull a piece of turquoise ribbon with a silver accent across this layer and taped the ends to the back.  This was then adhered to the card front.  The scallop accent was created with a Stampin Up Scallop circle punch in the same yellow as the card, then a 1 3/8" circle punch, then a 1.25" punch with the 50 color printed on it with a yellow circle.  I then added a rhinestone heart over the 50. This accent was adhered over the ribbon with 3D foam tape. The insert was customized with the invitation information.

Tuesday, July 15, 2014

Cards- Damask Top Note

I made a couple of these cards for my exchange group.  I started with cards I bought at a craft store.  They were thermal embossed black on white.  As soon as I saw them I knew what I would do with them.  Paint them of course!  I used Tim Holtz Distress Stain and rubbed it all over then wiped it down to bring out the shine on the embossing.  This color is TH Victorian Velvet.  I cut the decorated piece and a solid piece of black with the Stampin Up Top Note die.  I then trimmed the decorated one on the stitched die cut line and mounted it onto the black one. I cut these in half cross ways and used half on each card.  I dyed the small silk flower with the same distress ink then mounted a large white silk and the small onto the half of the Top Note.  All held in place with a black mini brad.  I stamped the greeting in the right hand corner with a clear stamp and Versafine Onyx ink.  Added a bling rhinestone on the i in birthday.
What can you find that allows you to change it and make it your own?

Monday, December 23, 2013

Cards - Christmas for Girls

Here's another card for the girl at work.  Same sketch as previous but in a monochromatic color scheme.  I cut the Tim Holtz Cabinet die from Figgy Pudding by Basic Grey.  I selected a warm grey card.  I embossed the vellum with the Cuttlebug Victorian folder.  I placed white silk poinsettias in 2 different sizes and a small white silk in the centre and held them all in place with a pewter flower brad. I wrapped the white organza around the two layers and tied a knot on the left.  Punched the green color printed greeting with the Stampin Up! Artisan Label punch and added a small bling rhinestone above the Merry.  Punched another from silver card stock and cut it in half width wise and offset the onto the back of the greeting.

Card - Christmas Cards for Girls

I made these cards as a result of a request from one of the girls at work for Christmas cards for her girlfriends and Mom.  I chose the Christmas Magic designer paper by Fancy Pants Designs. It was cut with the Sizzix Tim Holtz Cabinet die.  I added a Baja Breeze card and layered a piece of embossed vellum in between.  The embossing folder is Sizzix Textured Impressions Sugar & Starry Night By Basic Grey.  I wrapped white narrow organza ribbon around the die cut and tied it in a knot on the left hand side.  I punched the Cherry Cobbler color printed greeting with the Stampin Up! Artisan Label punch.  I punched another one from Cherry Cobbler and cut it in half width wise and then layered them behind the greeting.  I added a small bling rhinestone above the Merry.  This greeting is adhered to the card front with 3D foam tape.  I placed 2 white silk poinsettias and a deep wine flower in the centre and pushed a hole through all the layers and held them all in place with a coordinating large brad.  The card on the right is punched with the SU Decorative Label punch.

Saturday, April 13, 2013

All Occasion Stack Class - Daisy

Here's a great card to have in your stash just waiting for the right time.  I made these card kits in turquoise shown here, pink, purple, and bright green.  I designed a script background which I color printed to match the card color.  I then selected 1/4 inch gross grain ribbon in a matching color which I placed across the script layer and taped the ends to the back.This layer was glued to the card front. I assembled the accent by gluing the white circle in the centre of die cut label.  It was cut with one of the framelits from the SU Apothecary set in the same card stock as the card. I punched a daisy in the same color which was glued in the centre of the white circle.  I placed a rhinestone in the centre of the daisy.  This accent was adhered over the ribbon with 2 pieces of 3D foam tape on either end.

Thursday, September 27, 2012

Card - Invitation Samples

I had a couple approach me to design some invitations for their 60th wedding anniversary which is the diamond anniversary.
Here's the samples they did not select. Check back later for their selection.
I selected a black card.  I embossed a white layer with the SU Elegant Bouquet folder.  I printed a 60 on to bottom right hand corner.  I glued the white layer to the card front then applied several crystal rhinestones.

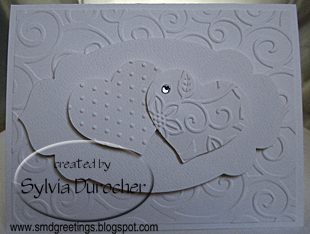
This card was a white on white concept.  I started with a white card and added a layer embossed with the Cuttlebug Devine Swirl folder. The next layer was cut with one of the SU Apothecary Framelits onto which I layered 2 die cut hearts which were embossed with Cuttlebug Swiss Dots on left and Craft Concepts In Bloom on the right.  I added a crystal rhinestone on the left heart.  The framelit die cut and the hearts were raised with 3D foam tape.

I chose ivory card stock for this one.  I printed some SU! Designer Paper from the Beau Chateau series. I slipped a Cuttlebug ribbon slider in Marina Mist onto the ivory organza ribbon and wrapped it around this layer and taped the ends to the back. I added a crystal rhinestone heart onto the centre of the ribbon slider.  I color printed the "invitation" on ivory card stock and cut it with another SU! Apothecary Framelit.  It was mounted to the card front with 3D foam tape.


Here's the one they selected.

I started with a dusty lavender card.  I embossed a white layer with the Cuttlebug Rebecca embossing folder and trimmed it to leave a tiny border.  I cut a lavendar scalloped oval with a Spellbinder nestabilities.  I color printed the information in lavendar onto white card stock then cut it with the corresponding smooth ovals in the SB nestabilities. These were adhered to each other then the element was mounted to the card front with 3D foam tape.