Showing posts with label hand drawn. Show all posts

Tuesday, August 16, 2022

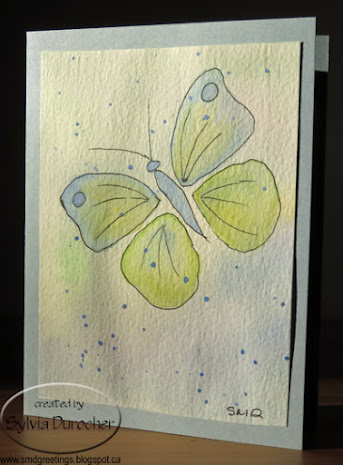
Watercolor Cards - Butterflies

I worked on more watercolor cards this week.

I needed a sympathy card and I have found that butterflies are a great symbol for that occasion.

I drew a basic butterfly outline that I will be able to use then adjust the shapes of the wings as I choose.

I again cut a long strip of 140lb water color paper and taped it to my desk.  I applied a light coat of color across the whole piece and let it dry.

Once dry, I cut it to 4" wide pieces then added my elements.

Here I have put the butterfly on the right and filled the wings with mostly lines.  I used a blue, yellow & green color scheme.  I added some color below the butterfly to make the bottom a bit darker which helps to ground the composition.

Once, dry I spattered a bit of blue and let that dry again. Trim the piece to it's final size and adhered it to a card base of Bordering Blue.

I created this butterfly with just lines in the wings put down with a Faber-Castell Ecco Pigment Black pen in size.4.

Painted with some pink, purples and blues.

Again, I added some additional color in the bottom left hand corner to ground the composition.  

A bit of purple spatter.

I believe the card base is Brilliant Blue.

Really loving the subtle colors in these cards.

I used my Lowe-Cornell watercolor palette.

The blue one will be mailed out today for a friend who lost her husband last week.  They have been married for over 70 years.


On this bulrush card I just lightly drew a rough composition with a pencil.  Started with my horizon line, added the sun, then the bulrushes.

I have a brown in this palette so I did not have to mix it but just darken it a bit.

I mixed a warm green for the bulrush leaves.

A warm golden yellow for the sun and some blue for the water.

I had to make decision about whether the bulrush stems were in front or behind the leaves.

Once dry I added a bit of yellow above and below the sun to have the sun glow.  This worked out very well this time.

Once trimmed I mounted it on a card base of Crushed Curry.

Each will get a blank quarter sheet insert and a white envelope.

Tuesday, July 12, 2022

Watercolor - Birthday themed cards

I worked on some more cards for upcoming birthdays.

I am not choosing to put greetings on my cards these days but the subject matter helps to communicate the sentiment.

I created birthday candles on this one.  I put an odd number of them.  These were penciled in then traced with the black marker then colored in bright colors.

I drew various patterns on the candles.  Some were made with the black marker and others were added once the first wash was dry.

Once the candles were dry then I added some spatter with orange and blue.

The paper is 140lb rough water color paper trimmed to about 4.00 x 5.25 inches.

Mouunted to Tango Tangerine card base with a quarter sheet insert on the inside with a white envelope!


The cards above are based on a similar process.  The one on the left is presents on a Pink Passion card base. The one on the right is balloons on an Elegant Eggplant card base with a wrap of purple crochet thread wrapped around the accent layer and tied to the front.  These will go in the stash for the summer birthdays coming up.

It was a good idea to create watercolor cards this year.

Friday, June 1, 2018

Exchange Cards - Tiny Flower Confetti

I made a couple of these cards for my Card Exchange partners for June.

I could not resist a small bag of these pretty hard plastic tiny pink  flower confetti when I saw them the other day.  They are just so cute! But I am in the mode of getting rid of supplies so I told myself not to hoard and just enjoy using them.

I found some inspiration on-line. I started with a 4 inch square of white card stock. I created a hand drawn square with a handwritten greeting using black markers. Then ripped all the edges.   I adhered the tiny pink flowers with Zots Bling which were the perfect size!  I adhered 13 in no particular order onto the greeting layer.

I then chose some strips of pink card stock in 3 colors and adhered to the the card front in various widths.  I trimmed them to the card edges with scissors.  I place 3D foam tape on the four corners of the greeting layer and placed on the left hand side of the black card.

These are off to my Exchange partners.

Monday, June 6, 2016

House Cards

I created these cards for a monthly card exchange group.
I had cut a couple when I made this card so I chose to use the second one here.   The front layer was cut from white cardstock with the Folk Art Festival cartridge and the Cricut.  I cut the shadow from royal blue card stock.  I then layered a piece of red behind the heart and yellow behind the windows.  I created a hill with some green card stock which I just cut free hand.  I punched the sun from yellow using a circle punch and placing only a corner of the piece in the punch.  It needed something and I considered spattering but could not decide on a color so I chose pencil crayons instead.  I added some depth to the green hill and pulled some grass growing from it.  I created subtle clouds in the sky with grey and blue.  Pulled some sun rays from the yellow sun in the corner.  I added a bird in the sky with a black fine tip marker.

For this card I had printed this crooked house clip art which is available for free on several websites. I colored it digitally then printed it. I fussy cut around the edge leaving a narrow white border.  I create a grass layer with some ripped card stock which I glued down and trimmed to the card edge. I punched a sin with a circle punch and adhered it in the top left hand corner.  I created a sidewalk to the front door with a piece of white card stock cut by hand.  I adhered the house over the sidewalk. I pulled out the pencil crayons and added some depth.  Yellow sun rays from the sun, smoke from the chimney in grey, cloud was grey and blue, green grass growing up and a subtle image of a tree on the right hand side with green and brown. The embellished white layer was adhered to a navy card base which matched the house roof.

These cards are headed to their new homes today.