Showing posts with label SMD Digi. Show all posts

Friday, November 24, 2023

Christmas Cards - Watercolor Ornaments - Process

I decided I wanted to make some special cards for my family.  I wanted to use watercolor and ink. What to make? I considered using die cuts so that I would have a framework to work within.  I did get rid of quite a few so I had to investigate what I had left.

Gingerbread - nice size but not enough artistic options

Snowman - too big and limited artistic options

I have quite a few ornament dies.  

Some too big.  These don't leave any room for a branch or other thing to have the ornament hang.


Others too small.  Not enough to stand alone, then I could make 3 three but that is 3 times the painting and design.  Are they all the same color and design? 

This one is one of the Stampin Up Keepsakes Ornaments as are the 2 small ones above. 

I could have used the three different ones but again a lot of decisions to make and designs to come up with.  

It was very cute.

I decided to use a permanent marker instead of the dip pen because I had watercolor containers, several brushes and several palettes out so I could have easily dip the wrong tool into the wrong liquid.


This is the Sizzix Ornament #2 die which was the right size. It had a nice hanger. 

It had this bump below the round part and here was my first attempt.  I did not like to highlight it by tracing it with the marker. Then it should be shaded to make it look nice.


I could cut the bump off as you can see in this photo.  Yes, that was better.  I was inclined to create the main part of the ornament as a circle which would limit my options.


Then, I remembered that I had designed a digital ornament quite a few years ago. You can see it in this post.   I decided to pursue this option.      Pros: Using my own design was a great idea.  It meant I could size it exactly the height I wanted. It had a hanger. Cons: I would have to cut them out myself.  I decided that would add to the handmade original feel.
I traced the shape onto my nice mixed media paper with a pencil.  I then cut them out and then added the black line with the marker. Eventually, I learned it was better to do the line first then erase the pencil lines and then cut out the shape.  Here is one of my rejects.  I was not happy with the green watercolor on the outside, the circle limited my designs, then I used acrylic gold to try and save this one and I was not happy to mix mediums.
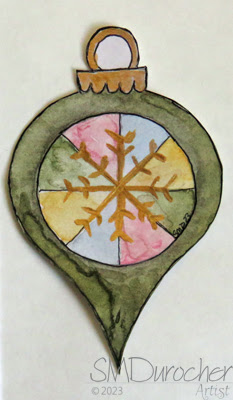
After a lot of trial and error I finally found a process that worked for me. I wanted to put these ornaments on a green watercolor background then onto a card base.   I had problems with the green watercolor layer as well.  I used salt to create texture but it must not have been wet enough so I got very little of it. This is one of my cards.  I'm not sure about just having it stuck there.  It should have a connection but I don't what it will be. Should it be a bow? a ribbon?  Would have been better to think of that before I adhered it.  We shall see what I come up with. 

Friday, June 3, 2022

Digital Cards - Daisy

I worked on a digital card today.  

I worked with a bubble background I create a few years ago featuring warm green colors and warm blue colors. 

I added a daisy digital image I create a long time ago.  It is a vector image so it can be sized and colored easily.

I added some circles with different l percentages of transparency to allow me to add a greeting to the card. It works well with the bubble concept in the background.  I added 5 circles of varying sizes.

I placed the one I wanted to feature a greeting in the center of the card top to bottom and aligned to the left.

I added a black greeting with a shadow to add dimension.

I sized the image to work well with A2 (4.25x5.5 inch) cards.

This can be printed quickly on white card stock and mailed in short order.

I think I will develop a few more of these.

This went out as a thank you for the lovely bouquet of flowers I received.

Friday, March 9, 2018

Kitty Cards - Exchange

I have been working on creating some art for one of my photo calendars for 2019.  I had decided on a cat face. I have spent days on this project.  I have drawn many faces but I have not achieved the results I wanted - CUTE!.  I have incorporated a couple of the paper pieced art in my card exchange for March so that the effort spent produced some results.  I want to thank my sisters who have provided endless feedback on this art project.                           What do you think of the face? 

These are large cards A7 (5x7) cards because the original art work was based on a 6x6 background.

The kitty is paper pieced where the face is printed on designer paper then cut out by hand.  The ears are printed on the same paper and cut out then a triangle of black is added for depth.

I tried a couple of collar options.  On the left, is the bling collar with a jingle bell.  These again repeat the black from the face and ears.  I adhere the bling with Zots.  The jingle bell is a Martha Stewart punch.  I attached it with a piece of thread.   On the right, I created a bow tie with 2 triangles of black with a .75 inch circle in the middle.  I added a blue button in the middle with Zots.

The greeting was printed on the same designer paper as the cat face then I ripped the top and bottom edge.

These are off to my card exchange partners today.

Tuesday, March 8, 2016

Birthday Party Invites - Easily Personalized


I`ve developed a few birthday party invites.  These are distributed as digital files which are personalized then forwarded by email.  They can be printed at home, at the photo developer of your choice, or sent out digitally to those invited.  Makes it very quick and easy for busy Moms.

The one on the left features balloons which are my own art.  I have filled them with some of my watercolor backgrounds.  It has a banner across the top which has been colored to complement the balloons.  This one is designed as a quarter sheet of a regular letter sized sheet.
Updated: I've changed the background on this one which works much better.


The one on the right features one of my watercolor backgrounds and my happy birthday cake on a stand graphic.  The cake has been designed with the colors in the background.  This creates a bright and catchy invite for any party.  This one is 4x6 inches.


This one is in contrast to the bright and bold ones below. It's feel is soft and gentle. It was done with one of my bubble paper backgrounds in green, purple and turquoise.  I added the polka dot overlay to repeat the concept of bubbles.  I added my own daisy graphic in a coordinating color to add a feminine touch.  I chose to put the words in a delicate font to go with the overall feel of the background. 


Pink and purple for girls.  This one is in the wide orientation with the same birthday cake graphic from the top one.   The colors have been changed to work for a girl's party.  This is 4x6 inches.


Another watercolor background with wonderful feathered edges featuring bolder colors. The birthday cake graphics has again been used in this invite. The blues and purples in the background have been repeated in the cake.  This one is in the tall orientation and is 4x6 inches.


This one features ink spot decorated paper I made a while back.  I choose this one because of it's bold & bright colors.  The circle invite repeats the circles in the ink spots. The details are placed on a shaded box to insured they are visible and easily read.

These all can be personalized and will be delivered digitally.  They are available in 4x6 photo files or 2 or 4 quarter sheets in printable PDF. This makes printing at home easy. You can find them on my Digital Cards tab.

I will have samples at the Vintage Bazaar on March 19 2016.

Thursday, April 9, 2015

Cards - Exchange Group

These are the cards I'm mailing out to my exchange partners this month.  These are the cards which served as inspiration for this card.

I started by designing the greeting, see the details here.  After color printing it, I trimmed the greeting close to the border. I chose ribbon scraps in navy and yellow. I created a layout which I liked with 1.5" lengths. I applied double sided tape and applied them to it keep the order I had laid out.  Once stuck I trimmed them at an angle.  The whole greeting element was then attached to the card front with 3D foam tape.

Class - Great Time!

We had a great time at class last night in the north end.  There were 7 ladies who participated. Sandy provided a hot cup of tea and most everyone got the cards done in the 2 hours.  We had some creativity happening as ladies interpreted the design in their own way.  That is so great!
Here are the cards I made from the Ready 2 Go Stack Card kit.
This yellow card is a wonderful color.

This sample of the ribbon threader puts the ribbon at the top which provides still another layout for this versatile layout. 


On this pink card I just cut the bottom of the back layers on at an angle then shifted the grey one up and voila another look!

Wednesday, April 8, 2015

R2G Occasion Card Stack Kit - Polka Dot Greeting

I've been working on card kits for my all occasion class tonight.  This is part of the Ready 2 Go Stack kit.

I wanted a large central greeting so after a bit of research on the web I designed a greeting of my own which included words and frames. With the large polka dot greeting where the dots are colored the rest of the elements are grey.  I trimmed the greeting close to the outside solid border.  I then lined up the bottoms of the white and grey card stock strips.  I ripped both at the same time so they would match exactly.  They could have been trimmed with scissors too.  I then shifted the grey one up until the white border matched the sides.  These were adhere to each other.  Then this layer was added to the card front.  You will see from the examples it can be offset or centered.  Then I cut the 3D foam tape in half crosswise and which gave me 4 pieces. I placed a piece in each corner of the greeting and adhered it to the card front over the grey strip. 

In this kit the card matches the colors of the polka dots and there are 4 different colors in the kit.  You will notice that there are 2 different greetings as well.

Tuesday, March 31, 2015

R2G Card Kit - Polar Bear

I'm working on Ready 2 Go kits for my upcoming classes.  I just love this polar bear from the Cricut Joy of the Season cartridge. He was cut at 2.25" from white paper.  I cut his scarf from non shedding glitter paper and adhered it to the bear die cut. I added his ear, eye and nose with a black marker. The star is from the same glitter paper punched with the Creative Memories Sparkle punch.  I selected a white card and then adhered a dark blue/light blue star background designer paper by Creative Imaginations leaving a small border.  I then designed a vellum greeting layer including the sentiment, trees and a line representing a snowbank.  I color printed it then clear embossed it. I trimmed inside a grey border I had included when printing.  I then adhered the bear to the vellum with dry adhesive and the star with a small Zot.  Then I turned it over and only applied dry adhesive to the areas covered by the bear and star to ensure the adhesive did not show through the vellum.  This layer was then adhered to the card front leaving a small border of the blue star paper.

Monday, February 9, 2015

R2G Card Kit - Baby Bird HB or Welcome

This is a card kit I adapted from the extras from this Card Club.  Likely no one needs 4 baby cards so I decided to add a birthday greeting which then could be used for others. In this case 4 birthday and 4 Welcome baby greetings are included to provide the most flexibility to the card maker.

Card - 2 shades of blue card and 2 shades of yellow are included in the kit
Bird - I designed and drew the bird & branch. This allows me to color it to suit any given situation.
Banner - matches the card color.  The banner can be cut with a flag end as shown for just at an angel based on preference.
Greeting - I designed the greeting and printed them in colors to match the card. I used a large 2" oval punch to create the greetings.  The greeting is 3D foam taped over the banner. This gives dimension and keeps the dark banner from showing through the greeting.

Tuesday, June 2, 2009

Card Club - May - Father's Day

Father's Day is soon! Are you sending yours a card? I am.
On this card I used a leaf image I designed myself several years ago when I was screen printing on cardstock. Now the color printer can do the same effect with less mess. The cardstock is Always Artichoke from Stampin Up! I'm finding I am using that color a lot lately. The acetate greeting allowed my girls to add the greeting or not. The scrapbook paper was very versatile allowing quite a few color options for accent and card.