Showing posts with label metallic ribbon. Show all posts

Wednesday, February 19, 2025

Cards - Charity Set 2

I chose a SU Cherry Cobbler card base in A2 size.  I trimmed a piece of designer paper in kraft with white polka dots and adhered to the card front.

I added a couple pieces of SU designer paper in chevron pattern in red to the the card front.  

I stuck the wood butterfly to the SU Artisan Label Punchie with a Zot and then it to the card front with 3D foam tape. 

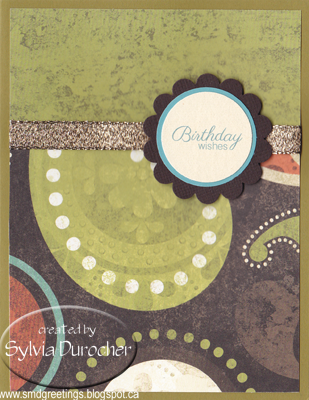
I adhered the SU Small Oval punchie greeting to the horizontal piece of designer paper.


The chevron paper is from a Stampin Up designer paper pack.

I wrapped a piece of red and copper metallic ribbon around the top and then taped the layer to the A2 card front.

I created an accent with a red SU Decorative Label punchie topped with a SU Small Oval greeting punchie and the wood butterfly.

A Zot holds the butterfly and double sided tape for the rest.

Each card has a quarter sheet white insert.


The dark brown card base is topped with a gold polka dot on kraft card stock.

I added a kraft and gold ribbon along the left hand side. The brown SU Artisan Label punchie is topped with a wood butterfly held in place with a Zot.

The SU Small oval punche greeting is placed in the bottom right hand corner.


This brown card base again topped with the gold polka dot card stock.

This time I used the SU Decorative Label punch and topped it with the SU Small Oval punchie greeting.

The wood butterfly in the top left hand corner stuck with a Zot.

These will get to my sister who has the contact for this card donation.

Wednesday, September 1, 2021

Exchange Cards - Blue Wash

I am using up supplies from old kits.  I had the blue card base, the white silk flower, the metal flower, the brad and silver ribbon.  

I needed a new background and some sort of greeting.

I found a couple of pieces of the Blue Wash designer paper which matched the Brilliant Blue card base so that was trimmed to leave a small border.

I taped the ribbon to the back and across the front and again to the back. I found the greeting in my Stampin Up box.  I aligned the flowers to the left of the greeting and adhered these layers together.  I then adhered this layer to the card front.   I then trimmed the greeting to the card edges with scissors.


I used similar supplies for this card. 

I needed a flower diecut which had 6 petals. After perusing my stash of dies, I used largest flower from the Sizzix Flower Layers and Leaves die and some heavy card stock.   I colored it with a bit of Brilliant Blue reinker in watered down and brushed on.

I added the ribbon across the designer paper and then adhered the three flowers with the tiny brad over the ribbon. 

I stamped the greeting on the same heavy card stock, ripped the top edge and soften it with a bit of water. Adhered with double sided tape.

These are headed out to my exchange partners.


Wednesday, July 1, 2020

Graduation Card

A card for my sister who has graduated from her university business program.   She has been attending night classes for a long time and she is finally done!

I chose school colors for the card of black and maroon.  I started with the black card base.  The background is a large hand decorated tag with white acrylic paint.  I added gold ribbon which adds a bit of celebrate to the card.  I put one piece wrapped around the tag and the other coming down from the top of the card.  I flagged the end of the shorter piece.  The grad cap was created with my Creative Memories Double Square punch. Larger in maroon and smaller in black.  I then tied a tassel from some gold cording and held in place with a black brad.   It was mounted over the top piece of gold ribbon with 3D foam tape.  The greeting is the Stampin Up Modern Label punchie in maroon with a white Word Window greeting.

Happy Graduation during COVID19.

Friday, November 16, 2018

R2Go Christmas Stack - Prism Snowflakes & Trees

I started with a navy card base.

I tacked a 4" square of vellum leaving even borders top and bottom.

I added the silver metallic ribbon wrapped around the card front and taped to the front over the vellum where the accent will cover it.

The snowflake element starts with a small white sequin then a silver fiber one, then the prism one and finally the Stampin Up Snow Flurry white one cut from card stock.  Make holes as needed in each of the snowflakes. These are held together with a navy mini brad where the prongs are spread apart on the back.

Adhere the snowflake element with the 3D foam tape.

Glue the quarter sheet insert.


I started with a warm green card base.

I assembled my trees by cutting the black strip into 3 pieces then adding one to each tree with a tiny brad. The trees are adhered to the card front with double sided tape.

Remove the star & Zot from release paper and adhere to card front at the top of the tree one at a time.

Rip the white paper to create your snowbank.  Trim it to the card edge if necessary. 

Layer the white circle greeting onto the black larger circle. Add the 3D foam tape to the back and adhere to card front as shown.  Glue the quarter sheet insert to the inside.

Monday, October 23, 2017

Card Club - October - Gold Handmade Paper

I started with the handmade paper which was painted and highlighted with gold. I cut it into 3" squares.  I then cut 4" squares from gold card stock.
I chose a rust card onto which I glued the gold square on the left side of a landscape card.  I then wrapped a piece of gold metallic ribbon across the front and taped the ends to the inside of the card.
I adhered the gold handmade paper on top of the ribbon.


I chose the grey in the paper for the greeting.  I printed small tags which I trimmed along the edge by hand with scissors.  I repeated the gold one more by choosing a gold paper clip to hold the greeting to the card.

I chose terra cotta, rust and burgundy card bases for these kits.  The greeting can be excluded with no detriment to the final card.

Monday, January 23, 2017

Card Club - January - Copper Flowers

The decorative paper features copper outlined flowers.  I trimmed it to about 3" wide and 5 inches tall. 

I chose a taupe layer of card stock based on the colors in the feature wood grain flower.  It is trimmed to 4.00 x 5.25 inches and I embossed the right hand edge with a flower border folder by Cuttlebug from the With Love set. 

The decorative layer was adhered to the embossed layer then this was glued to the white card.  I then punched 2 holes at the top of the decorative layer and inserted a length of copper metallic ribbon to make a inny outy bow. 

Innie Outie Bow: Push the ends of the ribbon through the holes from the front to the inside of the card.  Then put the ends back to the front through the opposite hole. Cut the ends with flag ends. 

This copper ribbon has been a challenge to use but this decorative paper was a perfect match. 

Saturday, July 16, 2016

Decorative Paper - Set 2

I delivered cards to the gallery today.
This card features the Memory Box Jumbled Happy Birthday greeting cut from silver foil card stock.  I chose a blue card which worked well this decorative paper made with ink applied to photo paper with a foam brush. It was glued to the card front leaving a small border. I adhered the greeting on the bottom third of the card with Quick Dry Adhesive by Scotch.  I punched 2 holes with the Stampin Up slot punch and pulled a piece of silver metallic ribbon through and knotted it.
On this wedding card I used some paper made with the Bubble Technique.  It was trimmed to leave a small border of the card showing.
It was in the purple lavender color range so I found a purple card that would work well with the paper.
I printed the clip art wedding couple from EDigg Clipart in black on vellum then clear embossed the image and greeting.  I trimmed the vellum to be smaller than the bubble paper.
I tacked the bubble paper to the card front then placed the vellum in place and held all in place with 4 tiny white brads in each corner.  I used a push pin to create holes for the brad prongs then spread them apart on the inside of the card.


This card features decorative paper made by brushing acrylic paint onto white card stock.  It creates a nice matte finish.
I punched the one edge of the purple and the white card stock strips twith the Martha Stewart Arch Lattice border punch.  I adhered the white one on to the right edge of the purple one.  I placed turquoise grosgrain ribbon on the right and white on the left.  This layer was adhered to a turquoise card.
I stamped the Stampin Up Triple Treat Flower stamp onto white with Tempting Turquoise. I punched the Five Petal Flower punch from the same decorative paper.  These were layered and I added a TT button in the centre held in place with a Zot.
I created a bit of dimension with some white cotton thread which was adhered to the accent.  The accent was then adhered to the card front with 3D foam tape.
Great card for any occasion.

Decorative Set - Set 1

This sunburst layer was cut from decorative paper made with technique using Alcohol Inks and Floor Wax.  My mixing of colors had created some muddy colors so it was a challenge to decide which color to highlight.  I tried warm pink, kelly green, yellow cards and finally settled for this warm green card.  I cut the decorative layer with the Stampin Up Sunburst Thinlit.  I adhered it to the card front then trimmed the rays to the card edge.  I added several Prima Flowers as an accent held in place with a gold flower sequin on a gold tiny brad. I added a greeting with the SU Decorative Label punchie and a SU Word Window greeting.  These were adhered together then glued to the card with 3D foam tape.


You can check out my other cards made with this great die by following this link.


On this card I used decorative paper made by spritzing color from a spray bottle through stencils and other materials to create decorative patterns.   This piece includes yellows, greend and blues.  I chose a pale blue textured card onto which I adhered the decorative paper.  I then spread a piece of metallic ribbon across the bottom third of the card and taped the ends to the inside of the card.  I layered several Prima flowers with other silks and held them all in place with a tiny gold star brad.  Great any reason card.

This card features a clear embossed color printed greeting in bold red letters on vellum.
Once printed I decided to create a custom background. I trimmed a piece of photo paper to leave a small border then applied Tim Holtz Antique Linen Distress Stain to the center and Walnut Stain to the edges.  I made sure to touch the cut edge of the paper was well.  This leaves the sentiment very visible against the background with a great dark brown border on the red card.
I chose a red card to repeat the color in the greeting.
The background was adhered to the card then the vellum was held in place with tiny gold star brads in the corners and other areas.  This makes a great card for a guy's birthday. 

Monday, July 11, 2016

Jumbled HB - Teal and Silver

I am working on options for card layouts done with the Memory Box Jumbled Happy Birthday thin die.  I have used flowers, a punch and now I added ribbon. 
The designer card stock layer in a damask pattern has been punched with the Stampin Up Slot punch from both the left and right hand sides.  This creates a half inch slot into which I can pull a length of ribbon. 
I die cut some foil card stock from a chocolate box with the greeting die.  I adhered the dies to the bottom of the background layer. 
I pulled some half inch silver metallic and narrower teal organza ribbon through the slots and knotted them both together.  Trimmed the ends with scissors.  The layer was adhered to the teal card. 

Monday, February 22, 2016

Card Club - Feb - DS Split

This is a designer paper split using coordinating double sided paper. I selected paper from Fancy Pants - Fancy Free collection - Tradition.  I cut the DSP to 4.00 x 5.25 then cut it at 3.5 inches.  I turned the smaller piece over and tape them back together with tape.  I placed the gold metallic ribbon over the join and taped the ends to the back. The laye was then adhered to the card front as a single piece. This is a great versatile design because it can become a tall or wide card.  I used the SU circle punches to create the greeting. I assembled it by adhering the 1 1/4" circle to the 1 3/8" circle then to the scallop circle.  The scallop is attached to the card front with 3D foam tape.

The second card features paper from WeRMemory Keepers - Urban Window Collection - Boho Chic Funky Fix. This one was put together in the portrait orientation which contributes to the design's flexibility.

Monday, November 23, 2015

Card Club - November - Christmas Tree DSP Split

This is a designer paper split.  I cut the DSP at 4.00x 5.25 inches.  I printed the greeting on the back of the top half then cut the paper at 3.5 inches from the bottom.  When I turned the smaller piece over there was the greeting.  I added a metallic gold and kraft ribbon over the join and taped the ends to the back of the layer.  This was then adhered to the green card front.  I added a green Christmas tree brad on the right hand side which holds everything together. 


The DSP had two color variations some with green trees and the other with grey trees. I chose a grey card and I had to come up with a different accent for the grey paper so I chose a silver snowflake held in place with a tiny gold brad. 


Wednesday, November 4, 2015

Card - Special Invitation


I was asked to make this card by one friend for another who is going through a transition in her life.

I started with an ivory parchment card in half sheet size (letter folded in half).  I then cut a Bazzil Mocha Divine textured piece of card stock down to 8.00x5.00 inches.  I wrapped a wide gold ribbon across the top and another across the bottom and wrapped the ends to the back and taped them down.  I then chose a piece of warm taupe cotton lace.  I pulled a length of ivory & gold 1/8 inch satin ribbon through it then taped it's ends to the back of the brown layer.  I used a Zot to hold the center down.  I color printed the words in brown onto vellum and then embossed it when clear powder. I cut it with the largest framelit from the Apothecary set. I added brown small flower punchies from the same card stock as the accent layer and then an iridescent flower sequin held in place with a tiny gold brad at each end .  This will help to keep everything together. I added large Zots to each corner for an extra measure of adhesion. I die cut a butterfly with the largest framelit from the Sizzix Winged Beauties set from the same brown textured card stock.  I held it in place with 3 small Zots on the body allowing the wings to come away from the card.  This adds a great dimension to the card. 

Sunday, September 20, 2015

Gift Card Holders - Felt Gifts

I had a good sale on Saturday so it's time to replenish some of my inventory.  I made more gift card holders in a different design this time.


It's still a tri-fold design but this time it features a felt gift on the front.  I selected coordinating 12x12 double sided card stock cut to 5.5" tall.  I used a narrow gold ribbon pulled through 2 holes in the bow to tie it onto the card. The bow repeats the bow on the felt accent.  The card is held closed with a gold metallic paper clip.

The inside features a quarter sheet insert for the giver's sentiments and a small envelope to hold the gift card, coupon or cash.


Wednesday, April 8, 2015

R2G Occasion Card Stack Kit - Ribbon Threader

This is the next card in the  Ready 2 Go Stack kit.  This card has no greeting and could be used for any occasion.  I started with a brown card with a top fold.  It could also be used wide with the fold on the left as in the sample below.  I cut the Spellbinder A2 Ribbon Threader layer from a neutral solid card stock. I ran a piece of ribbon through the threader and flagged both ends with scissors.  I taped the back to ensure the ribbon stayed in place.  The layer was then adhered to the card front. I then layered a piece of designer paper cut 3.25 by 3.00 inches.  I added 3 leaf punchies in coordinating colors.

The designer paper and card have been coordinated as well as the ribbons and punchies.  This turned out to be very time consuming. Lesson learned.


I'm glad that the card is very versatile in orientation and based on the colors can be used for a guy or a gal.

Wednesday, December 10, 2014

Banner - Merry Christmas

I added a Merry Christmas banner to my office decorating for this year.  I have set up the nativity a couple of years now.

The banner was created by cutting the letters from gold card stock with the Cricut and the CM Tiny Treasures cartridge. Then I layered them onto eggplant card stock which made the letter that color. Once pressed, I then trimmed the purple card stock by hand leaving a small border all the way around.  I punched 1/8" holes in each corner and strung them onto a gold ribbon. I want to add a star but did not get to it yet.

I've submitted to the Anything but a card Challenge at Fantabulous Cricut.

Monday, November 24, 2014

Card Club - November - Silver Poinsettia

This was a simple card with 2 silk silver poinsettias.  One is opaque metallic and the other is nearly transparent with glitter.  I found some metallic ribbon to match the bling level of the flower. The bottom half of the card was embossed with the Sizzix Tropical Paisley folder.  Then, I brought the ribbon across the card front and taped the ends to the inside. I aligned the metallic poinsettia then made the hole in the card front with a push pin .  I then put the thin flower over the metallic one and pushed the clear crystal brad through the hole I just made and spread the prongs on the inside of the card.  This kit included navy and green cards.

Thursday, October 23, 2014

R2G Christmas Card Stack Kit - Snowflake

I stated with the snowflake designer paper.  It is good weight and was great to work with.  I matched it to a blue card.  I chose to coordinate it with a chocolate silver shimmery ribbon.  I cut the designer paper to leave just a small border and adhered it to the card front.  I then placed the ribbon to the left of centre and taped the ends to the inside of the card. I cut 3 snowflakes: 1 blue the same as the card with a Martha Stewart punch, 2 thin snowflake from mirror card stock with a Stampin Up snowflake sizzlet then 3 a white punchie with a smaller MS punch.  I layered these then placed them over the ribbon on the card front and used a push pin to make a hole for the brad.  I used chocolate brown brad to hold all these layers to the card front with the prong being spread apart inside the card.  I designed the banner greeting then color printed it.  It was trimmed by hand then adhered to the card front with 3D foam tape. I added 3 small rhinestones just above the greeting using mini Zots.

Sunday, July 6, 2014

Joy Banner

I'm using left over supplies from my previous cards.

The letters were cut with the Cricut from cherry metallic card stock with the Creative Memories Tiny Treasures cartridge. I selected a green card.  I diecut a Stampin Up Top Note from vellum.  I adhered it to the card front with a line of snail adhesive that will be covered by the ribbon.  I laid the silver metallic satin ribbon across the middle of the card.  The ends are taped to the inside of the card.  I mounted the 3 letters with 3D foam tape. Here are the cards I made earlier.

Saturday, December 7, 2013

GC Holder - Musical Notes

I'm finally getting to some of my Christmas shopping.

I made this gift card holder with the Sizzix Jumbo Crescent Tag die and black cardstock.  I folded the card stock in half before cutting. Here's a link to the ones I've made before. This time I placed the fold on the side instead of the bottom.  I added some music paper to the front.  I hand cut the curve at the top and punched the hole with a 1/4" punch.  I cut the music notes with the green Sizzix small music notes die.  Some in copper and some in black.  I added the greeting with the Stampin Up! Modern Label punch and the Word Window punch with the greeting being color printed.  I added a copper metallic ribbon to keep it closed.

Tuesday, March 6, 2012

Card - Gold Hydrangea

I started with a taupe card.  I cut a 5.25x4.00 piece of the same card stock and embossed it with the Cuttlebug Polka Dots folder. I wrapped gold metallic ribbon in a cross pattern slightly to the left of centre around the embossed layer.  The ribbon is taped to the back.  This layer is then adhered to the card.  The flower is an ivory hydrangea flower with heavy gold embellishment.  I added a set of green leaves.  This accent is held in place with a jumbo gold brad over the intersection of the 2 ribbons.  The brad has been sanded slightly to remove the super shine it had.