Showing posts with label glitter card stock. Show all posts

Wednesday, April 16, 2025

Cards - I Win - Glitter Butterflies

I continued with the glitter butterflies today.

I chose a Stampin Up Glorious Green A2 card base.

I added 3 blocks of striped glitter designer paper and adhered them with double sided tape.

I added ribbon antennae and mounted it with 3D foam tape. 

I mounted the circle greeting just below the butterfly creating a cohesive focal element.

Added a white quarter sheet insert.


I created this card with similar supplies as the card above.

I adhered a strip of glitter striped designer paper to the top of the landscape (wide) orientated A2 card.

The glitter butterfly received its antennae of satin ribbon then was mounted with 3D foam tape along the bottom edge of the striped paper.

I punched a Stamping Up Decorative Label punchie from the striped paper then cut it in half to mounted the halves offset on the left and right.  Those were glued to the greeting punchie then the full element was mounted to the card front with 3D foam tape.

A white insert was added.

I chose SU Island Indigo as the card base for this set of cards.  Cut to A2 sized card.

I mounted a SU designer paper from the Adventure Bound DSP pad.  Trimmed to leave a small border and mounted to the card front.

I put a strip of Whisper White card stock through the Big Shot with the Swiss Dots folder and mounted that to the DSP.

The butterfly got white cotton thread antennae and was mounted with 3D foam tape.

The SU Small Oval punchie greeting was adhered with DS tape.

A white insert was added.
Another Island Indigo card base with the Adventure Bound designer paper in beautiful blue tones.

I used a SU script folder with the writing going horizontally for this card as it was in the landscape (wide) orientation.

I glitter butterfly has white cotton thread antennae and is mounted with 3D foam tape.

The SU Small Oval punchie greeting coordinating color was adhered with double sided tape.  A white insert was added.

This will be headed to my sister's this weekend and will be in then next batch of cards for IWin charity.

Saturday, April 1, 2023

Card Kits - Flowers

I volunteered to help my sister prepare card kits for my other sister`s daycare.

I first assembled the flower main accents.  Onto the yellow brad I placed a white flower sequin, then a yellow small silk flower, then a medium white one, then a pink bit larger one then a blue large silk flower.  I pressed the prongs of the brad apart on the back. I added a large Zot glue dot still on it`s release paper.

I selected the card stock to match the color of the flower accent.  Here, I choose navy blue.  The various kits feature red, green, turquoise, pink, and peach. The card base measured 11 inches wide and 8.25 inches tall. I scored it at 5.5 inches and folded in half.

I selected green plaid glitter paper to suggest the greenery for the flower.  I cut the plaid paper to 3.25 inches wide and 7 7/8 inches tall which allowed a full 9 scallops.  

The scallops were punched with a Martha Stewart border punch on both side of the strip of glitter paper.

I included a white insert measuring 5 x 8 inches and yellow envelope.

With the card already folded, the green glitter band is adhered onto the card front, the release paper is removed from the back of the flower accent and it is adhered onto the green plaid strip. The white insert is glued to the right hand side of the fold on the inside of the card.  I made 23 kits and provided 1 actual card sample and instructions for the staff. 

All put together, ready to deliver on the Easter weekend.


Friday, September 20, 2019

Upcycled Card - HB - Vellum and Glitter

A friend had a card she wanted to upcycle into a new card.

I had to trim the card and the vellum overlay. 

I chose a warm green card in half sheet size to coordinate with the green lettering on the front.

Since the card was glittery double sided tape did nothing to keep the vellum aligned that that they had been separated.  I used tiny gold brads in all four corners to hold everything in place.

I added the sentiment on the inside printed in color.

It is a wonderful sentiment and it is great when we have such friends.


Wednesday, November 28, 2018

Cardmaking - CH - Class 5

Style 2 - Designer Paper Split.  I bought these 12x12 glitter papers together but don`t have a designer or manufacturer.

This is very versatile paper in that it has lots of colors.  The bottom piece is cut 4 inches wide by 3.5 inches tall.  The top piece is cut 4 inches wide and 1.75 tall.  These are taped together on the back.

I added a kraft ribbon over the join which was taped to the back.  This layer was then adhered to the front of a nice pink card.

The greeting was printed with colors from the designer paper.  It was punched with the 2 inch oval and adhered to the card front with 3D foam tape.

I created kits with kraft card and pink ribbon and green card with red ribbon.


Style 3 - Square - The ornament element is 3.25 inches square.  It was adhered to a 3.5 inch red layer which coordinated well with the ornament color. Creating a hole with a push pin, I added a clear crystal brad in the center and pressed the prongs apart on the back.

I chose a deep burgundy card which matched well with the background color on the accent.  I glued a piece of gold moire paper to the card front leaving a small border.

I wrapped a piece of gold ribbon around the card front and taped the ends to meet under the accent layer.

The accent layer was then adhered over the ribbon with 3D foam tape aligned with even borders top, left and bottom.

Style 8 - This card was designed with Stampin Up elements.  I chose a Garden Green card base.

The diagonal stripe designer paper is from the Be of Good Cheer DSP set.  It was cut to leave a small border of card color.

I cut a 6 inch length of Cherry Cobbler Tulle and wrapped it around the DSP in the bottom third of the layer and taped the ends to the back.

The greeting was created with ivory metallic card stock cut with one of the SU Apothecary Framelits.  It is attached to the card front over the tulle with 2 tiny green brads on the bumps on the right and left sides. The greeting was color printed and punched with the SU Word Window and mounted to the label with 3D foam tape.

The designer paper layer was then adhered to the card front.

The felt wreath is from the Stampin Up Stitched Felt Winter Wishes Embellishment Set.  I added a Cherry Cobbler bow made from thread which is held in place with a Bling Zot.  The wreath was attached above the tulle with Scotch Quick Dry Adhesive.

Wednesday, August 15, 2018

Glitter Cards - Thank You

I created these card with glitter card front which I water colored with Stampin Up Watercolor Crayons.

I coordinated the card with the largest flower and I added a quarter sheet insert.

I will add these to the selection for my upcoming project.


Monday, January 16, 2017

Glitter Card Mosaic Bird

The Christmas cards I receive each year a few include some with glitter.  Gorgeous cards that sparkle and glitter.  When it's time to take them down what to do with them? For this card the bird was cut from the glitter card mosaic. The wing was cut with the Cricut and the Create a Critter cartridge then I embossed it with the Cuttlebug D'vine Swirl folder.  I added a definition to the beak with a marker and used a white brad for the eye.  I punched the branch with the Stampin Up Build Up Bird punch from white card stock.  I chose a piece of aqua polka dot designer paper and adhered it to the black card front.  I adhered the mosaic bird to the card front then adhered the wing and the branch.  I added a greeting with a black SU Modern Label punchie and a Word Window greeting. These are adhered together then mounted to the card front with 3D foam tape.  Sending these to my card exchange buddies.

Glitter Card Mosaic Technique

I spent some time with my sister Therese on the weekend and she came up with the idea of a glitter card mosaic.  Check her cards out.
1. Collect the cards.
2. Cut the card fronts into squares.  We chose .75" which is the width of the spacer on the paper cutter.
3. Layout the squares on a contrasting card stock until you have something appealing.
4. Glue the square down and press overnight is best.
5. We cut several holes with die cut machine to assess the placement on our mosaic.
6. I traced the shape of this post it bird on the back of the card stock.
7. Create a project with the cut out.  I made a card.


Sharing this post with Mosaic Monday #23 hosted by Maggie at Normandy Life.

Wednesday, July 13, 2016

Harry Potter ish HB Card

I created another card with the Memory Box Jumbled Happy Birthday die.  I cut the green plaid glitter paper with the greeting die.  I found a piece of navy small patterned DSP.  I ripped the bottom edge of the DSP and placed a strip of the green glitter paper behind the DSP to fill the layer back to 3.75x5 inches.  This layer was adhered to the warm blue green card.  I then adhered the greeting with Scotch Quick Dry adhesive.

This card reminds me of Harry Potter.

Wednesday, June 29, 2016

Christmas Tree Greeting

I started by selecting the green glitter card stock.  I cut it with the Memory Box Merry Christmas Tree die.  I found a piece of DSP from Basic Grey - Life of the Party - Shindig which is wood grain.
I felt the tree shape need to be more defined. Therefore, I cut a piece of clear plastic to create a stencil of the basic tree shape and adding a trunk.  I placed the stencil on the DSP and sponged brown ink inside the shape and brushed the edges of the DSP rectangle as well. I adhered the die cut over the stenciled area.
I cut an extra large star and one of the small star from bright green card stock.  I adhered the large one offset from the original one at the top of the tree and the tiny one was adhered right over the "i" in Christmas.
The designer paper was adhered to the warm taupe card.


Submitting to these challenges:
Christmas Card Challenges #30 Anything Goes
Less is More - Use a Stencil 


The second card features a tweeked stencil,a dark brown card, Early Espresso ink and a taupe snow bank.

Friday, December 18, 2015

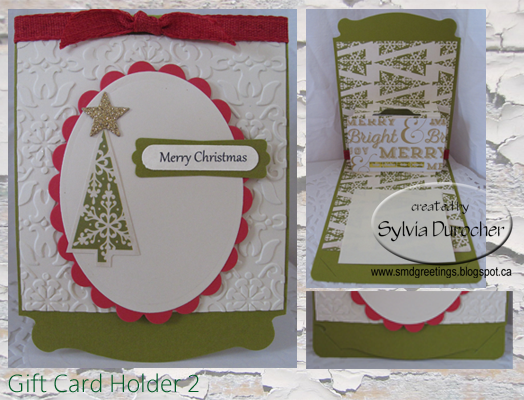
Gift Card Holder - Version 2

Another Gift Card Holder still using the Stampin Up Card Base Pop'nCuts die.  I cut this one from a Dill card stock. This time I used the Sizzix Pop 'n Cuts Magnetic Insert Die - Suitcase, 3-D (Pop-Up) for the inside.  I cut a piece of designer paper with triangle trees on it.  It was trimmed to 9 inches tall and 4 inches wide.  I trimmed the suitcase handle off with scissors. I chose this insert die because it was so close to the size of a gift card. The gift card is held in place with a Zot.I've added a sticky note for my sentiment which will allow it to be reused.
The front has a piece of ivory card stock embossed with the Stampin Up Vintage Wallpaper folder.  I adhered that to the card front then added a red cotton ribbon along the fold.  I cut a red scallop oval with Spellbinder Nestabilities then a smooth oval with the corresponding die.  I cut a triangle tree from the scrap of the designer paper.  Added a gold glitter star cut with the Sizzix Star die.   A SU Modern Label punchie with the Word Window greeting punchie. Not sure the straight edge of the embossed layer is the best but I will continue to tweek the design.
Again, the fact that the card keeps itself closed with the tab/slot is great.

Thursday, December 3, 2015

R2G Card Kits - SU - Festival of Trees

Another Ready2Go Card kit for a kid's Christmas Party!

This kit has a Ruby Red card base.  I cut the greeting layer to 4.00W x 5.25T and created it with the Festival of Trees Stamp Set.  The tree outline is included on this layer.  I provided a white triangle tree cut to 2 7/8 W X 3 7/8 T onto which strips of Certainly Celery card stack was adhered.  Once I was happy with I just trimmed the green to the edge of the white triangle with scissors.  I adhered the strip tree onto the card front using the outline printed on it for alignment. The gold glitter stars were cut with the Sizzix Stars#2 die. I trimmed the pot with scissors leaving a small border all the way around. I adhered sequins on my tree then added the gold glitter star and the red pot with 3D foam tape.

I provided plenty of green strips and sequins to meet any kid's desire.

Monday, October 27, 2014

Card Club - Oct - Glitter Circle Trio

I used some card stock with selected flowers glittered as a starting point for this set of cards. I punched the glitter card stock with the Stampin Up 1.25 inch circle punch.  I punched the next layer with the 1 3/8 inch circle punch from deep purple card stock.  I printed my large greeting layer on white card stock in a color to match the card.  The white layer is adhered then the solid circles then the glitter circles.

The other set of card stock was in more muted color tones so I chose an olive card and a lighter purple card stock for the solid circles.