Showing posts with label farewell. Show all posts

Saturday, May 13, 2023

Sylvia's Simple Shots

We had a farewell lunch with our quilting group for our leader who is moving.

She brought a few magazines discovered during her decluttering process. 

I brought these home as they are small projects and working with small pieces of fabric which I thought would be interesting.

I have not really had time this week to look at them.

The air is smoky because of the wildfires burning in our province.

The air quality is not great but I really enjoy my walks outside so I have been going anyway.

People are being evacuated and our trees are burning to the ground by the hectares.


The spring perennial flowers are starting to bring some much need color to the gardens in my area.

Siberian Squill, Red Tulip and Bleeding Hearts.


We had a good day for Mom's funeral and the internment of both my Mom and Dad. There had been a lot of planning and things went well.  The day was gorgeous shirt sleeve weather.

I walked behind the hearse with my twin sister and her husband as it brought them to the cemetery.  Mom passed in January and Dad 1 year to the day of the funeral. They were both cremated so we chose what would have been their 69th wedding anniversary for this event.

The graveside service was lovely.  We were lucky enough to get permission from the owner of our home which they moved from in 2017 to gather some soil from Mom's wonderful garden so we could cover their urns with the soil she so loving took care of for 50 years.  

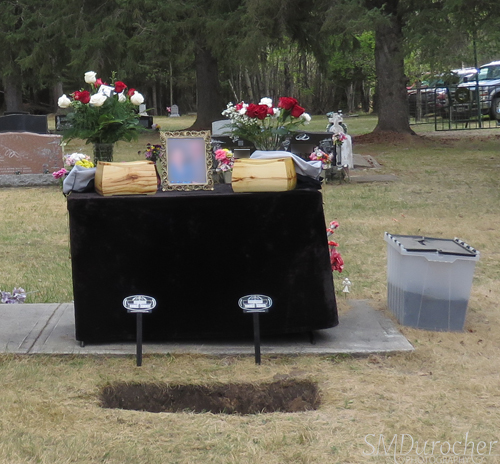
Their children, grandchildren and great grandchildren participated along with life long friends and family.

I was able to catch up with high school friends who were the ladies who prepared the funeral lunch.

We were so blessed to have them as parents for so long.

Thursday, March 19, 2020

Farewell Card - Painted Blooms

A card for the lady who started the Welcome to my Kitchen fellowship group.  Nine of us met at her house in the fall of 2015 and brain stormed the mission, the activities, and division of responsibilities. It has been a huge success.

We have been going strong for nearly 5 years which means it is meeting a need.  I took charge of the group in 2016 when she needed more time to spend with her elderly mother.

This card is half sheet size so there is enough room for all the sentiments our ladies want to share.

I started with a 8.5 x 11 sheet of Stampin Up Soft Sky card stock which was folded in half.

I chose a sheet of the SU Painted Blooms designer paper - cut to 5.25 x 8.25 inches and adhered to the card front.

I placed a white paper doily in the bottom left hand corner, glued it down and trimmed it to the edge of the card.

I added a grosgrain ribbon in Rose Red wrapped around the card front along the fold and knotted.  Trimmed the ends.    I placed a circle of the same card stock over the doily and trimmed it again to the card edges.   I printed a sentiment banner in Wild Wasabi and Rose Red which I fussy cut to the border.  It was adhered to the card front tucking the left hand end under the ribbon.

Wednesday, March 30, 2016

Farewell Card - Teal & Ice

I made this card for a couple who are taking on new responsibilities. 

I used teal card stock and cut down the 12x12 to 8.5x11. I folded the card in half and adhered a piece of the designer paper by Adornit - Carolee's Creations - Cold Water Collection - Ice to the front leaving a small border.  I printed the greeting with a watercolor background from Pixabay onto a piece 4x6 photo paper.  This was mounted to the card front with a piece of matching card stock offset on the left hand side.

Change is for sure so as we transition to a reality we will see and do new things.  Adventure awaits for all of us.


Monday, May 26, 2014

Card - Farewell

I made this card for a couple who are leaving our office soon for new duties in Toronto.
I started with a blue card and just folded the full sheet in half which makes are large card for everyone to share their sentiments.  I layered onto it some designer paper by Fancy Pants - Tradition from the fancy-free collection by Michelle Coleman.  I punched a border with a Martha Stewart double edge punch from deep red card stock and ran 2 lengths of caramel seam binding through it.  The ribbon was taped to the back of the DP layer.  This layer was then adhered to the card front.  I chose to mix card stock flowers with silk flowers.  I used the Tim Holtz Tattered Flowers die because it provided the size of flower I was looking for. The 2 blue one and the red one were cut from card stock already used in the card. I added 2 velvety satin flowers in between.  I held all of these in place with a large red brad.  The insert is caramel with blue writing.

Tuesday, June 18, 2013

Card - Farewell - Pink Lily

Another card for those leaving our office this month.  I chose the Designer Paper by Kaiser Craft - Tigerlilly Collection - Blossom.  Love this paper!  I layered a piece of the paper onto a large half sheet pink card.  It's double sided paper so I chose to add a band across the top 1/3 with the small dots side.  I added borders top and bottom punched from black card stock with the Martha Stewart daisy border punch.  I added another strip of the Tigerlily paper in the center. I fussy cut a pink lily from the leftover paper.  I mounted that onto a black smooth oval cut with Spellbinder Nestabilities then onto a step larger oval in white.  This accent was adhered to the card front with 3D foam tape. 

Card - Farewell - Blue Floral

Another card for the farewells at work.  I started with a large half sheet leaf green card.  I added the designer paper, which I ripped at about 1/3 down from the top.  I added a strip of blue card stock down the center at 8.25" tall onto which I added a length of bright green grosgrain ribbon. The ends of the ribbon were taped to the back of the DP.  This layer was then adhered to the card front.  I cut a scallop oval in an off white card stock with Spellbinder Nestabilities, then layered a smooth oval of the same blue as the strip, then a punched some sprigs of green leaves from some green card stock with the Martha Stewart punch.  I added 3 off white silk hydrangea flowers to the center held in place with a large blue brad.

Card - Farewell - Taupe Orchids

I made this half sheet card for a couple leaving our office.  I started with a taupe card onto which I layered a piece of Designer Paper by LilyBeeDesign - Buttercup - Puddles.  I trimmed the paper to center the paisley like design on the card front. I cut a Spellbinders Nestabilities Label 13 from the same cardstock and spattered it with white acrylic paint.  I punched holes in the top and bottom with the Stampin Up! slot punch.  I pulled 3/8` grosgrain ribbon through and taped the ends to the back of the DP.  I chose one of my photos of orchids and applied a sepia filter to it and printed it on white card stock. I cut it with a Spellbinders Oval Nestabilities and then cut a white oval in the next increment.  These were layered and adhered with 3D foam tape to the center of the label.  I placed a taupe brad through the ribbon and card front just above and below the oval center. 

Wednesday, November 14, 2012

Card - We will Miss You

I created this card for a someone at work.
I started with the polka dot designer paper Bella Blvd "One Fall Day" which had nice warm tones.  I found card stock that matched the deep teal green in the paper.  I decided to have the sentiment repeat the circle theme in the paper.  I designed the sentiment myself then color printed it.  I cut the sentiment with my SB circle nestabilities and cut 3 more in colors within the designer paper in graduated larger circles.
I'm really happy the way it turned out.

Monday, June 20, 2011

Card - Accordion Card

I made this card for a couple who are leaving our office and moving to Toronto. I needed a large card for everyone to sign. I decided on an accordion card. I wanted the left side to represent Alberta so I added mountains and pine tree. The vellum in the centre represents our Muttart Conservatory in the river valley. Then along the road in the centre I created sign posts with locations long their way east; Saskatoon, Winnipeg, and Sudbury. The right hand cover represents Toronto and Ontario. The cityscape, CN Tower and the water.
I used artists canvas 6x9" for the covers. I painted the sky and the grass on with acrylic paint with a bit of a dry brush technique. I used 50lb text weight paper for the accordion which was painted in the same way. I used my Creative Memories Wavy Cutter to create the highway that runs the full length of the card from left to right. I added the white centre line with a Marvy Opaque marker. The mountains were cut by hand, the pine tree is a Sizzix die cut, and the grass was ripped and cut with decorative edge scissors. The Muttart Conservatory is 3 large glass pyramids so I decided on vellum which was scored and then I added a bit of fine black marker to add definition. I designed the road markers in Corel Draw. The cityscape was cut on the Cricut - Paper Dolls Dress Up. I placed yellow paper behind to put light in the windows. I cut the waves with the wavy cutter and chalked them to add some depth. The CN tower was a clipart image which I printed and cut close to the edge. The clouds were cut with the Cricut - Create a Critter. I made a vellum sleeve to hold and protect the card.

Banner - Farewell

This is a banner I created for a farewell we hosted today.  The triangles were cut to accommodate the 4" letters cut with the Cricut and the Base Camp cartridge.  The colors were lime, navy and yellow.  The letters were cut from yellow card stock and glued to the navy flags.  The lime scallop was cut with Sizzix Sizzlits Decorative Strip Die - Scallops, Giant which is 12 inches long. They were adhered along the top edge of the flag and trimmed as needed.  I attached the flags to a navy grosgrain ribbon with tiny blue brads.