Showing posts with label Sizzix Stars#2 die. Show all posts

Wednesday, August 6, 2025

Slow Stitching - August 2025 - Week 1

My theme for August is Friends.  I am following K3N Cloth Tales Comfort Covertlet project.  

I die cut a star for each friend in colors that I associate with each of them.

I used 2 strands of embroidery floss and the blanket stitch to attach the stars to my background fabric or foundation layer. I chose the threa according to the colors in the fabric.

Some fabrics have metallic accents

Monday, November 27, 2017

Card Club - November - Star

I started with the large greeting which was left over from making this Nativity Christmas Stack kit.

I chose a card base which matched the color of the greeting.  I cut a piece of sparkly paper to leave a small border of the card showing and adhered it to the card front.

The greeting was tacked in place with a bit of tape near the bottom center then the 2 tiny black star brads were added in each of the top corners. Using a push pin to make holes through the card front push the brads through and spread the prongs apart on the inside of the card.

I cut the star with the Sizzix Stars#2 die from silver card stock.  It was adhered to the sparkly paper overlapping the greeting.


Monday, July 11, 2016

Star Trio Birthday

I started with a Stampin Up Marina Mist card.
I created my own background with a sponge, a MM ink pad and a piece of photo paper.  I intentionally left the top part white so the happy would contrast with the card color.
Once dry, I cut it with the Memory Box Grand Happy Birthday thin die.  I trimmed to sides down to 5.25 inches and adhered it to the card front.
I cut the stars with the Sizzix Stars #2 Originals Die using Basic Gray and Real Red card stock.  They are held in place with a tiny white star brad.


Sharing with Stampin Up Color Q challenge #349.

Wednesday, June 1, 2016

Decorative Paper - Set 3

This card features paper created with the Bubble Painting technique.

This technique was done on plain white card stock so it matte and not shiny.  There is a great variety of greens from moss to a yellowy one.  I chose a green grey card stock.  I trimmed the decorative paper to leave a small margin and adhered it to the card front.  I then placed a piece of River Rock card stock across the bottom third of the card.  On top of that I adhered my greeting with 3D foam tape.  The greeting was color printed on ivory card stock and punched with the Stampin Up Decorative Label Punch.  I rubbed the edges with Always Artichoke ink pad. I cut a star from River Rock then a smaller one from the same bubble decorative paper.  These where layered and adhered above the greeting to the left.


Here's a sympathy card made with the circle trio using the same bubble paper.  I punched the decorative paper with the smaller 1.25" circle punch then the solid card stock with the 1 3/8" circle punch. These were adhered together.  The large greeting is my own design and was printed in Mellow Moss.  I used the same green grey card stock as the first card. I adhere the left and right circles leaving even borders then just place the third one in between leaving even borders.


This card features Paste Paper.  The acrylic paint used in the technique was brown.  I cut the paper leaving a small border.  It was adhered to the front of a warm brown card which worked well with the colors in the paper.  I cut the Memory Box Birch Tree Trio from sand colored card stock.  I adhered them to the paste paper with snail adhesive so I could just rub off the areas which had adhesive sticking out.  The greeting is printed on vellum in black then embossed with clear powder. I ripped the top and bottom edges.  I placed it across the bottom third of the card and added the copper maple leaf brad in the top right hand corner.  I used several tiny round brads to hold the rest of the greeting in place.  Once in place I trimmed the ends to the card edge with scissors.

Friday, March 4, 2016

Decorative Paper - Card Set 1

This is another collection of cards for sale at the gallery.  I started with the green paste paper which I trimmed to leave small border.  I adhered it to a dark green card.  I printed a large greeting layer on white then cut out the Happy with the Sizzix Phrase die.  This was adhered to the paste paper then I added 3 gold stars cut with the Sizzix Stars die.


This card features a piece of decorative paper made with pink ink and marked with a letterpress die from Sizzix. I brayed some Night of Navy ink onto it then pressed it onto the pink paper.  It only left a faint mark.  I cut the piece to leave a small border.  I place a piece of crisp ribbon down the centre and taped the ends to the back. It was adhered to the card front.  I then place a silver metallic scallop circle then a white silk flower topped with a smaller pink one held in place with a tiny navy brad.  I trimmed the vellum greeting to 4" and placed onto the card front as shown and held it in place with 2 tiny brads.
This card features ink sponged background paper in light to dark green. I printed some script and postage digital stamps onto it in black.  The paper was trimmed and adhered with postage on the left to a medium warm teal card front.  I added a teal teapot cut with the Cricut and the Folk Art Festival cartridge.  I mounted the teapot with 3D foam tape.  Before I adhered it I placed a piece of mint green card stock behind the holes to highlight them.

Friday, December 18, 2015

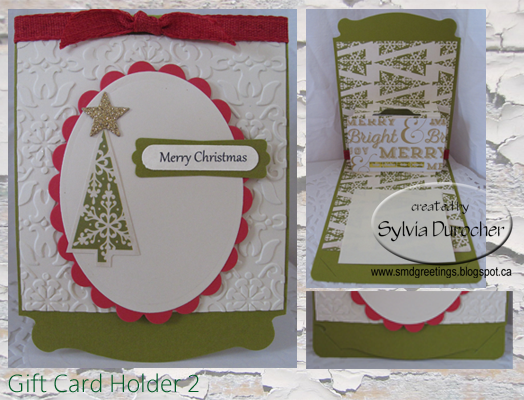
Gift Card Holder - Version 2

Another Gift Card Holder still using the Stampin Up Card Base Pop'nCuts die.  I cut this one from a Dill card stock. This time I used the Sizzix Pop 'n Cuts Magnetic Insert Die - Suitcase, 3-D (Pop-Up) for the inside.  I cut a piece of designer paper with triangle trees on it.  It was trimmed to 9 inches tall and 4 inches wide.  I trimmed the suitcase handle off with scissors. I chose this insert die because it was so close to the size of a gift card. The gift card is held in place with a Zot.I've added a sticky note for my sentiment which will allow it to be reused.
The front has a piece of ivory card stock embossed with the Stampin Up Vintage Wallpaper folder.  I adhered that to the card front then added a red cotton ribbon along the fold.  I cut a red scallop oval with Spellbinder Nestabilities then a smooth oval with the corresponding die.  I cut a triangle tree from the scrap of the designer paper.  Added a gold glitter star cut with the Sizzix Star die.   A SU Modern Label punchie with the Word Window greeting punchie. Not sure the straight edge of the embossed layer is the best but I will continue to tweek the design.
Again, the fact that the card keeps itself closed with the tab/slot is great.

Thursday, December 3, 2015

R2G Card Kits - SU - Festival of Trees

Another Ready2Go Card kit for a kid's Christmas Party!

This kit has a Ruby Red card base.  I cut the greeting layer to 4.00W x 5.25T and created it with the Festival of Trees Stamp Set.  The tree outline is included on this layer.  I provided a white triangle tree cut to 2 7/8 W X 3 7/8 T onto which strips of Certainly Celery card stack was adhered.  Once I was happy with I just trimmed the green to the edge of the white triangle with scissors.  I adhered the strip tree onto the card front using the outline printed on it for alignment. The gold glitter stars were cut with the Sizzix Stars#2 die. I trimmed the pot with scissors leaving a small border all the way around. I adhered sequins on my tree then added the gold glitter star and the red pot with 3D foam tape.

I provided plenty of green strips and sequins to meet any kid's desire.

Sunday, August 16, 2015

Triple Stars

I selected the Stampin Up Well Worn DSP and a Cajun Craze card.  I followed this tutorial for the sunburst. I cut a piece of DSP to 4.5x6 inches which I cut into 4 pieces of 4.5x1.5 inches which were cut in half on the diagonal.  I cut 2 from Not Quite Navy card stock as well.  I marked the center of the card about 1 inch from the bottom edge. I placed the points on the mark and played around with their placement. Once I was happy, I glued them down.  I trimmed all the DSP pieces to the edge of the card. I cut a narrow strip of NQN card stock and adhered it just below the horizontal edge of the DSP across the card.  I cut 3 stars with the Sizzix Stars#2 die; large in Early Espresso, medium River Rock, smallest Cajun Craze. I trimmed the largest star to the edge of the card.  The greeting is from the Itty Bitty Banners Stamp Set which was stamped NQN on River Rock and cut with the Itty Banner framelits.  It was adhered on the right of the star accent.


Submitting to the following challenges:
TGIF Challenges - TGIFC16 - Sunburst Sketch
SU ColorQ - cQc 303


Sunday, May 17, 2015

Congrats Grad

I made this card for my niece who is graduating from high school.  I started with the stars and then went from there.  I punched a piece of Stampin Up Not Quite Navy with a star border punch from Creative Memories but it's a great substitute for the Confetti Star Punch.  I then punched the stars again from non shed silver glitter paper. I put tape on the back of the strip and placed the stars into the holes.  I used left over DSP strips from this Christmas Card project. I chose a Cherry Cobbler card to go with the strips from the Season of Style stack.  I adhered the wider DSP strip first then placed the narrower strips perpendicular to it.  I alternated narrow and skinny strips.  Then I adhered the NQN star strip over the wide one and shifted it over to the right.  The greeting is from the Sprinkled Expressions stamp set and done in Not Quite Navy.  I cut the right hand side in a banner and adhered it to the card above the star strip.  I then die cut stars with the SU Sizzix Stars #2 die, smaller in the same silver glitter and large in NQN card stock. Layered them and adhered the accent in the top left hand corner with Zots.  I'm happy with the outcome.

I'm submitting this card to the following challenge(s):

TGIF 03 - Congrats Grad

Wednesday, February 25, 2015

Card - Non Traditional Christmas Star

I started with a teal card.  I used a DSP by My Mind's Eye - Good Day Sunshine - Bold Dots Paper.  I cut it to leave a small border on the card front.  For the stars I started with a yellow ivory card stock and brushed it with Tim Holtz Distress Stain in Antique Linen and then added a bit of TH Gathered Twig to match the dots in the paper. I cut the stars with the Sizzix Star Die. I used TH Aged Mahogany stain for the small star and applied some to the edges of the yellow and teal stars.  I wanted the greeting to match so I brushed some stain onto the rubber stamp but the coverage was not great. I brushed the edge of greeting with the same Aged Mahogany stain. I dyed a piece of white cotton thread with the same stain.  I wrapped it around the DSP layer then glued it to the card front.  I layered the stars and held them in place with a tiny gold star brad.  The greeting is adhered to the card front over the thread with 3D foam tape.

Submitting it to:
 Holly Jolly Christmas Card Challenge - non traditional colors.
Christmas Card Challenges - Sparkle Creations - Anything Goes
Crafty Hazel's Christmas Challenge - Anything Goes

Monday, February 9, 2015

R2G - Card Kit - HB Stars on Label

This is a set of cards I had planned for a class later this month but my plans were changed so I've made them into card kits instead.  These make great cards for guys.

DSP - SU Just Add Cake DSP custom cut with Cricut The label die cut is adhered in the top half of the card.

Card stock - Stampin Up Early Expresso & Wild Wasabi

Stars - Sizzix Stars and Star#2 cut in EE and WW with tiny star brad. The star accent is layered as shown then a hole is made in the centre with a push pin and the tiny star brad is put through.  This accent is adhered to the center of the DSP diecut with 3D foam tape.

Greetings -  Early Espresso ink on Whisper White Decorative Label with a HB Stamp  The greeting is placed as desired on the bottom of the card and then the excess is trimmed off with scissors.

Sunday, February 1, 2015

Christmas Card Challenge - Feb - Star Layers Ribbon

The Christmas Card Challenge for February ( is it really here already?) is Star Layers Ribbon.  Are you going to join me?  Leave me a comment with a link to your card.

Here's my card for the challenge.  I started with the designer paper.  I wanted something with a small enough design to be okay with the size of the star.  I chose Celebrate Family Flowers - Confetti - Kaleidoscope Collection by My Mind's Eye. I chose the Sizzix 3 Stars die.  I then found a warm dark blue card stock to match the DSP.  I had decided that I would chose solid card stock, DSP and silver metallic, cut them all three of them at once and then just swap the stars into 3 groups. I need a light background for my dark stars so I selected a silver pearl card stock which I embossed with the Sizzix Stars and Swirls folder.  I trimmed it to leave a small border.  I added a red cotton ribbon bow that was just cinched in the middle with a piece of matching thread.  This creates less bulk for mailing.  I adhered a piece of the same thread to the back of the pearl layer in the top center before I stuck the layer to the card front.  I brought it down the card front and taped it down, which will be covered by the star.  I layered the 3 stars and pierced the centre with push pin and inserted the tiny red star brad.  I mounted the stars to the card front with 3D foam tape.   I decided to leave out any type of greeting. Repeating the star in the background worked well.

Sunday, October 26, 2014

Peace Card Set

I made another set of cards for a donation to a fundraiser.

I found green backgrounds from the web then created the word PEACE with digital images from Aria Sparkle.  I created an oval with a gradient fill with a dark border.  I layered the word on top of it. I found the sprig of olive branch on CLKER.  The bottom one is a gradient background with darker edges.


Once the card was printed I added a pearl white card stock die cut of a dove on the top and a star on the bottom one. These are Sizzix dies.

Saturday, September 27, 2014

Rusty Star Wreath Card Set

This is another set of cards for the auction.

This is a wreath is my own design.  I have printed it in a warm dark green.  I have placed rusty stars onto it.  I added a great greeting in several fonts in the same colors in the wreath.  I added a great organza ribbon bow in a warm copper color.

The stars were diecut with the Sizzix Stars#2 die from copper card stock.

Yet, again in a clear box.

Thursday, September 25, 2014

Snow Angel Card Set

Another set of Christmas cards for the auction.  I started with a photo I took of a vintage snow angel Christmas decoration.  I added a night sky in warm tones then layered over it a texture background of falling snow that I designed. I added a snowbank on the bottom of the card with the "Peaceful Wishes" greeting layered over it.  I printed this onto ivory card stock.  I then added a matte gold star die cut with the Sizzix die.  This was added to the card front with a glue dot to add just a wee bit of dimension. Super happy with this one!


I then packaged the set of 20 cards in a clear square box.  I added a spacer just like the retail industry does which worked out really well. The box was purchased from a packaging store.

This looks great.

Saturday, July 27, 2013

Card - Versatile Sketch

Here's another card with the sketch I used earlier.  Check out the other cards I've made, the Christmas one and the feminine one.I wanted to make a masculine card with the same sketch.
I started with the die cut made with the Tim Holtz Cabinet Card die.  I cut the designer card stock to just under 3.5" and ran it through the Big Shot which eliminated the second notch.  I cut a circle that matched the top with a Spellbinder Nestabilities in white.  I found a greeting in my stash and trimmed it to fit along bottom of the die cut. I brushed the edges with a navy ink pad. I added a length of navy seam binding wrapped between the circle and the greeting and tied in a knot with the ends trimmed.  I added a navy star cut with a Sizzix die in the middle of the circle with small kraft star all held in place with a navy star brad. This was mounted on a kraft card which had a layer of navy gingham designer paper adhered to it leaving a small border.

Monday, November 26, 2012

Card Club - Glittered Trees

I used glitter designer paper on this card.  I selected the sheet with the greetings then the other sheet was the trees. The pieces are cut at about 1/3 and 2/3 of the card front. The tree bottom piece is a 4" square and the greetings top piece is 1.25" tall and 4" wide.  I used navy, red, and light blue card stock for cards in this set.  I placed the cut edges of the 2 glitter pieces and taped them together.  I placed with white ribbon across the join and taped the ends of the ribbon to the back of the DP layer.  This layer was adhered to the card front. The stars were cut with a Sizzix die in 2 different sizes and colors.  The large one matches the card color and the smaller is always white.  These are held in place with a star shaped tiny brad.

Saturday, November 10, 2012

Christmas Card Stack - Snowman

 I had another great class today!  I started with the snowman image which included non traditional colors.  On the left, I chose an olive card which I found in the band of his hat.  I spattered it with Radiant Rain in Green Pearl.  I cut a brown snowbank with my CM wavy cutter. The star was cut with a Sizzix die and I printed greeting in brown which was punched with the SU Word Window punch. The star has been adhered with 3D foam tape.
On the right I chose a brown card which matched the hat. I spattered the card stock with Pure Gold acrylic paint.  I cut the snowbank from gold metallic card stock.  The star has been cut from the same card stock and mounted with 3D foam tape.  I printed the greeting in dark brown onto the same paper as the card and punched it with the SU Word Window.

Wednesday, September 19, 2012

Card - Challenge - Washi Tape


I made these cards for a card challenge on my internet group. The challenge is to use Washi Tape.  I didn't have some in my stash so I searched the internet and found this Washi Tape Tutorial.  I made tape with double sided tape and tissue paper. I used non stick craft sheet which worked really well!

I applied my tape to black card stock in a variety of directions, shapes and sizes. It needed something to unify the pieces so I sprayed the collage with Maya Mist Snowy White which provided just what I wanted.  I cut the collage pieces with the TH Ornamental die.  I selected 2 cards which worked with the colors on the collage. I applied a silver card stock strip behind the die then added a star in the same card stock in the top left hand corner.  I added greetings in the bottom right hand corner which were applied to a SU Modern Label punchie then the accent was applied to the card front with 3D Foam Tape.  The left one is Thank which was cut with the Cricut.  Right is color printed greeting cut with the SU Word Window punch.

Tuesday, July 24, 2012

Card - Challenge - Non Traditional Colors

I made this card for Holly Jolly's weekly challenge which is non-traditional colors.
I used cut offs from this card which was my blog Christmas Card for July - Angels.  I made the tree with the scraps from the angel's dress.  I mounted the 2 small triangles of this great Designer Paper from Webster Pages onto dark brown card stock and trimmed leaving a border all the way around.  I added a very small triangle at the bottom for a trunk. I needed a background and I decided to emphasize the star theme so I selected a star background but not a traditional Christmas one.  I chose gold card stock and embossed it with the Cuttlebug star embossing folder. I mounted that to my ivory card. I die cut a star from the ivory card stock with Sizzix die and held it in place with a gold glitter star brad. (recent purchase at Michaels). I added a SU! Tab punch in the dark brown folded in half over the gold layer on the right hand side.  I stamped my greeting in Chocolate Chip on the same ivory card stock and punched it with the SU Word Window punch. I mounted it with 3D foam across the tab punchie.