Showing posts with label custom order. Show all posts

Sunday, March 14, 2021

St. Pats Birthday Card

My friend requested a St. Patrick's Birthday card for her aunt again this year. You can check the ones I have made in past year!

I found a vintage St. Patrick's image of this lovely lass with a gorgeous green dress and a fan in hand.

I added the sentiment in the top left hand corner and printed it in color.

It was trimmed leaving a white border then adhered to a layer of green with 4 tiny lavender brads in each corner.

This was mounted onto a layer of lavender card stock then onto a white card base. I ripped the right hand side of this layer to be highlighted against the white. 

This lady is celebrating her 90th birthday.

Tuesday, October 1, 2019

90th Birthday Invites

There's a guy turning 90 this month and his family wants to celebrate.

I was asked to design an invitation which included the family tartan.  His wife lent me a scrap from the making of his kilt.  I scanned it then repeated it enough to get a sense of the overall pattern.  I then placed several onto a 4x6 graphic and had them printed onto photo paper. 

On the sample on the left I chose a blue green linen textured card in the A2 size oriented in the tall portrait direction with the fold on the left.

I added a length of gold metallic ribbon and a length of red grosgrain ribbon on the left hand side.  I then trimmed the ends at an angle. I layered the tartan piece which measures 1.25x 4 inches on top and aligned along the top of the card.  These are all held in place with a gold glitter star brad.

The large birthday layer was printed on white card stock in navy and red.  It was trimmed and tucked under the tartan layer.

Mostly similar elements arranged differently.  The second sample was a wide or landscape orientation with the fold at the top.

Same blue green linen card.

I chose to use a metallic gold card stock which was more subtle.  It was cut to 1.25 X 6.00 inches and adhered one inch from the bottom of the card. The ends were trimmed once adhered.

The red grosgrain ribbon was aligned along the tartan piece and the ends taped to the back.  It was then aligned along the left hand side of the card.  It was adhered with double sided tape.  The glitter star brad was placed on the ribbon about the middle of the gold strip.  It anchors these layers to the card front.

The 90 layer was color printed on white card stock in navy and red.  It was trimmed to 2.75 square. It was adhered to a navy layer cut to 3" square.  This accent was then adhered to the card front aligned next to the tartan with 3D foam tape.

The inside insert provides all the necessary details.  He chose option #2 and I delivered these this evening.

Wednesday, June 12, 2019

HB Cousin

Another card with a custom greeting.

I chose a warm green card base in the portrait orientation in the A2 size.

I printed the greeting layer in ivory in warm green and warm pink.  It was trimmed to leave a small border and adhered to the card front.  It also includes the stem and leaf for the flower.

I used designer paper from K&C Company - K Classic - McKenna 12x12 pad in green, pink and mustard yellow.   I punched them in these 3 sizes - 1.5, 1.25 and 1.0 inches.  I corner punched them on the opposite corners.  I aligned the squares on one of the pointer corners.   These layers squares were adhered to the greeting layer with 3D foam tape.

A quarter sheet white blank insert was glued to the inside of the card.

Doggie Birthday Cards

I was asked to make some birthday cards for her granddaughters with a card she received for her birthday.

I managed to get two 5x7 cards made because it was a trifold card.

This is the full card front.  I had to cut it down a bit on the length.

I adhered it on a pink card base.

I then printed a greeting on a piece of the same pink card in Rose Red.  I trimmed the piece to .5 inch by 3 inches.  I then used a corner rounder on the top left and right corners. It was adhered to the card front aligned along the stitched line with 3D foam tape.

I placed a blank white sheet insert.


I trimmed the cut out layer of the card to just under 5 inches wide.

I chose a warm white card base to coordinate with the gate in the image.

For the greeting,  I measured to determine where I could place it then color printed it onto the card front when I printed the credits on the back.

The doggie layer was adhered to the card front with 3D foam tape aligned to leave a small border on the bottom.

I placed a blank white sheet insert.


Monday, June 3, 2019

90th Birthday Invites - Samples

I was asked by a friend to make custom invitations for her 90th birthday celebrations.

I put together two samples and met with her on today to review the options and finalize the details for the insert.

This sample features designer paper K&C Company - Classic K - McKenna.  It is a pad of coordinating patterns in pink, green and ivory in 12x12 size.

I cut a strip of the striped paper to 1.5 inches by 5.5 inches wide.  I wrapped a piece of ivory & gold organza ribbon across it and taped the ends to the back.  This was then adhered to the card front.

The accent is a pink layer cut from another sheet in the collection to 2.5 inches square.  The text layer was printed in Rose Red & True Thyme on a piece of warm green card stock which was cut to 2.00 inches square. If features a frame from Pixabay.  The accent was adhered to the card front with 3D foam tape.

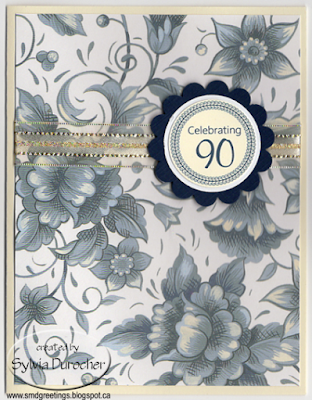
This sample features designer paper by Frances Meyer - Suzanne Nicoll - blue floral.

It features dusty blue flowers with ivory highlights.

I chose an ivory card base with the same ivory and gold organza ribbon. 

The accent is a scallop circle punched with the Stampin Up punch in navy blue linen card stock.  A 1 3/8 inch circle of white card stock then the text layer in ivory.  The circle text features a frame and the text in Night of Navy.

I cut the designer paper to 4.00 x 5.25 inches and wrapped the ribbon across at 1.5 inches from the top.  The ends were taped to the back.  This layer was adhered to the card front.

The assembled accent was adhered to the card front over the ribbon with 3D foam tape.

Tuesday, April 9, 2019

Custom HB Card - Hexagons

I made this card for a friend you requested a special birthday card for a son who is celebrating the big "50" this year.

I chose a taupe, grey and black elegant striped designer paper.  I added it to a large taupe card base in the half sheet size (8.5x5.5"). 

I wrapped a length of silk ribbon along the right hand edge and taped the ends to the back. I added a short length and tied it onto the other. The layer was then adhered to the card front.

I cut 4 hexagons in black and 1 in red which I arranged onto the card front. They were adhered with 3D foam tape.

I printed the greetings on taupe card stock and cut them with the smaller die. The dies are Spellbinder Nestabilities - Hexagons. These were adhere to the larger hexagons with double sided tape.

Wednesday, March 13, 2019

Cards - Special Granddaugther Christmas cards

A friend asked me to make special cards for her granddaughters from a couple of the Christmas cards she received last year.

As they were large cards to start with I chose the half sheet size card size at 5.5 x 8.5 inches.

Doggie Reindeer

I trimmed the card front. I then chose a deep espresso card base to coordinate with the large reindeer antlers which I scored at half of the full letter sized card stock and folded.

I placed holes in the recycled card to the left and right of the central image with the Stampin Up Slot punch.  I ran a red cotton ribbon through the doggie card front through slots then across the inside of the card and knotted it along the edge of the right hand edge of the image. 

I created a special greeting which was printed in green on white card stock.  I created the banner with the Stampin Up Banner Triple punch by layering the greeting onto a red card stock layer leaving a small border.   The greeting is adhered to the card front with 3D foam tape.

Doggie Elf

I trimmed the card front a bit to have it fit on a half sheet card.  You can see the iridescent glitter in the top left corner so I wanted to work with that. 

I chose a kelly green card which I scored at the half to give me a 5.5 x 8.5 inch card. 

I found some wide ribbon in my collection with an iridescent strip which matched the recycled card front. I cut 5 pieces of ribbon and flagged the bottom ends.  I placed double sided tape onto the card and then placed the ribbon at different lengths across the card as shown. 

I adhered the doggie card aligned the card top with 3D foam tape.  I printed the special greeting onto white card stock and created the same banner greeting as before with the banner punch.  It is attached to the card front with 4 tiny red brads in each corner.

I included white inserts with a special sentiment.

Tuesday, May 22, 2018

Custom HB Card

I created this card at the request of a friend.  Recently when she was with her 2 sisters they discovered that the letters on the key 5 on a cell phone matched their initials - J K L. 

She asked for a card with the key pad with and the 5 key highlighted. 

I printed the phone onto card stock.  I printed the greeting and layered it with pink card stock.  I trimmed the top corners to match the round corners on the phone`s screen. 

I printed the 5 key again and highlighted it with pink ink and chalk and mounted it over the phone with 3D foam tape.

I found some graphic designer paper with chevrons and mounted it onto teal card base.

I added 5 teal sequins on the left hand side held in place with bling Zots.

I hope she likes it.

Friday, January 26, 2018

Tea Cards - Custom Order

This tea cup appeared in my 2018 Nice Cuppa 4x6 photo calendar.  This photo of the tea cup with the matching bowl was in the first round of photos taken for the calendar.

The friend who owns this china requested a set of cards made with the image.  I chose a bright warm pink card which worked well with the flower in the bowl.  I used a very pale green card stock  with a Pink Passion greeting.   I printed the greeting then ripped the top and bottom edges.

The 3.75 x 3.75 inch photo and the greeting were adhered to the card front with double sided tape.

The greeting and the insert was customized for each recipient.  I made 7 of these.


The same warm bright pink card stock was used for these. 

I used a 3.5 x 5 inch photo for these where I trimmed a .25 inch from the top of the photo.  It was adhered to the card front with double sided tape leaving a generous border.

I made 3 of these - one with a customized sentiment and 2 with a blank insert which will allow it to be used for any occasion.

She was very happy with the set of cards.

Sharing with Pink Saturday.

Friday, December 8, 2017

Tea Cup Set Card

I had a request from a friend for a card made with this tea cup set.  Here's the first card I made with this photo.

I trimmed the photo to 3.5x3.5 and added a light pink layer.  I printed the greeting on the same card stock in dark green ink.

The square element was adhered to the card front.  I ripped the top and bottom edge of the greeting and adhered that below the photo.

With the number of colors in the tea set the card colors I can use are varied.

She bought a few Christmas cards as well.

Wednesday, November 1, 2017

Photo Calendar - Landscapes and Flowers

I received an order for a 2018 Photo Calendar - Ready2Give Half Sheet with flower and landscape photos.

With a sale at the end of the week I will make a few more. 


I created the calendar and then printed it 2 sheets at a time on a letter sized piece of white card stock.  Each calendar page is 5.5 W x 8.5 T inches with the calendar on the bottom with a 3.5 x 5.00 inch photo at the top. 

I punched a hole at the top of the calendar with my Crod-a-dile which easily allowed me to do all 12 sheets at one time to ensure they were all aligned.

This allows hanging on a nail, straight pin or push pin.  A binder clip could also be added to hang it with a magnet.

I selected photos from my collection to fit the bill.  The front photo is a country lane in winter.  The flowers include dahlia, wild geranium, AB rose, sunflower, poppy, and poinsettia. The landscapes are a barn in winter, Rocky Mountains in Canmore, field of hay bales, rows of canola, and dock at Pigeon Lake.

Friday, December 23, 2016

Nativity - Special Card Order

This is a large card which is a half sheet.

I started with the gold starry night vellum which I purchased in 8.5x11 package. I mounted it onto a navy card.  I added 2 gold star brads in the top corners.  I placed adhesive where the stable and snowbanks will be placed.

I chose my new nativity graphic.  I added a gradient background in the stable. I made the stable blue to coordinate with the card color.  I sized and printed it only white card stock and fussy cut around the edge.  It was then adhered to the vellum.

I ripped several layers of white for snowbanks in the front.  I applied Bashful Blue chalk to a couple of them and layered them getting shorter as I moved into the foreground.

I cut a star from sticker paper adhered to white card stock.  I used the Sizzix Star and Starburst die.  The star was adhered above the stable wit 3D foam tape.

I printed the greeting on white card stock and ripped the edges to repeat the edges on the snowbanks.

Wednesday, April 6, 2016

Business Card & Promo Graphic

I designed a business card and a promo graphic for a client.  She wanted a vintage feel using the colors white and aqua. I found the ironwork grill image on Vintage Feed Sacks graphics site (see note) which I thought worked pretty well.  It was just black and white graphic so I colored it the aqua color and gave it a clear background.  I then created a white background onto which I placed the ironwork graphic and the relevant text.  She was wanting a larger graphic to put on a t-shirt or other promotional material.  I followed the same process for this one. She added her tag line on this one which I think is very appropriate.  They were delivered in digital format so she can get the business cards printed through the printer of her choice as well as use the files on social media. You can find her on Facebook Alberta Vintage.

You can check out my Digital Products page for further details.

Note: I was going to leave a link for the graphic but it seems be redirecting to a different site.  I`m not sure if that is temporary or permanent.  I will keep an eye on it and post a link if it clears up.

Sunday, October 14, 2012

Invites - 60 Wed Anniversary

I was asked by a couple I know to design and make the invitations for their 60th Wedding Anniversary.  I made 4 samples and this is the one they chose. Here's a link to the others.
I started with a soft lavender card.  I embossed the white layer with the Cuttlebug Rebecca folder.  I then trimmed it all around to leave just a small border of card color.  I cut the oval accent with my  Spellbinder nestabilities dies.  The oval accent works really well in the centre of the embossed layer. The scalloped oval for the lavendar and smooth oval for the white layer.  I color printed the central oval and then cut it.  These were glued together and then mounted in the center of the embossing with 3D foam tape. 
60 years of marriage is a great testament their love, commitment and faith.  Congratulations!

Monday, December 27, 2010

Christmas Cards - Custom Designed

I designed these cards for a client. The music sheet ones are in 4 different colors (green, sepia, mauve, & brown) with 4 Christmas songs (O Little Town of Bethlehem, Away in the Manger, Joy to the World, & Silent Night). The leaves are printed then a red hydrangea silk flower was added with 2 graduated sized gold sequins on a tiny gold brad. The insert was customized to their specifications.

The Wisemen cards were also designed with a blue and taupe backgrounds and a custom insert.


I'm really happy with the way these turned out.