Showing posts with label DIY. Show all posts

Wednesday, April 22, 2026

DIY Project - Quilt Design Wall / Photography Backdrop

I finally got my Quilt Design Wall put up so I could hang my second quilt this year and photography it.

This is a multi purpose set up because space is at a premium in this place.

1. I can hang quilts for my final photos.

2. I can use this as a photography backdrop - Hanging fabric/paper from the cafe hooks at the top lets me set up my camera on the tripod and go back 7ft which gives me a lot of flexibility. Always there to use at a moment's notice.

3. I can hang my flannel design wall when I am making a quilt. The design wall is white 100% cotton flannel and the quilt fabric pieces stick to it and make moving the pieces around really easy. The size will accommodate any quilt I will make.  It measures 72" Wide x 80" Tall.

I was lucky to get the right hand hanger and the middle one into 2x4 with the left one in an anchor.  That will support anything I will use this for.

The tools came in handy. Drill for the anchor install, level, screwdrivers, hammer and nails to assess whether I was in only dry wall or I had hit a stud. I did use my stud finder as well. The square to make sure I was even to the closet wall.

The dowel at 3/8" in diameter and 72 inches long was not straight so you can see in the top right hand photo that I had to tie the dowel to the hook support so it would not pop out of the hooks.  The dowel and cafe hooks will stay there all the time as they are placed above the trim of the closet doors. 

The metal rods which acts as weights for the design wall will stay in all the time.  I fold the wall in half height wise then roll it onto the rods.

To store the wall I made a custom bag to hold it.  This way it stays clean and some what wrinkle free.

I then added a hook to the shelf in the craft room closet where the bag can hang. 

Done and dusted.

Super happy with the final result.


Upgrade: 20260427 - I found out that I could put a larger dowel if I pulled it through the sides instead of passing it by the mouth of the hooks so I headed to RONA and purchased a 1/2" x 72" dowel.  I sanded it and gave it a coat of Tung Oil. I hung it up the next morning.  Much better.


Saturday, February 21, 2026

Sylvia' Simple Shots

One of my sister's cooked turkey for supper and I was invited to join in. 

I brought buns from COBS which was a hit. 

I had the company of my sister, brother and a couple of cousins. We caught up on news and talked about our lives and current projects.

The weather was good and the roads excellent.  I came early in the afternoon so I could head home after supper.

It was dark but that was okay.

The next day holiday Monday - Family the snow came down and the wind blew!

The snow was drifted right up the the patio door.

And the temperatures were nearing -20C.

It snowed again all day Tuesday which meant I cancelled my trip into the city to visit the bank.

The snow banks from December had disappeared and now have reappeared.


While the snow fell, I started reading the trilogy of the Fionavar Tapestry.  I read it 30 years ago and enjoying it again.

The map in the book is quite small so I searched the web for a better one.

I found this one which is great.  

I like to find myself on the map as I read the book. What is far north?  How close is the Summer Tree to the the castle?

I can refer to it regularly as the chapters move along.


I have been eating my Chia Seed Bites with Krema yogurt.

I bought the yogurt for Christmas and it was sitting in the fridge unopened.

It needs to be eaten right away so why not!

It is delicious.


It's been cold all week!

I tend to hibernate when it's this cold.

No walking outside, not much sunshine.

It is really the end of Feb so spring is coming.

We spring forward to Daylight Saving Time in a couple of weeks. March 8th


I had an appointment for blood work this week.

I had a call from my Dr. the next day.  A phone appointment has been booked for the news.

My cholesterol was elevated last year and I expect the that it will be again. What does one do?

Wait and see.


Getting the drill out and using it is getting easier.  My Dad's cordless - Thanks.

I have a power bar in the bedroom which powers the clock and the sparkly light and timer.

I am not sure how this did not become obvious till this week but I am still processing the move.

The bar had holes for it to be mounted to a wall. So I found 2 drywall screws, the drill and a screw driver and in 10 minutes job DONE!

I now have an extra outlet behind the wooden shelving unit I can use for something else.


I enjoyed turkey left overs this week as well.

My sister sent take away containers of turkey, gravy, rice stuffing, cranberry sauce, mashed potatoes and Caesar salad home with all of us.

It was delicious the second time as well.


Friday, February 13, 2026

DIY Project - Tape Dispenser - Upgrade


After a visit with my sister and brother in law recently, I came home with a couple of used hacksaw blades which I hoped would be an upgrade to the the tape dispenser.  

I scrubbed the hacksaw blade to remove rust and stuff so it would be smooth for the tape to stick to it.

I removed the coping saw blade & wood support and went searching in the wood bits for a piece of wood wide enough to support the hacksaw blade.  I did find one.

I put the coping saw blade back in the saw to cut the piece of wood and used eye hooks to keep the hack saw blade in place on the piece of wood because they were tiny enough. 

Then, I decided to use nails to attached the wood to the frame as the screws I had seemed to big for the small piece of wood.  It was fortunate that the eye screws were further out and were not in the way for the nails.

I brought the support and blade up higher on the support from the last one. Now the tapes sticks to the blade and rips well. 

Thanks for the help!

Saturday, January 31, 2026

DIY - Tape Dispenser - Multiroll

I created myself a multi roll tape dispenser with some wood and repurposed plastic parts.

The wood in pine boards. The base is 3 3/8 inches deep, 3/4 inches tall and 9 1/4 inches wide.

The 2 upright sides are 4' tall, 2 3/8 in deep, and 3/4 inches wide.

The ends are attached to the base with screws from the bottom.

I nailed a thin piece of pine wood across the front to which I wired the hack saw blade which serves as the cutter.

I finished the wood with a rub of Tung Oil.

The holder measured 9.25" W x 4" T x 2.5 inches D.

The plastic tube that the rolls slide onto and plastic ends were taken from a Scotch Washi Tape dispenser.  That dispenser only accommodated washi tape sized rolls and I wanted all my tape in the same place.

I used my Dremel tool with a cutter blade to cut the tube holders from the dispenser.

I used a drill to make holes in the plastic ends to attach them to the uprights at either end. I used screws and washers to protect the holes.  

The length of the tube determined the width of the holder because it needed to fit in the circles on either end. 

Saturday, December 20, 2025

DIY Project - Front Hall Art Shelf

 
I got out the tools - square, measuring tape, stud finder, level, drill, pencil, and the shelf.

I had a hard time finding a place on the right hand side above the light switch without electric.  Frustrating. I had some late breakfast and then tackled it again. I decided to align the right hand side of the shelf along the same edge on the mirror. I put it high enough for it to clear the closet doors. 

I used the blue anchors in my kit with a 1/4 inch drill bit.  I am getting better with the cordless drill which I inherited from my Dad when they moved to the apartment in 2015.  I have not used it much because I had a corded drill he gave me when I left home in the mid 1970s which works great too.

I did have to expand the holes a bit with the drill as they did not align as well as they should have.  I guess holding the shelf above my head and trying to find the holes with the pencil did not do a perfect job. Next time I will have to get a eye level.  But as you can see the shelf is level! Yeah. 

I got a chance to clear the DIY debris and the dust that had accumulated behind the Trofasts.  I washed the lace cover and then I could start looking for art for the shelf.

Wednesday, December 10, 2025

DIY Project - Create wood shelf

I had to replace the plastic shelf I put on top of the die cutting station because it was just not tall enough despite my best attempts to jimmy rig a solution.

I had the 2 slat shelves which I cut the legs for the kitchen so I decided I would use those.  I could add wood legs and ensure that the bottom shelf was tall enough for the red baskets.

I had to buy a piece of lumber to create the four legs.  I cut them 15 inches tall with the bottom shelf being 8 inches from the bottom then the other aligned with the top shelf.

The blue clamps are a life saver.  I clamped the lumber to the stool then I used my hand saw to cut.

I marked where I wanted the screw and drilled a pilot hole to ensure I would not crack the wood.

I used the smallest screws I had but they could have been even smaller.

It stood level but after putting it up on the die cut station it was clear it needed reinforcement.

I added a brace across the bottom shelf which helped quite a bit. It does restrict how deep my baskets can go toward the back. Happy!

Tuesday, December 9, 2025

DIY Project - Set Up Wall Christmas Tree

I knew that I would need a hook for the wall Christmas Tree.  At the downtown place it hung from the photo shelf.  Hence, I thought I would wait for the photo shelves to be put up before I hung my tree.  I was going to miss it.  My sister encouraged me to do what needed to be done to get the tree up. 

So the tools came out and I set out to see if I could find a stud in the wall and avoid electrical. 

I set up the hook below where the photo/art shelf  will go, I think. 

I found this hanger at the ReUse Center a while back because I was looking for option for hanging the tree since I moved.

I used the outlet below the table as a guide. I put in a blue drywall anchor from my kit and Dad's old drill and did it. 

Super happy.  It is a bit low but I can make it work. A decorate photo will be coming.

Saturday, November 29, 2025

Sylvia's Simple Shots

There's more snow this week. 

You can see the bike track in the snow again this week.

It is colder this week as well with temps in the -20C.

Winter has arrived.

That will be good for the coming craft sales because for some folks until it snows they just are not in the Christmas shopping mood.


This was done early in the week and then the weather turned. They steamed the kitchen stack on Monday.  

I had under the kitchen sink clear out in plenty of time. They did have to go and get parts as the PTrap was glued and could not be removed.

As you can see the truck was parked behind the big fence and they were climbing over with ladders.

The hoses came through the patio doors.  

I knew one of the guys that came because the same company did work in the building downtown.

The process went very well. 

DIY project - I took the Dremel and shortened the legs on the plastic shelf under the sink.

It did not fill under the PTrap after it was replaced.

It was about an 1/8 of an inch but it would not clear.  

Good to by handy with a tool.
With the timing I finished a couple of books this week.

The Favored Child by Phillipa Gregory.  It is book 2 in a trilogy and I have not read the first.

A couple of children are being raised together in the Dower House. They are Richard and Julia who are cousins but have lost parents and Julia's mother is raising both children alone.

There a mystical power at play, gender roles that confuse things, deep secrets which will change everything at the end of the story. How things change as children mature. Julie is connected to the land and Richard is not but that makes it difficult to be squire of the Lacey estate. 

Things get ugly and when the secret is revealed the world comes to make more sense.  Big book and a good read.
A Shelter of Hope by Tracie Petersen is the story of Simone Dumas who lives in the Wyoming Territory in 1883.  Her father is heavy handed shall we say and her mother has long been gone. Simone tends house far from town so is mostly alone.

After her father has acted very cruelly, Simone summons the courage to leave with very little.  She finds her way to a place she will not be recognized, changes her name and find employment.

In time the past comes calling.   The police are involved, her true identity revealed, a man steps up to protect her, people die, and her future is in peril.

I always like a strong female main character and Simone lives up to the part.

Great book!


The new computer arrived this week which was custom built as I could not find what I needed on store shelves.

Happy with the speed, the disk space, and the overall performance.

I just love the LED lights on the inside.  That is so cool.

The printer/scanner was set up EPSON 2980 Super Tank.   Windows 11 with its apps has been easier than I thought to use.
I managed to get software in a permanent license.  Wonderful.

It was the reception for the Fire and Ice Show at the Spruce Grove Art Gallery hosted by the Allied Arts Council.

My aunt and I attended the reception for the art show and the opening of the Christmas Store as well.

Check out the beautiful cookies made by Cindy I believe. Almost too pretty to eat. Gorgeous work.

I bought another small wood star from Val E at the Christmas Store.

Wonderful evening.


It's that time of year again.  Time to make Caramel Popcorn for family and friends.  I was up early because my friend was coming for lunch.

I made a lot less this year as it is not our big family get together this year.  I will deliver these as I see family of the next few weeks.


When my friend arrived we headed to Tims and bought lunch and brought it back to my house to eat and have a cup of tea.

It had been months since I saw her and my house was in a more organized state than when she visited in late August.

We decided to head out and hit a craft sale before heading to visit the Spruce Grove Art Gallery and Christmas Store at Heavy Metal Place in Spruce Grove.

After our outing we came back for another cup of tea and she headed out a little later to be home before dark.


My friend and I dropped by this sale in the PERC building in Stony Plain.

There is nothing I need, my Christmas list is very short, so I came to realize that I don't need to attend craft sales.  

I had been feeling like I was missing something special but my circumstances have changed a lot and I only need to attend if there is a reason to.

Interesting how time marches on and I am not the person I was. 

Learned a valuable lesson.

Wednesday, May 14, 2025

Chair Repairs - Broken Spring

After pushing my recliner back last week I heard a funny sound.

I did not find the broken spring till the next morning.

What shall I do about this?  Not a hassle I need with everything going on.

I called a local store which sells this type of recliner and asked for their service department.  I was asked to email a photo and they would get back to me.

The lady referred me to a link of Amazon but it was not exactly the same as what was broken.

I don't shop on line so I started sourcing a spring locally.  

I found this set of springs at Rona.  The length is about right but it is bigger in diameter. Should be 1/2 inch instead of 3/4 inch.  Also the hooks on each end don't quite match in placement.

For less than $10 I was willing to see what I could do with these. 

You can see wire at the bottom on the photo which will feature prominently in the solution.  I tried just hooking the ends to the 2 points in question but the closer one would not stay on the peg. I tried several things that did not work.

I needed something stronger than my first attempts.

The wire I am sure I picked up on a morning walk a couple of years ago.  Never know when something will come in handy.

By creating the loop for the pin on the chair I was able to address the fact that the hook on the one end was in the wrong direction.

As well, I could twisted the loop once it was on the pin to tighten it which kept in place.

This works well.

You can see that with the wider diameter it curves a little bit but does not obstruct any vital functionality.  Works for now.


Saturday, January 27, 2024

Sylvia's Simple Shots

It took about 5 hours to find the box, make the dividers, roll all the less than a full skeins onto bobbins. A full evening of busy hands. You can see my pin cushion, scissors and sharpener fit in there as well. 

Now that I have decided that I will continue with stitch work it was apparent I needed to organize my stash of embroidery thread.

I used my Stampin Up Tab punch to create my little bobbins out of 110lb white card stock. Added 2 slits on the bottom as the store bought ones. I punched 75 of them - 3 full sheets.


These are my DIY Embroidery Thread Bobbins.

They measure 2 inches tall and 2 3/8 inches wide.

I placed all the full skeins in a ziplock bag. The spools of embroidery thread went into a smaller bag.  The skiens of "different" thread into another ziplock bag.

There is room in the large bag for the small embroidery hoop as well.

I am very happy with my progress.

There are very many ways to store embroidery thread and I did view a few videos. The small plastic box is from the dollar store.  It is organized by color because that is how I will use my thread.  I am not concerned with the number. Much of what I have is acquired second hand when sometimes the labels are missing.  That is okay with me.

The Bookseller - First Hugo Marston novel by Mark Pryor was a great book.

Hugo is former FBI agent is working as head of security at the US embassy in Paris.  His friend Max the bookseller is kidnapped at gunpoint. 

The police don't seem to interested in getting to the bottom of his disappearance.  Hugo enlists a beautiful and mysterious journalist, a semiretired CIA agent and reluctant police detective to help him negotiate politcal intrugue, police corruption, an escalation drug war, and the ghosts of Nazi collaboration that haunt some of Paris's most prominent citizens.

I love Paris as a setting.  The plot took a lot of twists and turns before the truth came to light.

I will have to keep an eye out for the other 8 in the series.


I found a sparkly at the ReUse center this week. There were a few crystal ornaments which I brought home as well. It was a good week for clear glass and plastic ornaments.

I woke up the next day after I hung it in the window and there were the rainbows on the wall and the floor as well.

I will have to find a better place and way to hang it but it is a winner.


I brought these home as well from the ReUse Center but they were stuck to scrapbooking tags with some sort of glue.  It took quite alot to get them separated.  

These are very small buttons and I think will work with future embroidery projects.

They are pastel colors but 12 is super.


I got some supplies to keep my organized in the coming years.

The page protectors are for half sheets which I use in binders to manage my sewing projects.  My niece was kind enough to order them for me.  I met the delivery guy at the door and he had 7 packages for this building alone.  I wondered how the Amazon boxes arrived at people's doors and now I know.

The small sheets are for my memo binder that lives in my every day bag which I take with me everywhere. I found these at Staples.

I visited a small home based business this week which works at ensuring that unused fabric and sewing notions are given an opportunity to see life with a new owner.

I found this fat quarter of purple fabric, 3 spools of cotton thread, a bit of lace for future embroidery projects and I could not resist the Bernina tape measure.

Nice to support a local entrepeneur and get some goodies at the same time.


Saturday, February 4, 2023

Sewing Project - ReUsable Shopping Bag

I've had several discussions with my sister about making reusable shopping bags now that single use plastic ones are not being handed out.  I have 5-7 grocery bags that I have used for years.  Those are the large boxed corner ones.  The original ones I bought are very good quality has have had to be sewn back together several times.

The more recent reusable bags are not made of such durable fabric and some of those have had significant reinforcements to keep them in service.

I decided to search the web for some DIY reusable shopping bags.  An organization she is volunteering with is considering give out reusable bags instead of the blue recycle bags they have used in the past.  With that goal in mind I thought I would give my hand to a bag and see how it went.  

I had purchased a really good quality microfiber sheet - double a while back which did not get used the way I planned so it was still sitting in the "to be used" fabric pile.  I thought that would work well for this project. 

There are many video tutorials on you tube so I check out quite a few until I found one that made sense to me.

This is the video I chose to follow: DIY Eco Shopping Bag is based on a plastic shopping bag. As you can see I used a Walmart bag as a very basic pattern.

We were hoping to be able to add a pouch to store the bag when not in use.  This bag as too substantial to act like a rip stop nylon one. 

I added the band on the front where I can fold the top up and tuck it in then fold the handles then another fold and tuck this layer on top of the previous one.  Pretty bulky to really store.  It is a gorgeous bag and will hold a lot and last a long time. I was grateful to have this thin striped cotton to lessen the weight.

I think the next ones I make with be a single layer with bias tape on the handles.

Monday, May 3, 2021

Sylvia's Simple Shots

It was a nice trip to the wetlands at 6:30 am to ensure contact with the least number of people and the most number with wildlife.

I found many birds.  The wetlands are in desperate need of water/rain.  There many areas with no water and therefore no habitat for water fowl.  

This Northern Shoveler male was showing off his colors.  There were several pairs doing some sort of mating behavior.  It is a large duck and unfortunately at this angle you can not appreciate his bill.

Love this shot with an unusual presentation.


This is another upgrade to the photo studio.  I generally scan my greeting cards for this blog but I had a discussion with my sister about needing a scanner with the new computer. 

That would mean photographing all the cards and it would be nice to have a consistent set up.  

I decided that I would make a large piece of background paper.  This one is 24 inches wide which is the full width.  It measures 36 long so it more than covers the back and floor of the studio.

Love the mottled color scheme which will just fade to out of focus.

Perfect.  Easy set up is a must.

I also wanted a prop.  I tried several objects from around the house and a white vase about 8 inches tall worked really well but it was glossy and the lights showed up in the surface.  I thought I maybe could purchase something but with the way things are with COVID I am not going out except for essentials.  

Could I alter the surface of the vase?  After a bit of research I found this post.  It uses acrylic paint and baking soda. I cut down the proportions for a bit of paint. 

Using an old craft paint brush in case it ruined it and took some craft acrylic paint in Warm White and mixed it up.  It went on quite thick which I was okay with.  You can see the glossy and matte contrast in the second picture. 

I let the first coat dry completely then applied a coat of just the acrylic paint.

I am so impressed with this DIY technique. 


Here you can see how I have the background and vase in this card photo.  It creates a context for the card but nothing detracts from the card.

Loving it!


This is a screen capture of a live stream set up by a wildlife photographer in Denmark named Morten Hilmer. Wildlife in the Forest.

It runs 24/7 and is set up on a stream on his property.  It is powered by solar energy.

As you can see there are pheasants, many other birds, foxes, badgers, deer, and many other creatures who come to the stream.

It is a nice pleasant way to spend a few minutes with soothing sound and seeing nature.  It turns to black and white infrared during the night but you can see the animals clearly.  If you are looking for a you tube channel to give you some relaxing time, please check it out.

The challenge at Flickr Macro Mondays this week was nuts. Metal ones or the edible kind.  This shot is of roasted almonds.  You can check out my Flickr photostream (SMDPics) to see the shot I submitted. 

I am sharing with Angie who hosts Mosaic Monday #129 and

Mersad who hosts Through My Lens #287.

Have a great week!

Thursday, September 3, 2020

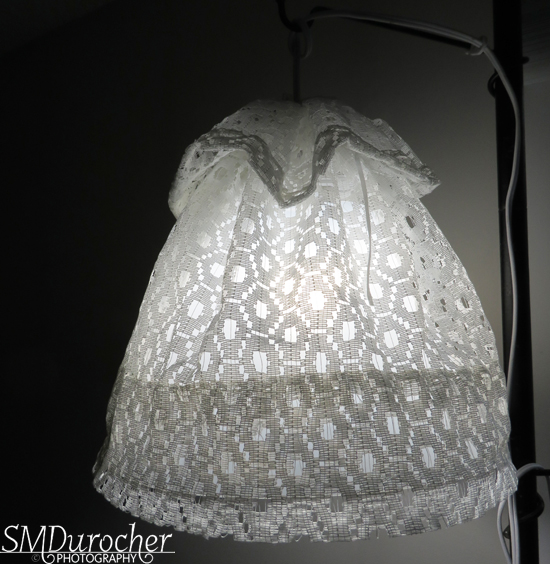
How To - E Collar to Lampshade

I needed a lampshade for the other area of my sewing space.  My sister had given me an Ikea Hemma light cord.  I had added a LED daylight light bulb but it needed a shade. It has a UNO lampshade connection. The one Ikea shade I liked was 18 inches in diameter so was too wide for the hanger I was going to use.  It would accommodate max 14 inches. I headed to the thrift shop to see what I could find.  No lamp shades but a clear plastic dog E Collar that was the right shape and size.  I think I can work with that. 

I needed something to create the lampshade connection.  I decided a clear plastic lid from a food container would work.  I scored the size of hole I needed and cut it out with an exacto knife.  Then I put the 4 slits so I could slip the straps of the collar through and secured them as designed.

I like this because it allowed for the warmth of the bulb to escape through the spaces at the top. 


The hole I had cut was perfect and I could run it along the threads of the light fixture. Very secure. I then screwed the washer piece from the inside of the lampshade and then added my light bulb.  That was working really great!

Now I needed a covering for this structure. When I revamped the other lamp in the space I had leftover lace.  I measured the circumference of the lampshade and sewed the lace to that size.  I added a hem to top edge of the lace as well.   Now it was just a matter of threading a piece of ribbon through the holes in the lace to allow the lace edge to come even with the lampshade's bottom edge.

The shot on right is looking up from under the lampshade.


The light fixture came with clips so I just ran the cord along the hanger then down the pole to the outlet.  It has a switch which is at the height of the desk so very convenient to turn on as needed.