Showing posts with label scrapbook. Show all posts

Wednesday, August 28, 2024

Sketch Book Cover - Paste Paper

I bought this Scrapbook Binder a while ago for under $5.  I was trying out ideas for what would work for me as a sketch book.  After using it for a few months I have decided to move forward and finalizing it.  

It was just cardboard so it needed a cover.  I dug into my stash of paste paper and there was a piece big enough.  I used a large glue stick and put glue on the cardboard and the paper and adhered pieces to the front and back separately and pressed them with books. Once that was dry I glued down the inside flaps and dried those under books.  I then added the dark spine which is also paste paper.  That was a bit tricky to press but I did my best.  Then I cut down a letter sheet of 24lb bond paper to line the inside back and front.  Pressed again.  

Finally, I could put my sketch paper back inside.  I am using 65lb card stock from Micheals which I find too light for card making so it needs to be repurposed. I just it cut down to 10 inches and punch 3 holes in the left end. Works great.  

I still have the original 8x8 scrapbook sleeves which allow me to store paper that does not fit in the 3 hole system.

I have decided not to put any words or images on the front cover.

I am getting ready for Inktober 2024.  I hope to produce more drawings this year.


Paste Paper is kind of matte and a bit rough so I decided it needed sealing.

I dug out the bottle of Modge Podge matte finish I applied a thin coat to the outside.


Wednesday, March 8, 2017

One Thousand Gifts - Between Sessions

There is Between Session work in the One Thousand Gift bible study.

We are asked to continue to write down our gift list.  To always have a place to write handy - a file on the phone, the computer, a note book and or a dry erase board.

Ten more dots to write down gifts in our guide.  I will share a few from this week.


1. Tea with a friend
2. Time to make art
3. A clean house
4. A good visit with a sister

I found these journals at a local craft store and made them available to the participants if they did not already have a journal.


Ann says when we move too fast we no longer collect memories.  How can we collect our memories so we can retell and share our stories with others?  Where do we go back to remind ourselves of our stories?  I find that when I am too busy I forget to take pictures then I have little to remember the experience later.

A few suggestions are:

1. Scrapbooking - digital or paper
2. A digital photo frame with regular updates
3. Keep a guest book and bring it out when company comes.

Do you have ideas you want to share?  Leave me a comment.

Saturday, April 13, 2013

Scrapbook Outlet - Opened this week

There's a new Scrapbook store open in Edmonton.  As you can see the snow continues to fall but I had to check it out.  So after my All Occasion Stack Class I took a short trip over to the store.  The prices are good, the staff are helpful and know their product and now they have retail hours.  It's called Scrapbook Outlet.  
Check them out!

Sunday, January 27, 2013

Scrapbook - Retirement Book of Remembrance

A friend and I created this 12x12 scrapbook album for a couple who retired.  Friends and colleagues sent greetings which were collected into this album. We decided on a black fabric album with a photo on the front.  We selected black, red and white as the color scheme for this book.  Most pages are black except for those set up for co-workers and friends to include their sentiments.   We created borders with Stampin Up! Tasteful Trim Bigz XL, ribbon, Martha Stewart and EK Success border punches.  We prepared about approximately 40 pages onto which letters, emails, and cards were mounted. I think it turned out really well.

Tuesday, July 3, 2012

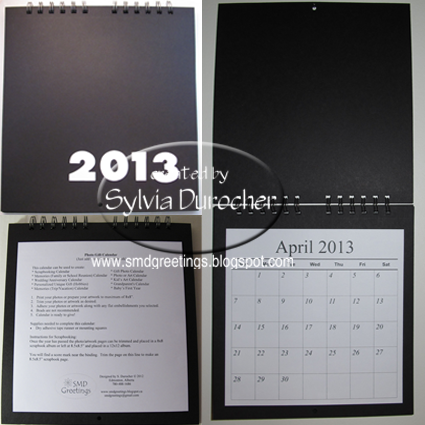
Calendar - 2013 Scrapbooking Photo Gift

I had many mothers come to me last year at a craft sale asking if I had a blank calendar where they could add the pictures of their kids for each month which would make great gifts for the grandparents. Here's the calendar I designed for this year's gift giving season. Keep reading for many reasons for making a personalized calendar as a gift for someone special - maybe even for yourself.  Check my Calendars page for prices.
Top left pic: Front cover of the calendar closed - the numbers on the front page are not glued down so you can place them as you choose.  Bottom left pic: Back of the calendar closed which includes the information included here and credits for the calender design. Right pic: Calendar open hanging on the wall. 

Scrapbooking Photo Gift Wall Calendar
 (Just add your photos or artwork)
 This calendar can be used to create:
* Scrapbooking Calendar                                    
* Gift Photo Calendar       
* Memories (Family/School Reunion) Calendar  
* Photo or Art Calendar
* Wedding/Anniversary Calendar                        
* Kid’s Art Calendar
* Personalized Unique Gift (Hobbies)  
* Grandparent's Calendar (Grand-kids)
* Memories (Trip/Vacation) Calendar    
* Baby’s First Year

1. Print your photos or prepare your artwork to maximum of 8x8”.
2. Trim your photos or artwork as desired.
3. Adhere your photos or artwork along with any flat embellishments you selected.
4. Brads are not recommended.
5. Calendar is ready to give!

Supplies needed to complete this calendar: Dry adhesive tape runner or mounting squares

Instructions for Scrapbooking:

Once the year has passed the photo/artwork pages can be trimmed and placed in a 8x8 scrapbook album or left at 8.5x8.5” and placed in a 12x12 album.

You will find a score mark near the binding.  Trim the page on this line to make an 8.5x8.5” scrapbook page.

Monday, February 20, 2012

Guest Book

I was asked to design a guest book for an upcoming special 10th anniversary event.  She wanted something nicer than one you can purchase at a retail store, one where photos of the anniversary could be placed and one with a place for a photo on the cover.
After a bit of research I decided on a 8x8" scrapbook.  I found a black leather look one. She selected a black and white stripped ribbon which would add a bit of a focal point to the front cover. I diecut a red ribbon slider with a Spellbinder die.  To it, I added a white paper flower and a metal medallion and held it all in place with a tiny black brad. Once it was strung onto the ribbon I just knotted the ribbon onto the album placing the knot to the inside.
Then I went looking for paper for the pages.  I tested the weight of many sheets of paper.  I looked at drawing paper, watercolor paper, and sketch paper.  I needed 10 sheets for the actual signatures and greetings then a few pages in the front for "then and now" photos.  I settled on a pad of white 90lb watercolor paper with 15 pages.  I determined that the sheets should be 8"Tx9.25"W based on the page protectors I had removed from the album. I cut the paper down to 8.5 x 11 so I could put them through my printer.  Then I designed the pages on the computer and printed them in black.  The sheets were then was cut down to the correct size.  I punched the holes in the pages on the left hand side based on the spacer that came with the album. She had asked to have a bit of accent added to the pages.  Based on the red on the front I stamped a small flower on the left hand corner of the pages and added a small swirl on the bottom right hand side in Real Red.  The album has a sleeve at the back for a CD so that photos from the event can be stored for history's sake.  She will find a photo which is just right for the front cover.