Showing posts with label clear embossed vellum. Show all posts

Friday, February 7, 2025

Thank You Cards and Gifts - Renovation

I managed to get my small gifts and thank you cards for folks who were involved with the renovation project at my house that started back in September and finished up a couple of weeks ago.

I am still unpacking and will be for the next few weeks.  

I had some great people working and helping during this stressful time of my life and I wanted to let them know how much I appreciated it.

I was up early this morning in my kitchen and I made some caramel popcorn.  I did not get the opportunity to do that this Christmas as I was living in temporary accommodations.  

I check off the things I needed.

  1. Recipe
  2. Margarine
  3. Nuts
  4. Popcorn
  5. Corn Syrup
  6. Brown Sugar
  7. Stainless Steel sauce pan
  8. Large yellow bowls
  9. Popcorn maker and Ultra21
  10. Measuring Cups
  11. Stirring spoon
  12. Brown Sugar
Where's the brown sugar.  After checking my packing list most of my food Tupperware had not been unpacked.  After unloading 3 boxes I found the brown sugar.  I am good to go.

I made 3 bags of caramel popcorn and 6 cards.

It was great to be back in my kitchen doing what I have done for years at Christmas time.  Well, this year there was a 6 week delay but I enjoyed do it.  I expect the recipients will enjoy the popcorn.


Next the thank you cards. 

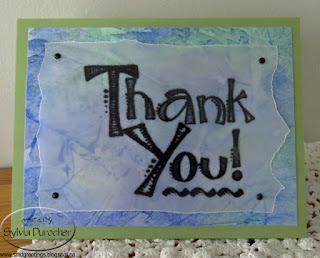
I decided to use watercolor paper I made a long while ago with a clear embossed black greetings.

The greeting is printed on vellum then heat embossed with clear powder.

I downloaded some free graphics from online.

The card stock is coordinated with the piece of watercolor paper then the vellum is trimmed and held in place with brads

The card stock is Pear Pizzaz in the A2 size.

The card stock is Brilliant Blue with the watercolor paper trimmed to leave a small border.

The greeting is cut to 3.5 inches square and aligned along the right hand side.  Held in place with pink mini brads.

The cards are for the tradesmen that worked on the project, the managers that were involved, the staff at the temporary accommodation, and my insurance agent.

The gifts were delivered and were graciously received.

The card stock is Stampin Up Island Indigo.

The greeting is placed along the bottom edge to soften the pink in the watercolor paper.

Held in place with silver tiny brads.
The card stock is SU Soft Suede.

The greeting was just designed with fonts on my computer.

Ripped the top and bottom edge of the vellum.

Held in place with brown mini brads.
The card stock is SU True Thyme.

The greeting was aligned with the bottom edge and held in place with tiny black brads.
The card stock is SU Elegant Eggplant.

The greeting was aligned with the top edge and held in place with deep purple mini brads. 


Friday, January 15, 2021

Christmas Card Challenge - Jan - Handmade Paper

I started on my 2021 Christmas Cards. I was inspired by a photo shoot I am planning.  

I used small sheets of handmade paper in light warm blue color.  I chose a deep warm blue card base.

I color printed a star and a greeting from the Stampin Up Bright and Beautiful set in Baja Breeze.  I heated embossed them with clear powder.  I cut the stars by hand and ripped the top and bottom edges of the greeting.

I used tiny blue brads to attach the star and greeting to the sheet of handmade paper.  I added a small sequin to the star and a snowflake sequin behind the greeting.


I have four cards in the card box.

I have not used handmade paper sheets in forever.  It was nice to get some onto cards.

Tuesday, October 9, 2018

Cardmaking - CH - Class 2

Style 3 -  Square - The designer paper chosen is Stampin Up Autumn Spice.  The card color selected is Old Olive. The designer paper was cut to 4 inches square.  The edges were rubbed with an Early Espresso ink pad. It was adhered to the card in a portrait orientation.

The buttons are from Stampin Up and matches the card color. I tied a length of Early Espresso thread through the button which was knotted and trimmed.

The greeting was color printed in Cajun Craze and clear embossed.  They were cut apart to 1" tall.  I ripped the top and bottom edge.  It is held in place with Zots. Once placed the button was adhered with a large Zot to the left of the words of the greeting.


Style 2 - DSP Split - I chose cool colored designer papers.  The 4 inch x 5.25 inch piece is cut at 3.5 inches then the 2 pieces are taped back together.

I added a piece of white grosgrain ribbon across the join and tape the ends to the back of the layer.  I created an accent of silk flowers starting with a tiny pink handmade paper one on the white brad, then the aqua one, a raspberry colored one, then the final large white one.  A hole was made through the designer paper layer with a push pin, the prongs were pushed through and the prongs spread apart on the back.

The layer was then adhered to the front of a deep burgundy card.

The greeting was printed on white card stock, punched and it was adhered to the card front with 3D foam tape.  The card works without a greeting as well.

Style 1 - Ripped 4 inch - The designer paper is cut to 4 x 5.25 inches.  It is ripped and the pieces are positioned to the edges leaving the orange card showing in between.

I chose a butterfly accent color printed and punched with the Stampin Up Decorative Label.  The colors on this one is Tango Tangerine and So Saffron.  This label is adhere to the card front with 3D foam tape.

I had 7 ladies in the class tonight.  They had a good time.  A couple of the girls had experience which was very nice.

Perfect as all kits are used and I can move onto another sketch for the next class.


Monday, January 22, 2018

Card Club Kit - Set 3 - Card 4

I just loved this designer paper - WeR Memory Keepers - Wildflower - Botanical. I spent way too much time finding the right image for this card but I am happy with this owl available from Pixabay.

I printed the owl in Early Espresso onto vellum and clear embossed it.  I trimmed the vellum to 3.75 x 5.00 inches.  I tacked the vellum in place leaving a small border. 

I cut a slit in the fold and ran the dark brown seam binding through and brought it around to the front.  I placed some double sided tape between the vellum and designer paper where it will be hidden by the ribbon. I knotted the ribbon and trimmed the ends.

I placed the leaf onto the ribbon and used a push pin to create a hole through the card front.  I pushed the tiny brad through a hole in the leaf, and captured it under the brad.  This works to keep the leaf and the vellum secure.

Tuesday, October 17, 2017

R2Go Christmas Stack - Bethlehem

I tweaked this card and put together a stack card kit.

I chose a graphic I downloaded from the internet when I did some research.  I was not able to find it again to find the credits. I will update when I do.

I printed the Bethlehem graphic onto vellum in black and clear embossed it.  It is trimmed to 3.75x5 inches.

I designed the color shaded layer to have the most color behind the central building fading out to white toward the outside edges.  This layer is cut to leave a small border of card base. 

I selected two colors for the card bases in this this kit. Lavender and a medium blue.

The color layer is adhered to the card front.  When the vellum is aligned, use a push pin to create holes in the four corners for the black brads.  I put star brads in the top holes and round ones in the bottom.  

It has been added to the Stack Class Kit page.

Bethlehem Vellum - needs tweaking

This is a card I was going to turn into a kit but it was not quite right. It needed to be tweaked so I put this one together and will work on a kit version.

I love the Bethlehem graphic I downloaded from the internet. I could not find credit today when I went back looking.

I printed it black on vellum and clear embossed it.  On the card stock layer I designed the shadow for the town in a light blue green.  The words are on the card stock layer. I adhered the card stock layer to a turquoise card then I placed some vellum adhesive on the words to the vellum would stick.  I added a tiny black star brad over one of the stars in the sky.

Tweaks:
The words need to be on the vellum layer.
I need a star higher up on the vellum so that the star brad is higher.  The bottom needs a brad as well but I don't know how that will work out yet. The shading needs to be more general so alignment of the vellum does not need to be so specific.

Wednesday, May 17, 2017

R2Go Christmas Kit - Silhouette Holy Family

I started with a navy card.

I added a snowflake designer paper from the Michaels Recollections series - Snowflakes. This piece was trimmed to 4.00 x 5.25 inches to leave a small border and adhered to the card front.

I printed the Silhouette Holy Family image along with the greeting in navy onto a quarter sheet vellum and clear embossed it.  It was then trimmed to 3.75 x  5.00 inches.

It is attached to the card front with a tiny silver star brad in the center of the star and 2 silver circle brads in either bottom corners.  A push pin was used to make the holes to allow the brads to be inserted and the prongs pressed apart on the inside of the card.

Tuesday, May 16, 2017

R2Go Christmas Kit - Star of Wonder Copper

I chose this wonderful designer paper of stars by FlairDesigns - Star Bright in warm colors of chocolate, beige, rust, and caramel.  It is cut to 4.00 x 5.25 inches.

I paired it with a warm brown card.

I printed the greeting in Really Rust on vellum and clear embossed it.  I ripped the top and bottom edges. I added a strip of card stock under the words to provide the contrast.  The vellum and strip are held in place with 2 tiny copper brads.

I die cut a copper star with the Sizzix Star & Starburts die and I adhered it over the vellum greeting strip.

R2Go Christmas Kit - Teal Bethlehem Vellum

I printed the Bethlehem graphic with a teal - turquoise gradient fill onto a quarter sheet of vellum then covered it with clear embossing powder and heated it.
I cut the gold onto white starry night background card stock to 4.00 x 5.25 inches.  It is adhered to the front of a warm medium teal colored card.
The vellum was trimmed to the same size as the starry night background.  I ripped the top left hand corner from the vellum to reveal the gold stars. I added a bit of double sided tape behind the buildings and adhered it to the star layer.  Open the card and use a push pin to create a hole in the center of the yellow star.  Insert the prongs of the gold star brad through and press the prongs apart on the inside of the card.

Sunday, May 14, 2017

Mother's Day Card

I made a card for my Mom.  I generally have followed the commercial approach to Mother's Day and made pink cards but my sister reminded me a while back that Mom's favorite color is blue.  Very true.

I watercolored a flower then mounted it to a turquoise layer.  I added a black frame with a Sharpie marker.  Then mounted it to a true blue card.

I placed the vellum clear embossed greeting across the front.  Made holes with a push pin for the tiny black brads.  I trimmed the greeting to the edge of the card with scissors.

I am spending the day with my Mom.


Wishing all mothers a wonderful day.

Monday, April 24, 2017

Card Making with Seniors - April - Watercolor Flower

These are art from Joanne Fink.  I used watercolor pencils to color them.  They measure 3.75 x 4.50 inches.

I then chose card stock colors which coordinated with them.  The black allows the painted art to be highlighted.  Then a layer of turquoise to coordiate with the bloom and green to match the leaves and stems.

The vellum greeting was printed then clear embossed.  The top and bottom of the greeting was ripped.  It was placed across the art and the ends were taped to the back of the black layer.

This was adhered to the blue then that to the green layer.

Makes a quick and easy card with great layers.

The same card with different layer color, this time pink.  This allows you to change the look of the card for a particular person perhaps.

This one is off to my card exchange buddy.


Thursday, April 13, 2017

Blue Green Mom's Day

I made this card to help out my sister who needs Mother's Day card for sale next weekend.
I started with the watercolor piece.  I simply wet the paper and use my water brush to drop color onto it. I started with the blue then added the green for the leaves.
Once dry, I trimmed the piece.  I wrapped a turquoise string on the left and tied it with a bow.
I added a clear embossed black greeting on vellum across the top and taped the ends to the back.
I chose a piece of turquoise card stock and press embossed it with a Provocraft with leaves in opposite corners. I just embossed the right hand side.  I adhered this layer to the front of a green card. 

Monday, April 10, 2017

Art Card Stack Class

I am holding my Art Card Stack Class tonight and these are the cards we are making.  This is a very different from the kind of cards I usually make.  I had hoped that by offering something different it would be more popular and I would be able to capitalize on the trend of adult coloring books. Did not turn out that way.  I have a few ladies registered.

I will be bringing a couple sets of pencil crayons, and water color pencils with brushes.

I have 2 ladies who purchased the Stampin Up Watercolor Crayons years ago and would like to learn how to use them with the Aqua Painter (water brush) which was sold at the same time. We will use a clear mount for our palette.  I am looking forward to helping these ladies make use of the supplies they have.  I also have these supplies which I have not used a lot so we will have fun together.

These line drawings are printed on heavy card stock.  The designs are by Joanne Fink. She is an Orlando based calligrapher/designer.

I chose to mount them onto black card bases so no matter what color the participants chose it would match the black outlines in the art.  I wanted to add greetings but without hiding the wonderful art so I chose vellum as a substrate.  Again, with black letters clear embossed on the vellum so it all matches and does not conflict with any colors selected.  All held in place with tiny black brads.
My 2 Cents:
As a person who has spent the better part of the last 20 years working on cards, teaching classes, and in many involved in this craft I am disppointed in the lack of appreciation for them in the younger crowd.  I know that when the postage increased in our area a few years ago that was the final straw for some who just abandoned the practice completely.

Cards are not popular among the younger crowd and the older crowd struggles with the motor dexterity to handle the materials and tools. I, one day will no longer have people who will participate.  I am sad about that but that is for a day way in the future I hope. 

I was speaking to a young lady yesterday and she was not interested as she does not send cards at all.  I guess it's all on line or not done at all.


Laurentien pencil crayons - the brand I used when I was in elementary school. Can be applied light or heavy. Soft or bold are options.


Artist's Loft - Watercolor Crayons which are applied like pencil crayons then lightly moistened with a paint brush to blend the color(s) and fill in the white spaces.


Stampin Up Watercolor Crayons. They are solid color pencils so there is enough color in this box for me to paint the rest of my life and likely beyond that.  These are available under other brands.


A spray bottle to provide a bit of moisture when needed.  The Aqua Painter brush from Stampin Up.

I am looking forward to the class and sharing my knowledge and giving these ladies the ability to leave my class and continue to make art and cards.

Friday, March 31, 2017

Christmas Bethlehem - Starry Night

I purchased some of this gold starry white card stock this week and I wanted to know if it would work for some of my Bethlehem cards.  I trimmed it to 4 x 5.25 inches and adhered it to a purple card.
The vellum layer is a graphic of a wood cutting pattern which I altered by coloring it purple then adjusting the fill to provide variations in color from deep to lighter.  I added my own Bethlehem star graphic and printed that on a quarter sheet of vellum. I then coated it with clear embossing powder and heated it.  I found a greeting in my stash (Stampin Up Apothecary Framelit die cut with a SU stamped in purple) which was adhered to the vellum with 3D foam tape to the right side.  I placed some double sided tape behind the greeting and the town graphic and adhered it to the starry background.  I then added a tiny gold brad in the center of my star for a bit extra texture and some good holding together of the layers.  I think this paper makes an effective starry night for my cards.

Wednesday, November 2, 2016

Coaster Calendars

I've created another version of my Coaster Calendar for the sale on the weekend.  I chose verbs.  I hope this inspires others to action.

These make great gifts for friends, teachers, a girlfriends exchange, or special people who live far away because they are easily mailed.  Imagine the pleasure of opening a Christmas card to find a small gift inside.

I chose 4" coasters to which I glued 4.25" squares of designer paper.  I chose light to medium colors to allow my action verbs be visible and easily read.  Once pressed and dry I trimmed the designer paper to the edge with scissors. I then used a sanding block to soften the edges.
I designed the action verbs to be 2" by 4".  I printed them on vellum so that the designer paper would still show through when placed above the calendar.  I printed them in black on the color printer and clear embossed them.  I trimmed the 4.25 to 4.00 inches and then corner round punched the 2 top corners to repeat the round corners of the coaster.  I taped the vellum where the calendar would cover it.  I did add a bit of vellum adhesive in both top corners.

To make the calendar, I created the calendar in software, printed it on 8.5x11 paper, cut it into small pages, stapled the pages to a backer then adhered the backer to the front of the coaster.  I added a black eyelet at the top to provide a hole to hang the calendar and secure the vellum.  I used my Crop-a-Dile to set the eyelet.  It's perfect for the job.
I have added a magnet to the back so they can stick to the fridge or a file cabinet.


I included a credits label on the back.

Saturday, October 1, 2016

Baby Boy - Customized Giraffe Frame

My sister requested a frame for her grandson with the colors grey and yellow.  I had a good quality metal frame in stock so I have put together a frame for her.  I made a similar one for my nephew's baby boy.
The frame is not standard size at 13.75"W x 10"T which meant cutting a custom mat.  I chose a medium grey linen card stock and cut it to size. I measured 1.5" from the edges and penciled in the hole on the back.  I cut it with an x-acto knife and metal edge ruler.  The opening is 10.75W x 7.00 T.
The letters were cut with the Cricut from the same card stock.  The cartridge I selected is Base Camp which provides a basic roman letter.  It is not mono spaced so more calculating had to be done to determine the size of the letters.  I cut the name at 2.25 inches. The date was cut at 1.75 inches.  I chose a piece of yellow card stock that matched the frame nicely and adhered behind the grey mat.  I then adhered the letters and numbers with quick dry adhesive which has a very small pointed applicator which works well for small pieces.
I found the giraffe graphic on CLKER.  I changed the colors to suit this project.  I decided to have a Dad, Mom and baby giraffe.  I placed those to leave room for the heart. I placed a line on the bottom to give the images context. I sized the image based on the space available in the middle and I color printed the central panel on a piece of vellum 4.25x 11 then clear embossed it. I punched the heart from the same card stock and adhered it.  This has adhesive behind it to stick it to the yellow card stock.  The ends were tucked under the grey mat and taped down.
The glass and backer were added and it was placed in the frame. It looks great!!!

I was asked to update the vellum.  This is the final version after a couple of versions.

Thursday, September 1, 2016

Christmas Card Challenge - Sept - Lavender / Bethlehem

My Christmas Card Challenge for September - Lavender and Bethlehem.  I make Christmas cards every month so my cards are ready by Dec 1st to be addressed and sent out.  Do it today!
I started with the We Three Kings cling mount rubber stamp by Cornish Heritage Farms.
I then selected my Bethlehem digital image.  I had to modify it to make it proportional to the kings stamp so I added a 4th hill for the 3 kings stand on.  I printed it on a quarter sheet (4.25 x 5.5 inches) of white card stock. The hills and windows have been colored in medium grey and the buildings are black. I trimmed this piece to just under 4.00 x 5.25 inches.
I then stamped the kings on 4.00 W x 4.25 T inch piece of vellum with Versamark ink in Lilac.  This ink allows for clear embossing very nicely as it does not dry quickly.  Once embossed, I ripped about 1/8 inch from the left hand side of the vellum. I placed a bit of vellum adhesive on the back in the bodies of the camels.  It was aligned along the right hand side and the top and bottom edges were folded to the back of the Bethlehem layer and taped down.
I chose Pale Plum card stock by Stampin Up. The Bethlehem layer was adhered to the light purple card front.
I cut a starburst star from silver no shed glitter card stock with the Sizzix Star & Starbursts die.  It was then adhered to the card front with 3D foam tape.  It was aligned along the ripped edge of the vellum.  I have 99 cards in my box.

Submitting to Christmas Card Challenges #38 - Anything Goes

Wednesday, August 24, 2016

Snowflakes - Winter's Butterflies

I put these cards together the other day.  I need to add cards to the box so 2 more is good thing.  I have 93 card in the Christmas box.

Light blue textured card stock.  A four inch square of designer paper featuring a winter blue design.
I printed the snowflake greeting on vellum and ripped the top and bottom edges. Trimmed it to the width of 4 inches like the DSP.
It is held in place at the top of the card with a star brad with a snowflake confetti on the left and a tiny round white brad on the right.

Monday, August 1, 2016

Christmas Card Challenge - Aug - Light Blue / Winter

I chose designer paper - Snowflakes by Recollections purchased at Michaels. I cut 2 sheets of the paper into 4 x 5.25 inch pieces.  I chose the one with dark snowflakes for this set of cards and coordinated it with card teal card stock.  I adhered it to the card front leaving a small border.  I then printed the greeting on vellum and clear embossed it.  It was cut to 1.25 inches tall and 5.25 inches wide.  I placed a white snowflake confetti to the left and held it, the vellum to card front with a tiny white star brad. I added a tiny white round brad on the right hand side to keep it from shifting.
This is a great card to make in volume.  I made six of these for my card box.

Sharing with Christmas Card Challenges - #34 - Anything Goes

Saturday, July 16, 2016

Decorative Set - Set 1

This sunburst layer was cut from decorative paper made with technique using Alcohol Inks and Floor Wax.  My mixing of colors had created some muddy colors so it was a challenge to decide which color to highlight.  I tried warm pink, kelly green, yellow cards and finally settled for this warm green card.  I cut the decorative layer with the Stampin Up Sunburst Thinlit.  I adhered it to the card front then trimmed the rays to the card edge.  I added several Prima Flowers as an accent held in place with a gold flower sequin on a gold tiny brad. I added a greeting with the SU Decorative Label punchie and a SU Word Window greeting.  These were adhered together then glued to the card with 3D foam tape.


You can check out my other cards made with this great die by following this link.


On this card I used decorative paper made by spritzing color from a spray bottle through stencils and other materials to create decorative patterns.   This piece includes yellows, greend and blues.  I chose a pale blue textured card onto which I adhered the decorative paper.  I then spread a piece of metallic ribbon across the bottom third of the card and taped the ends to the inside of the card.  I layered several Prima flowers with other silks and held them all in place with a tiny gold star brad.  Great any reason card.

This card features a clear embossed color printed greeting in bold red letters on vellum.
Once printed I decided to create a custom background. I trimmed a piece of photo paper to leave a small border then applied Tim Holtz Antique Linen Distress Stain to the center and Walnut Stain to the edges.  I made sure to touch the cut edge of the paper was well.  This leaves the sentiment very visible against the background with a great dark brown border on the red card.
I chose a red card to repeat the color in the greeting.
The background was adhered to the card then the vellum was held in place with tiny gold star brads in the corners and other areas.  This makes a great card for a guy's birthday.