Showing posts with label Tempting Turquoise. Show all posts

Tuesday, September 9, 2025

Card Making - Card Sets Continue

Still working with the Friends and Flowers Simply Scrapping Kit. 

The card base color is Certainly Celery. I added a layer of vellum from the SU Botanical Garden Vellum 6 inch pack. Using the large orange flower stickers in the kit I was able to add double sided tape to the back of the vellum to ensure it stayed in place. The photo corners are stickers from the scrapping kit.  Left Tempting Turquoise and right Only Orange.  I added small leaf stickers to both cards. Again, I am alternating the orientation to ensure variety. 

There is a lot of stuff in these scrapping kits. 
Here the card base is A2 and the color is So Saffron. Left is turquoise floral desinger paper with yellow scallop stickers above and bellow the square sticker. I added the same DSP over the square and then a yellow flower sticker onto the DSP.  The other has a turquoise square sticker and the same floral DSP. Another smmal flower sticker.

White quarter sheet inserts and white envelopes. 

Back to Card Making - Card Sets

I need a few cards for upcoming events so I spent a couple of days in the craft room.

I am working with the Stampin Up "Friends and Flowers" simply scrapping kit.

I chose Whisper White card bases in the A2 size. I chose one of the designer papers in the kit which is Tempting Turquoise with white flowers. I added some white seam binding across the width of the cards and tied in a knot in front.  The left card has a daisy accent created with my large daisy punch with a circle center all held with a tiny white brad.  The right hand card has a button accent with white thread through the holes placed in the bottom right hand corners.

This set of cards is working with the same scrapping set. I chose the striped designer paper. 

On the card on left I chose some sticker from the set to cover the raspberry stripes. I used one of the square stickers and topped it with a square of designer paper. I added a greeting in the turquoise strip - Thinking of You from the Teeny Wishes set stamped in Chocolate Chip. The right hand card highlighted the raspberry color and I chose the square sticker in that color, added a square of turquoise floral DSP, a flower sticker along with a leaf sticker. The center of the flower is another of the stickers. 

Tuesday, April 29, 2025

Cards - Charity - IWin

I picked up some clear butterfly stickers at Dollarama when I picked up the car today.

The card base is Stampin Up Pacific Point in the A2 size. 

I chose some Ranger Alcohol ink in red tones to match the butterfly.  I think the color is Red Pepper.  I diluted it with rubbing alcohol and spread it onto my clear embossed card stock.

I cut a strip of no shed gold glitter card stock to coordinate with the gold in the stickers.  I mounted the butterfly onto the gold strip.

Added a greeting with the SU Modern Label punchie in card base color and a Word Window punchie greeting coordinating color.  White quarter sheet insert.

This card is in the wide or landscape orientation with the Pacific Point card color with a inked clear embossed card stock colored with alcohol inks.

Another narrow strip of non shed glitter card stock.

The butterfly sticker was adhered over the gold strip.

A SU Modern Label punchie in Pacific Point with a coordinating colored Word Window greeting.

A white quarter sheet insert.


I chose SU Tempting Turquoise card base with a layer of my own paste paper cut to leave a medium border.

A strip of non shed gold glitter card stock across the top third of  the card with the butterfly stick mounted over it.

I added a Stampin Up small oval punching greeting in a coordination color.  Added a bit of blue pencil crayon around the edge and mounted with 3D foam tape.

Added a white quarter sheet insert.


This card has the same Tempting Turquoise card base with a looser pattern in the paste paper which I create myself.

Added a narrow strip of non shed gold glitter card stock adhered with double sided tape.

Mounted the blue butterfly sticker over the gold strip.

I added a Modern Label punchid in turquoise with a Word Window greeting adhered to the punchie.

Added a white quarter sheet insert.


Sunday, March 30, 2025

Cards - A7 - Die Cuts

Another few cards today.  Again, A7 (5.25x7.25 inch) envelopes.

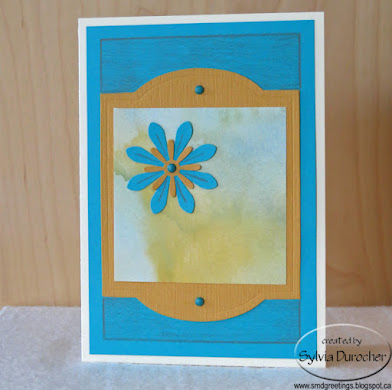
I started with an ivory card base.  I cut a piece of textured turquoise card stock to leave a small border.  

I cut a Tim Holtz Cameo Frame die cut from left over Stampin Up More Mustard card stock from yesterday's session. Trimmed a piece of watercolor designer paper to fit the middle of the die cut. 

The floral accent is a large daisy punchie in turquoise, topped with a small More Mustard one held in place with a turquoise mini brad. 

The cabinet die cut was then adhered to the turquoise layer with 2 more blue mini brads top and bottom.

I added the finishing border with a warm grey colored pencil and also added lines on the large daisy die cut.  A white insert and an ivory envelope to finish it off.

For this card the base is SU Tempting Turquoise card stock in 12x12. 

I used the negative piece from the Cameo Frame die cut to layer onto the card front leaving a tiny border. 

I placed a piece of the watercolor designer paper behind the More Mustard layer. 

I cut a Sizzix Leaf Stem die cut from warm green card stock then embellished it would pencil crayons. I cut a couple more leaves and added them below the opening.

I added a pencil crayon line along the inside of the die cut in a warm grey.

A white insert and an ivory envelope were added.

For this card, I chose a warm green card base. 

I ripped left over card stock in the More Mustard and the Tempting Turquoise and layered them with a piece of the watercolor designer paper.

I cut a flower with the Sizzix Flower Daisy #4 die from turquoise card stock.  I glued it to the front of the card with Scotch Quick Dry adhesive.

I added some texture to the flower with colored pencils. 

I mounted a tiny button in the center of the flower with a Bling Zot.

A white insert and an ivory envelope completes the card.

Wednesday, June 5, 2024

Cards - Christmas Snowflakes

This background paper is wrapping paper.  I liked the color scheme so I brought it home from ReUse despite having too much designer paper already.

I cut it to leave a border on the A2 card of SU Ballet Blue card stock. 

I cut the snowflakes with the Stampin Up Snow Flurry Bigz die from white and Tempting Turquoise card stock. 

The solid circle is punched with the 1.75 inch punch.  These were layered and aligned along the left hand side of the card.  All held in place with a white mini brad.

Full half sheet blank insert with a white envelope.

This card features a SU Lovely Lilac textured A2 card base.

A background of lovely mosaic purple toned wrapping paper.

I cut the snowflakes with the Snow Flurry Bigz Die.  Punched a circle of 1" from the same card stock as the card base.

All held in place with a mini brad in a warm purple color.

I added a banner along the bottom edge from the card base card stock.

I may add a greeting later.

Full white insert to cover the brad tabs showing on the inside of the card.  White envelope to finish.

This was very versatile paper because I made 4 cards with 4 different colored card bases.

This card base is Orchid Opulence in an A2 size with landscape orientation.

I cut the snowflakes with SU Snow Flurry Bigz die.  The middle snowflake was cut from Pacific Point card stock.

These are all held in place with a purple mini brad.

I complete forgot that I would use silver on some of these cards. It is what it is.  

Full half sheet insert and white envelope.

The card base on this card is Bashful Blue in an A2 size.

I cut the snowflakes with the Stampin Up Snow Flurry Bigz die.

The smaller snowflake is Brilliant Blue and the stack of die cuts are held in place to the card front with a snowflake specialty brad.

I added a strip of the card color under the snowflake stack.

Full half sheet insert and white envelope.

Glad to have a few Christmas cards in my box as it is nearly half way through the year.

Happy with these.

Saturday, December 2, 2023

Christmas Cards - Watercolor - Siblings

I made some special watercolor ornaments to put on my siblings Christmas cards this year.  This is the first year that Mom and Dad are both gone. We are getting together early December for a get together which is close to what would be Dad's birthday. 

This is an ornament I designed myself.  You can read more about the process here.  The ornaments were cut out by hand.

All the designs were hand drawn then I used a permanent black marker for all the outlining.  

I used my Stampin Up Watercolor Wonder Crayons for all the painting. The background is watercolor paper with a mixture of Always Artichoke and Garden Green.  I painted a wash on a couple of 9x12 sheets of wc paper.  I made it a bit darker at the top and lighter at the bottom. I did put salt on but it was not wet enough to produce much of an effect. When dry I added a spatter of Always Artichoke.  Once cut to the 4.00 x 5.25 inches I pained the branch and I spattered the pieces with Always Artichoke. 


The ornament has a Bethlehem Star in the night sky colored with More Mustard.  Some Elegant Eggplant and Night of Navy for the sky. On the snow banks in the foreground I used Marina Mist for the wash and Night of Navy for the contours.  Always Artichoke for the tree.

The card base is Elegant Eggplant.


A full moon in the night sky.  The moon is colored with Daffodil Delight with a light wash of Night of Navy for the sky.  I drew a house on the hills with was colored with Ruby Red and More Mustard for the windows.  Elegant Eggplant for the hills.  

The card base is Ruby Red.


This one features a sunrise which I had experience drawing when I did my glass art piece for the window a couple of years ago.

The sky is a light wash of Tempting Turquoise with the sunrise rays being first wash of Daffodil Delight, then More Mustard closer to the center then Tango Tangerine at the center. The hills are a combination of Garden Green, Always Artichoke. 

The card base is More Mustard.


I decided on a water theme for this one and drew a light house.  The sky is a light wash of Tempting Turquoise.  The lighthouse and rocks are done with a light wash of black gouache. The sea is Night of Navy.

The card base is Basic Grey.


This one here is a Christmas flower but I would not go so far as saying a poinsettia.  It turned out like a sunflower in the shape.  The ornament is Tango Tangerine wash.  The flower is a mix of Ruby Red, Bravo Burgundy and Cherry Cobbler.

The card base is Ruby Red.


This one features another Bethlehem Star in the night sky.  The star is More Mustard with a light wash of Marina Mist for the sky.  The mountains are 3 gradient washes of Elegant Eggplant.  Tiny black marker dots in the sky with a touch of More Mustard.

The card base is Elegant Eggplant.


This one features a large star in the center of the ornament.  I did trace the shape from the Stampin Up Star thinlit set, using the smallest one.

The star was washed in Daffodil Delight all over then one half of the points was painted with More Mustard. The ornament is a dark wash of Night of Navy.

The card base is Night of Navy. 

Friday, October 20, 2023

Christmas Cards - Arched Joy

Here are my first Christmas Cards for 2023.  I generally do a Christmas Card Challenge but it did not happen this year.

I used the TH Arched Frame die into which I placed the TH Joy Mover and Shaper die.  Running this combination in the Big Shot with the striped designer paper I got my main element.

I chose a designer paper with a variety of colors which allowed my to use several colors of card stock.  Top left - Handsome Hunter, top right - Tempting Turquoise, bottom left - Kiwi Kiss and bottom right - Island Indigo.

The Joy is visible against the darker card stock.   

I printed the words "to the World" on white card stock in coordinating colors and trimmed them to .75" tall and then cut the left hand end into a banner by hand.  This was mounted to the card with 3D foam tape aligned on the right hand side. 

I added a quarter sheet insert and a white A2 envelope.

Tuesday, September 12, 2023

Card - Watercolor - Yellow Cosmos

I painted this yellow cosmos for my niece's birthday card.   

I found an image on line just to give me an idea about their foliage.  I did a bit of a pencil drawing to start.

I used my Stampin Up Watercolor Wonder Crayons. I did a light wash of blue with Tempting Turquoise and a light wash on the bottom half with Old Olive. Once I had my first light color on the flower and the stem then I erased about 50% to leave just a very light line.

I used Daffodil Delight for my first light layer on the flower and Pear Pizzaz on the stem. I then added definition on the cosmos with More Mustard and Always Artichoke on the stem.

I added some very light stems on the bottom just so the flower was more grounded. 

I mounted the watercolor with double sided tape to a 5x7 card of Hello Honey.  I was a little short on the bottom so I added a length of  Washi Tape in More Mustard.  It rips very easily so I need to use this up so that its gone!

Saturday, October 1, 2022

Christmas Card Challenge - Watercolor - Ornaments

Another set of watercolor Christmas Cards. 

I wanted a branch with an ornament.  I put a wash of Old Olive green in the top right hand corner blended softly to the center and left hand side to suggested more tree.  

Once that was completely dry I drew my line for the branch with a pencil.  I worked with Always Artichoke, Old Olive and More Mustard. It was really hard to be loose and let the needles go willy nilly but it worked. 

Then, when the branch was dry I drew the ornament by hand with a pencil. I filled the ornament with Tempting Turquoise and Night of Navy. Card is Marina Mist. I added another layer of wash on the right hand side to suggest light from the left. 

I did the hanger with a very thin brush and Payne's Gray also lining the outside of the ornament.

On this card I used Elegant Eggplant purple color on the ornament with the same general steps for the branch.

I ended up with a harder high light spot on the left hand side which works better.  The darker side on the right hand side does not seem to be as dark as I intended.  Watercolor is sometimes hard to judge as it dries lighter.

I have used the color of the ornament to add spatter to the layer.

The card stock used for these ornaments is the back side of the Foil Joy cards I did last month.  It was a textured linen card stock.  I think it worked with the watercolor pretty well.


On this card I used Rich Razzleberry pinky purple for the ornament.

The pieces of card stock were trimmed to 3.75 x 5 inches before I started painting. They warped a little so needed to be steamed and pressed to flatten.

The ornament layer was adhered to the card front with 3D foam tape in the corners and a bit in the center.

I did add my signature on the original art after I photographed them for blogging.

Seasonal inserts and white envelopes have been added to the mix and they are sitting in the box for December 1st.

The color is Stampin Up Watercolor Wonder crayons and coordinating SU card stock.

Friday, December 10, 2021

Card Exchange - October 2021

I made a couple of large cards for my October card exchange.  Since they are late and it Christmas time I chose to make them with a Christmas theme.  Love making Christmas cards at any time.

I chose turquoise alcohol ink background paper in 4x6 and cut ornaments with the Sizzix Bigz Die - Ornaments #4. One of each design.

I cut the hangers from copper metallic paper and glued them on top.

I added copper metallic thread.

I embossed a layer of white with a Cuttlebug folder from the Winter Bundle.  I wrapped the thread to the back and adhered the snowflake layer to the front of the Tempting Turquoise card.

The ornament was adhered with 3D foam tape.

I added a Stampin Up Modern Label greeting which was offset with a punchie from the same paper as the ornament.

On this one I added the copper star and mounted the turquoise one in the left hand corner.

These are large A7 5x7 cards.

These are on their way to my card exchange partners.


Tuesday, May 18, 2021

Seniors Week - June 7-13 2021 - Card Donations

I worked on more cards for the Seniors Week Project.

I started with the yellow and blue layer which I made last summer.  It involves making a marking tool with old toilet paper rolls to create dandelion flowers.  

That layer was trimmed to 4.00 x 5.25 inches. 

I placed a piece of blue rick rack across the bottom third and taped the ends to the back. This layer was then adhered to the front of a medium blue card base.

I added a color printed greeting punched with the Stampin Up Decorative Label adhered with 3D foam tape.

This card was created with a 4x4 photo reused from one of my photography calendars. 

I trimmed the 4x4 down a bit to leave a bit more of a border. 

I added the vellum sentiment which I adhered to the photograph with gold flower sequins held in place with orange tiny brads.  This full layer was then adhered to the front of a yellow card base.


These cards are reusing a small card I made for a Stampin up party I held years ago.  I had leftovers and they just sat. 

The accent layer has a Tango Tangerine base with Tempting Turquoise designer paper.  I added an accent strip in orange punched with the Stampin Up Dotted Scallop Ribbon border punch. 

The tag was stamped with the Too Terrific Tags set in Tempting Turquoise on Whisper White. Layer onto Tango Tangerine with a Tempting Turquoise grosgrian ribbon held in place with an orange tiny brad. 

The Whisper White layer was embossed with the Swiss Dots folder and trimmed to leave a small border. It was adhered to the turquoise card base.

The stack is growing!

Saturday, July 16, 2016

Decorative Paper - Set 2

I delivered cards to the gallery today.
This card features the Memory Box Jumbled Happy Birthday greeting cut from silver foil card stock.  I chose a blue card which worked well this decorative paper made with ink applied to photo paper with a foam brush. It was glued to the card front leaving a small border. I adhered the greeting on the bottom third of the card with Quick Dry Adhesive by Scotch.  I punched 2 holes with the Stampin Up slot punch and pulled a piece of silver metallic ribbon through and knotted it.
On this wedding card I used some paper made with the Bubble Technique.  It was trimmed to leave a small border of the card showing.
It was in the purple lavender color range so I found a purple card that would work well with the paper.
I printed the clip art wedding couple from EDigg Clipart in black on vellum then clear embossed the image and greeting.  I trimmed the vellum to be smaller than the bubble paper.
I tacked the bubble paper to the card front then placed the vellum in place and held all in place with 4 tiny white brads in each corner.  I used a push pin to create holes for the brad prongs then spread them apart on the inside of the card.


This card features decorative paper made by brushing acrylic paint onto white card stock.  It creates a nice matte finish.
I punched the one edge of the purple and the white card stock strips twith the Martha Stewart Arch Lattice border punch.  I adhered the white one on to the right edge of the purple one.  I placed turquoise grosgrain ribbon on the right and white on the left.  This layer was adhered to a turquoise card.
I stamped the Stampin Up Triple Treat Flower stamp onto white with Tempting Turquoise. I punched the Five Petal Flower punch from the same decorative paper.  These were layered and I added a TT button in the centre held in place with a Zot.
I created a bit of dimension with some white cotton thread which was adhered to the accent.  The accent was then adhered to the card front with 3D foam tape.
Great card for any occasion.

Thursday, July 14, 2016

Birthday Card Sister

I started with a Stampin Up Night of Navy card. 
I sponged a background on photo paper with a sponge and Island Indigo ink.  I punched the bottom with the Chevron Punch.
I cut the greeting with the Memory Box Jumbled Happy Birthday thin die. Happy in Real Red and Birthday in Tempting Turquoise. 
Adhered the background then the greeting words.  I used Quick Dry Adhesive for the die cut greetings.


This is a birthday card for my sister who celebrates this week and I hope the mail system will deliver it on time.

Missed the deadline for challenge at Fab Friday but I have put the challenge graphic to show the colors.

Sunday, May 17, 2015

Card - Simple Birthday

I started with a pink card which I believe is Stampin Up Pink Passion.  I cut 2 small squares and 1 larger square with my new Sizzix nesting framelits.  The squares are cut from Tempting Turquoise Patterns Pack DSP and the larger from Rainbow Sherbert DSP.  I stamped the sentiment with a stamp from the A Little Birthday Cheer Stamp set.  I then adhered the 2 squares based on a sketch for a challenge.  I cut the butterfly from Daffodil Delight card stock with the Sizzix Winged Beauties framelit set.  I added some definition with a black marker as well as a flight path.

Submitting this card to the following challenges:


Paper Pals Arts 251 - Color 

I've put Pink Passion for Melon Mambo

Friday, March 20, 2015

50th Wedding Anniversary Sample2

Here's the next sample I put together.

I started with a Stampin Up Whisper White card.  I cut a quarter sheet piece of Daffodil Delight yellow to leave a small border and stamped it with the Soft Swirls background stamp with Summer Sun ink.  I wrapped the Tempting Turquoise ribbon across the yellow layer and it was adhered to the card front. I cut the Deco Label framelit in white, then one from the Beyond the Garden DSP in DD and WW. I created a circle accent with the Number It stamp set in TT.  I mounted the larger white one behind the ribbon. The yellow Deco Label diecut and circle accent is mounted over the ribbon with 3D foam tape.