Showing posts with label origami paper. Show all posts

Wednesday, April 30, 2025

Cards - Butterflies - Charity

Another few cards for I Win charity.

These are the last of the clear butterfly stickers I bought yesterday.

I chose Stampin Up Glorious Grape cardbase in A2 size and added a layer of watercolor background cardstock.  Not sure when I created this but it works well.

Added a strip of gold non shed glitter card stock across the top third.  Mounted the sticker onto the glitter.

I added a SU Small Oval greeting in coordinating colors and added a bit of purple around the edge to tone down the white.  Mounted with 3D foam tape.

Blank white quarter sheet insert.

I used the left over scrap of the watercolor background card stock on this Glorious Grape card base set in the wide or landscape orientation.

I added a non shed gold glitter corner on the right hand side of the watercolor layer adhered with double sided tape.

I mounted the butterfly sticker in the opposite corner.

The banner greeting was perfect for the space left by the shorter background layer.  It is mounted with 3D foam tape.

A white quarter sheet insert was added.

The final butterflies were warm toned so I turned to my favorite Stampin Up color - Summer Sun.

I dug in the origami paper envelope and found a burnt orange piece, cut it to size and mounted it to the card front.

I chose a scrap of paste paper in blue and cut to 2.5 inch square and mounted the butterfly to it. I added a strip of gold glitter to the bottom.

A SU Modern Label punchie in the same blue paste paper with a Word Window greeting in orange glued to the front.

A white quarter sheet insert was added.

I chose Summer Sun card base again with a bit brighter orange origami paper for this card.

I added a Pacific Point strip of card stock then mounted the butterfly onto it.  I like that the tips of the wings show off their bright colors.

I added a bit of non shed gold glitter card stock on the blue strip.

The greeting is the same blue card stock punched with the SU Modern Label punchie  with an orange Word Window greeting.  Mounted with 3D foam tape.

A white quarter sheet insert.

Another 4 cards for this charity.

Friday, April 18, 2025

Cards - Donation - Teacher Appreciation

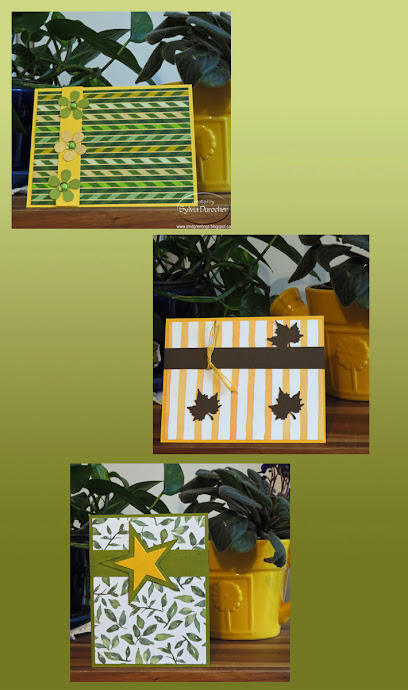
This set of cards feature more decorative paper.

The top card has a layer of Japanese origami paper mounted onto a Stampin Up Summer Sun card base. 

I added daisy punchies in green and gold with round sequins in the center and held in place with green mini brads.


This card is again the gorgeous Summer Sun card base.

I mounted a layer of SU designer paper in strips. 

I added a strip of Early Espresso cardstock across the top onto which I knotted some yellow cotton thread.

I added 3 maple leaf punchies mounted with Bling Zots.

The bottom card is an Old Olive card base with watercolor leaf designer pape from Stampin Up.

I added a length of the same green card stock across the top.

I then cut 2 stars with the Sizzix Stars#2 die with sharp points. Layered these and then mounted them onto the bar.

Again quarter sheet inserts and envelopes.


Cards - Donation - Teacher Appreciation

This top card is a reused card front from a card I made long ago.  

It is another piece of marbled paper with added frame with metallic gel pen mounted on a grey paper. I trimmed the card front so I could clean up the edges and mount it onto another card. 

I chose a Stampin Up Blushing Bride card base.


I have beautiful origami paper pack brought back by a friend who when to visit her daughter in Japan. 

I chose an Old Olive card base then added a piece of Night of Navy seam binding knotted on the front and adhered it all to the card front.


This floral motif marbled paper just needed a focal point so I added a daisy punchie in Pacific Point with a gold sequin and blue tiny brad.

I added a narrow strip of the same blue card stock along the left hand side on card front then adhered the marbled paper layer on top.

These again have white quarter sheet inserts and envelopes.

Thursday, April 3, 2025

Cards - A2 - Serendipity Paper

I created a 8.5 x 11 sheet of serendipity paper when I created cards with the origami paper this week.   

I cut it into 4 pieces to make the best use of it.  That means A2 cards.

I started with So Saffron card base to measure 4.25 x 5.5 folded.

I adhered my collage paper to the front leaving a small border. 

I cut a strip of the same card stock and added a length of Early Espresso grosgrain ribbon.

I added Spellbinder charm die cut hung with ivory crochet cotton.

A white quarter sheet insert and an ivory envelope.

For this card I chose the same yellow card base and adhered the piece of collage paper to the front leaving a small border.

I added a length of Early Espresso card stock across the landscape (wide) card in the top half

I cut a Sizzix Primitive Star with the yellow medium die. It was mounted onto the brown strip with 3D foam tape.

A white quarter sheet insert and ivory envelope.

I was lucky to get 50 of these envelopes at the thrift store this week for $2.00.


Another wide card.

The card base is Early Espresso and the collage paper was trimmed to leave a small border.

I added a card stock strip of brown and topped with a narrower strip of So Saffron card stock.

I punched a pine tree from dark brown card stock and adhered it with Scotch Quick Dry adhesive on the left hand side.

A white quarter sheet insert and an ivory envelope to complete the card.


The fourth card in this series made with serendipity paper.  I used origami papers 3x3 collaged to card stock.  

I chose a ginger colored card stock and adhered the trimmed collage paper to the front.

I added a strip of the same card stock to the front once I had added a length of dark brown grosgrain ribbon across it.

I hung a square charm cut with Spellbinder die set.

I added a white insert and an ivory envelope.

Not my normal color scheme but they worked out well.

Tuesday, April 1, 2025

Cards - A7 - Bands and Ribbon

Another set of A7 cards.

I started this one with a pack of origami paper 3x3 inches with travel and writing theme.

I just selected a few and glued them down to the front of my ivory card base.

I chose a light green card stock strip to overlay on the front and embossed it with a Stampin Up Script folder.  I then used SU Tea Stain ink to highlight the writing.  I added a length of Always Artichoke seam binding which I touched with the same ink to help it fit in.  I knotted onto the strip. I adhered it to the card front with double sided tape. 

Added a white insert and an off white envelope from my stash of free ones from years ago.

This designer paper is leftover from a previous card making session.

I love the colors.  I chose a Lost Lagoon card base and adhered the designer paper cut to leave a small border.

I chose a piece of Cherry Cobbler card stock and embossed it with a Cuttlebug folder.  I knotted a length of Baja Breeze seam binding around it and trimmed the ends.

The strip was adhered to the card front in the landscape (wide) orientation.  This seems to have a bit of a Christmas vibe.

Added a white insert and off white envelope.


I started with a designer paper leftover.

I added a Stampin Up Island Indigo card base.  I trimmed the patterned paper to leave a small border and adhered it to the front.

I added a card stock strip in Pumpkin Pie and embossed it with the D'vine Swirl folder.  I rubbed the swirls with a More Mustard ink pad. 

I added a coordinating knot of satin ribbon and adhered the strip to the card front.

I finished the card with a white insert and an off white envelope.


Saturday, August 3, 2024

Flooring Project - Thank You cards

I made a few Thank You cards for those who helped in this big flooring project. 

This was for the sister and her husband who came to the city to help me remove the carpet from the living room and dining room and expose the cement floor on a very hot and sweaty day.

I chose Stampin Up Rich Razzleberry card base in A2 size. I dipped into my commercially made handmade paper and cut a piece of this wax resist in teals, rich purples with swishes of gold.

I left the beautiful deckle edge on the bottom and taped it to the card front.

I stitched 3 small gold beads in the top right hand corner.

A white insert and envelope.


This card has an Old Olive card base.

I chose an origami paper front layer which was taped on.

I added a gold star sequin in the left hand corner.  To balance I added 2 square brads in the bottom right hand corner with a green one in the middle.

This paper has beautiful gold details.

This card is for the folks from whom I bought the flooring which answered all my questions during the process.


I chose a SU Kraft A2 card base for this card.

The front of the this card is a piece of botanical pressed wax paper.  A nice little flower and a piece of green leaf.  It needed to be mechanically adhered as it resisted taping.  

I wrapped a length of gold thread around the top a few times and then knotted it.  I then place the gold mini brad over the knot and pressed it through the card front. I added a gold bulb pin in the bottom right hand corner which went through the wax paper and card stock front.

A white half sheet insert to hide the metal pieces which have gone through the card stock.

A white envelope to finish it off.

This is for the flooring company which recommended the underlay which saved the project.

This card is for my niece who dropped everything on the Monday morning to pick up the 2 large rolls of underlay and deliver them to my brother in law who was going to install the floor.  Saved me a round trip to the south.

The card base is SU Always Artichoke.  I found this piece of lacy handmade paper in the stash.  Lightly glued to a piece of white card stock.  Trimmed to fit across the card front and taped in place.

I added a coordinating button with gold thread held in place with a Zot. White insert and envelope.
Started with a piece of Not Quite Navy card stock.  

Layered a piece of marbled paper in blue tones with copper accents on the card front.  I added a copper star sequin held in place with a Zot.  Then I added a coordinating bead held in place with a star copper tiny brad.

White insert and envelope. 

This is for my brother in law who installed the floor and my sister who hosted me at her house.  We did a few fun things while he was working at my place. There was a bottle of scotch delivered with the card.


I am loving the lacy curtains casting a wonderful shadow on the vinyl floor!

Monday, January 22, 2018

Card Club Kit - Set 1 - Card 2

I chose another sheet of Japanese Origami paper for this card.  This time I cut it into four 3 inch squares.  I chose a blue card to coordinate with the paper. I chose a wide or landscape orientation.

I adhered the gold sticker paper across the card and trimmed it to the edges with scissors. I adhered the origami paper over the gold and placed it on the left hand side.

I selected blue and gold star sequins which I placed on the gold paper to the right.  I used a push pin to create holes in the card front, pushed the prongs of the tiny gold star brad through and spread them apart on the inside of the card. 

Card Club Kit - Set 1 - Card 1

Well I knew this day was coming and it has arrived.  I no longer have ladies attending Card Club.  I have a few ladies signed up for kits so I have decided to produce a large Card Club Kit to cover the upcoming 4 months of card club so I can move on to other activities on the third Monday of the month.  I have been doing this card club for 15 years so it means a change for me.  I had 2 participating on a part time basis in the last session so this is no surprise.

I chose a card which coordinates with the paper.

I placed a strip of gold sticker paper 2 inches wide on the left hand side and trimmed it to the card edge with scissors.  I adhered a 1.5 inch strip of Japanese Origami paper on top of that layer and trimmed it as well.  The 6 inch sheet produced 4 pieces.

I chose star sequins colors that coordinate with the origami paper.  In this case - red, gold and green. These are adhered to the card front with tiny gold star brads.  I aligned the sequins then used a push pin to create the holes through the card front for the brads.  Placed the sequin on the brad, pushed the prongs through and spread them apart on the inside of the card.