Showing posts with label lace. Show all posts

Wednesday, April 9, 2025

Slow Stitching - April 2025 - Week 2

K3N Cloth Tales - Comfort Coverlet 2025 - Week 2

I added a teapot, tea cup and a lacy tablecloth to my stitching piece this week.

I chose a teal colored floss for these items.  Stitched with the stem stitch.  Teapot based on the one I use at home every day.

I added some brown stitches for my tea in the cup and some steam coming off the cup.

The lace I just stitched on the background just along the base of my tea items.

I am happy with the results.

Saturday, November 23, 2024

Slow Stitching - Extra Squares

Another extra square of slow stitching. I have used up the supplies I had packed for being away so I will have to dig out some more.

White cotton top layer on a foundation piece.  I did not learn my lesson about now covering the front with fabric as well which makes for a thick piece.  In all fairness, I did not have a plan when I started.

I chose strips of purple fabric in various patterns. I stitched the horizontal lines first in running stitch with purple thread from the ORTS tin.

Then I did the vertical ones with bright pink thread. Along the way I had found the lace flower I had dyed a while back and decided to use it.

I tacked it in place then added a purple circle which I over cast stitched to the piece. Then I added a lot of French Knots in yellow in the middle of that.  That was very thick with 4 layers of fabric.  Turned out nice.

Tuesday, October 29, 2024

Slow Stitching - No. 044 - Stitching Blind

K3N Cloth Tales Slow Stitching Challenge 2024

Week 44 - Stitching Blind

This was a challenge and uncomfortable. 

Prep - threaded 3 needles - green, yellow and navy. My base piece looks like wool but it is not. 

I put an applique pin to let me know what I thought was bottom.

I gathered green cotton, white lace, navy ribbon, and yellow yarn as layers on this piece.

I sewed the green cotton on first.  I see that I did not pull my thread taut which left me with loose thread on the front.  I thought this one had gone fairly well. 

Next, I did the lace which I thought was pretty straight but not really. I was using yellow thread but you can see I pulled the thread out of the needle and I just abandoned it halfway through.

The navy ribbon went pretty well.  I had lost one of my needles so I cut the navy thread, knotted it and used the rest of the navy to couch the yellow yarn which went very well. 

I will finish the few stitches so that I have a finished piece.

Monday, October 28, 2024

Tree Scent Ornaments - Spools

A few additions to the collection of 1 of a Kind Tree Scent ornaments.

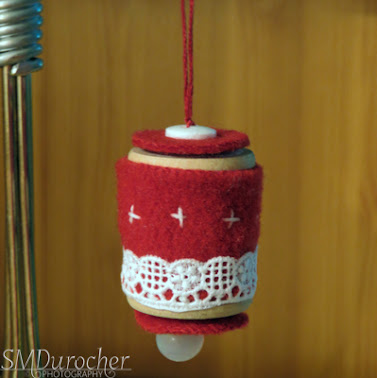
Vintage wooden spool wrapped with red felt. I stitched a length of white lace to the bottom and added a bit of white stitch above it.

Cut two 1 inch circles of red felt to put on each end. 

The bottom features a white pearl drop bead and the top a small white button. All hung with red wool yarn.


A wooden spool wrapped with lime green fleece.  

Once that was stitched on I wrapped the spool with dark green embroidery floss onto which I placed matte gold EBeads along the way.

I cut 1" circles for the bottom and top of the spool.

I added a gold button with a shank on the bottom and a gold bead at the top above the green felt circle.
 
All hung on variegated green yarn.


I stitched a length of plum wool ftlt with a few stitches in green, white and yellow.

This was wrapped around a vintage wooden spool . 

I cut two 1" circles in mustard felt for the top and bottom.

I added a plum colored button with a shank on the bottom and a tiny green button on the top over the felt circle.

All hung with plum embroidery thread.


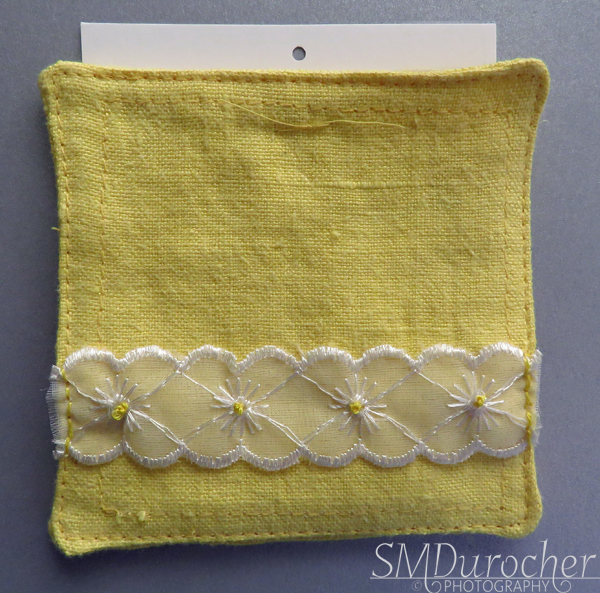
I used a traditional red and green color theme on this Tree Scent ornament. 

A red felt piece was stitched with white and green thread then stitched onto the wooden spool.

I selected 2 red buttons to go on the bottom and top of the ornament.

I cut two 1" circles of dark green felt for the top and bottom of the spool.

I ran red wool yarn to hold all the peices together and knotted at the top with several knots along the way.

These can be used as personal passive oil diffusers as you relax.

Friday, October 25, 2024

Slow Stitching - No. 043 - Sensory Stitching

K3N Cloth Tales Slow Stitching Challenge 2024.

Week 43 - Sensory Stitching

This week's focus is using our senses when stitching.

The sense of touch as we are stitching. How does it feel when the needle and thread goes through different fabric? Elements to excite our sight as we see our piece. Do we hear the needle as it goes through stiff fabric?

I chose a black fabric with a hint of herringbone texture to it.

I added the couched yarn, the button, the pom pom trim, the lace, the corduroy and the netting for my fingers. 

The button and colors for my eyes. 

The taffeta fabric below the button certainly engaged my ears as the needle went through that fabric.  Also there was printing on the piece of white tone on tone fabric in the bottom left hand corner and as I put in my seed stitches it was more difficult to push through the printed areas.

Friday, September 6, 2024

Stitching - Embellishment of Linen Coasters

I am working on ideas to embellish the linen coasters I made last year as I did not sell one set.

I found some lace in my stash and the pattern fit nicely on across the coaster.

I used lemon yellow embroidery thread and stitched it along the edge and did French Knots in the center of each flower.  

I added the lace to both in this set. 

Is rick rack too tacky? Double sided might work but again thicker than I would like. Single sided?


Here are a few things I am trying to see if they will work for the embellishing of the coasters.

I just did needling weaving on my slow stitch challenge but that is too much with trying to keep both sides pretty.

The yellow is just doing a bit of embroidery but I need to not pierce through the coaster.  I am investigating simple blackwork stitches.

I am looking at felt but it just does not feel like the same level of material for linen plus it is quite thick and would likely have to be strategically place not to interfere with your drinking vessel on the coaster.

I will post my progress as I go.

Monday, June 10, 2024

Slow Stitching - No. 024 - Crazy Patch Work - Stitching

I worked on the stitching all week because I knew it was going to take some time.

Week 24 - This is part 2 of the Crazy Patch Work challenge from last week.

I worked all week because I knew it was going to be a lot of work to get all the stitching done.  I added 3 accents pieces - a bead, a button, and yellow double holed thingy.  Then there is lace, rick rack, and gold cording.

I used French Knots, Seed Stitches, Couching Stitch, Cretan Stitch, Sheaf Stitch, Chain Stitch, Running Stitch, and Stem Stitch. This project increased my comfort zone with using different stitches.  The Elegant Stitches book was very helpful. 

The color scheme was totally based on the center piece of fabric.

Friday, April 26, 2024

Sewing Project - Wine Bottle Bag - Blue Floral with Lace

I pulled the fabric out last night so I could sew first thing this morning.

I just love this blue watercolor floral fabric.  The flower is very large so I just centered it on the front.

I chose a length of cotton lace which I placed below the top edge. I found a scrap of blue bias tape which echoed some of the colors in the print beautifully.

I used the wavy decorating stitch again on the bias tape and evenly spaced from the back seam to quilt the outer fabric to the flannel. This means I don't have a seam directly in front across the flower.

The lining is a white microfiber fabric which works well. Navy thread and a solid flannel so it would work with the white areas in the outer fabric.   I have attached my "My Bag" tag.

For information on the line. 

Tuesday, April 9, 2024

Slow Stitching Fabric Collage

I finished my second Fabric Collage square with slow stitching last night.

I used a foundation layer of 100% cotton then created a collage and basted the pieces on. 

I then started the slow stitching of the individual pieces. I added a couple pieces of lace, a couple felt buttons, and created a simple star shape as a focal element in white thread.

This piece will likely end up on the front of a bag like my first one.

It is fun! 


Sunday, March 17, 2024

Sewing Project - Book Bag - Navy Calico

I made another book bag/sleeve.  This time I chose a navy calico fabric from my stash.  I believe I was given this piece from a quilter that was de-stashing. 

I found the beautiful cotton lace at the ReUse Center in the last couple of weeks.  The blue bias tape is a leftover from making these ReUsable Bags

This was a smaller piece of fabric so I had to stick to the 12x19 inches to get handles as well.  I cut my flannel padding layer the same.  I then used the stitching of the bias tape then the lace for my first 2 quilting seams.  I then made them every 3 inches with the wavy decorative stitch width wise across the bag.

I used a piece of white microfiber cloth to make the lining.  I added a large inside pocket using a piece of striped cotton poly as I had no calico big enough.

The handles were cut 2x12 inches then just a 1/4 fold over on each side and then down the middle again making them 1/2 inch wide.  I would like more but it is what it is.

I found a beautiful vintage button and used white flat elastic for the closure.


For information on the "My Bag" Line

Sunday, January 7, 2024

Slow Stitching - No. 001

This slow stitching piece is due to a challenge from Katherine at K3N ClothTales

Week 1 was fabric weaving.  

Her word was Community.

It represents stitchers of different varieties represented by the horizontal and vertical strips of fabric. The circle in the center represents the unity among stitchers. I added a button in mine as well.

Lessons learned: Basting in the forms of pins is very important.  

My piece is only 4 inches square so long sewing head pins is quite cumbersome.  The rows fell apart and I had to re do them so that was not fun.

I chose a navy embroidery thread with 3 strands as I wanted it quite bold.  Looking at it now I see that my end stitches would have looked better on the back than the front as they go opposite of the rows stitches. 

Tuesday, December 26, 2023

Slow Stitching Fabric Collage

This is my Boxing Day project.

I am thinking of doing a slow stitch fabric collage project.  It will be fairly large so I thought I would dip my toe and see what it was like.

This piece is about 6x6 inches.  I used some yellow thread from Mom's stash. It is quite heavy compared to embroidery thread.  My needles leave a little bit to be desired. Too thick but the second one was pointy enough.

I dipped into the small stash of fabric I gathered for the large project.  I chose fabric, lace, yarn, and felt.


It took about 6 hours to do this piece.  

I am happy with it. I did not baste the pieces to begin with but that is very important on hind sight.

The middle stage is quite chaotic looking so you just have to move forward and add the other bits.  I was tempted to add buttons but until I know where it will be used I will refrain from adding that kind of texture. I did add a layer of white fabric to cover the back. 

Thursday, January 14, 2021

A Little Love for Mom

I made a book mark from some of the denim I cut off my jeans the other day.

I zigzagged about 1/4 in from the edge around the full rectangle with a tight stitch.  This will limit the unravelling that can take place.

I included a bit of lace at the top and a navy gros grain ribbon which can be used as a place marker as I stitched around.

I had to look up some embroidery stitches and find a needle and thread but eventually found all three.

I put 3 hearts in red along the length of the bookmark.   My stitching is not the greatest but it is the sentiment that I love her which is important.

Say I love you to those precious to you today.

It is ready to be mailed today.

Thursday, September 3, 2020

How To - E Collar to Lampshade

I needed a lampshade for the other area of my sewing space.  My sister had given me an Ikea Hemma light cord.  I had added a LED daylight light bulb but it needed a shade. It has a UNO lampshade connection. The one Ikea shade I liked was 18 inches in diameter so was too wide for the hanger I was going to use.  It would accommodate max 14 inches. I headed to the thrift shop to see what I could find.  No lamp shades but a clear plastic dog E Collar that was the right shape and size.  I think I can work with that. 

I needed something to create the lampshade connection.  I decided a clear plastic lid from a food container would work.  I scored the size of hole I needed and cut it out with an exacto knife.  Then I put the 4 slits so I could slip the straps of the collar through and secured them as designed.

I like this because it allowed for the warmth of the bulb to escape through the spaces at the top. 


The hole I had cut was perfect and I could run it along the threads of the light fixture. Very secure. I then screwed the washer piece from the inside of the lampshade and then added my light bulb.  That was working really great!

Now I needed a covering for this structure. When I revamped the other lamp in the space I had leftover lace.  I measured the circumference of the lampshade and sewed the lace to that size.  I added a hem to top edge of the lace as well.   Now it was just a matter of threading a piece of ribbon through the holes in the lace to allow the lace edge to come even with the lampshade's bottom edge.

The shot on right is looking up from under the lampshade.


The light fixture came with clips so I just ran the cord along the hanger then down the pole to the outlet.  It has a switch which is at the height of the desk so very convenient to turn on as needed.

Monday, April 24, 2017

Mosaic Monday - Fabric and Art

I attended my first Fabric Frenzy on the weekend.  It lived up to it's name.  I stood in line for an hour just to get in, it was raining/snowing, and I met a couple of ladies who quilt. I would estimate the number of people in line to be at least 300-500. They were letting in 25 at a time.  I understand this was unusual to have so many attend.  This is a fundraiser for Grandmas in Alberta for a New Generations who support grandmothers in Africa raising children orphaned. 

There was a room with quilting fabric and notions then one with all the rest of the fabric.   I knew my sister was ahead of me in line but did not see her outside. I managed only the quilting room and I found her there. I was shopping for my aunt who was supporting her sister in an art show which I was attending later in the day.  My sister managed to get her some denim and we each made color selections for the start of a quilt project. I did see several friends as they were leaving with full bags in arm. 

I managed some lace, thread and one piece of fabric for my self.  I'm really happy with the multicolored piece of 1 meter at $5 was a great price.


I was headed off to the art show for my aunt Maria the artist.  The goodies were excellent.

The weather was better 2 hours away from home.  I had a visit with 3 aunts and viewed some art. 


One of the artist at the show had fabric for sale.  Left over from when she own a fabric store.  Well it did not take much for some of us to head on over after the art show reception. These are the pieces I bought.


Sharing with Maggie at Normandy Life who hosts Mosaic Monday#37.

Sunday, March 20, 2016

Friday's Hunt 12

I'm joining Friday's Hunt hosted by Teresa at Eden Hills. The prompts this week are:
Start with L
Favorite
Lace

I took a shot of a glass lamp my niece made for me many years ago.  I have never filled it but it is beautiful.  It came with the copper star base.  It repeats the star theme as you can faintly see the star etched above the peace.


This dish is my favorite photo this week.  I attended a Vintage Sale yesterday and bought myself this little glass dish.  It catches the light well with so many glass pebbles on the under side.  The dish I have been using is divided so I needed when I can't fill all the spaces in the divided one.  It has traces of gold on the edge but it's pretty much all gone. I placed it on one of my blue plates and put a few blue/green glass gems in the center to create a focal point.

I dug through my small box of lace and found this one with a heart motif.  I placed the white border lace on a black cloth to have the details visible. 


Wednesday, November 4, 2015

Card - Special Invitation


I was asked to make this card by one friend for another who is going through a transition in her life.

I started with an ivory parchment card in half sheet size (letter folded in half).  I then cut a Bazzil Mocha Divine textured piece of card stock down to 8.00x5.00 inches.  I wrapped a wide gold ribbon across the top and another across the bottom and wrapped the ends to the back and taped them down.  I then chose a piece of warm taupe cotton lace.  I pulled a length of ivory & gold 1/8 inch satin ribbon through it then taped it's ends to the back of the brown layer.  I used a Zot to hold the center down.  I color printed the words in brown onto vellum and then embossed it when clear powder. I cut it with the largest framelit from the Apothecary set. I added brown small flower punchies from the same card stock as the accent layer and then an iridescent flower sequin held in place with a tiny gold brad at each end .  This will help to keep everything together. I added large Zots to each corner for an extra measure of adhesion. I die cut a butterfly with the largest framelit from the Sizzix Winged Beauties set from the same brown textured card stock.  I held it in place with 3 small Zots on the body allowing the wings to come away from the card.  This adds a great dimension to the card. 

Tuesday, September 1, 2015

Christmas Card Challenge - Sept - Skate Diecut Banner

Here's my card for this month's Christmas Card challenge.  I challenge myself to make cards all year long so that I will have the ones I need by December 1st.  How is your card making going?  I hope you are on track.  I think I'm a little behind.

The focus of the challenge is to include with skates, die cut and a banner.  I cut the Tim Holtz Bigz Die - Ice Skates from some warm blue card stock.  I cut the skate blade again from blue metallic card stock and trimmed it and adhered over the card stock skate. I laced it with some heavy crochet cotton and finished it with a bow at the top. I added a white snowflake punch to the ankle area. I chose a deep warm blue card.  I embossed a white layer with the large Cuttlebug Snowflake embossing folder.  I added a banner greeting which was stamped with Stampin Up sentiment from the Home for Christmas set with Marina Mist on the same card stock as the skate.  I trimmed it close and use the Triple Banner punch to flag both ends and mounted it onto a piece of dark warm blue card stock.

Saturday, June 7, 2014

Cool Tool: Skate Lace Threader

Here's the cool tool! It's a floss threader but I used it to thread my red laces onto my skate. Here's how.
Pull your red thread through the loop so now it will act as a needle would.  Pull the thread through the bottom hole back to front first and pull thread to the half way point. now pull the lace through the holes from the back as you go up.  Release that thread and put the other into the threader. Now pull that thread through all the holes from the front which should create that little cross until you get to the top.  Tie a knot and trim the ends.
I included a threader in each of the kits.

Sunday, April 20, 2014

Easter Blessings

Wishing you all Easter Blessings this Easter Sunday.  May you have a great day!